


Are you running a WooCommerce store and want to collect extra information from customers at checkout? Maybe you want to gather personalization details, delivery preferences, or guest information, depending on the number of products in the cart.
If your requirement is simple, just like adding a simple custom field, then you can start with this guide on adding a custom text field to the WooCommerce checkout page.
But with this approach of dynamic checkout fields, you can add custom fields that change automatically based on the items or quantity in the cart.
In this tutorial, we’ll show you how to add dynamic custom checkout fields in WooCommerce. By the end, you’ll see exactly how these fields work in action, so you can adapt them to your WooCommerce store, whether you sell products, services, or packages.
Note: This code snippet has been tested and works on WordPress 6.8.2 and WooCommerce 10.1.2.
Solution: Add Dynamic Custom Fields
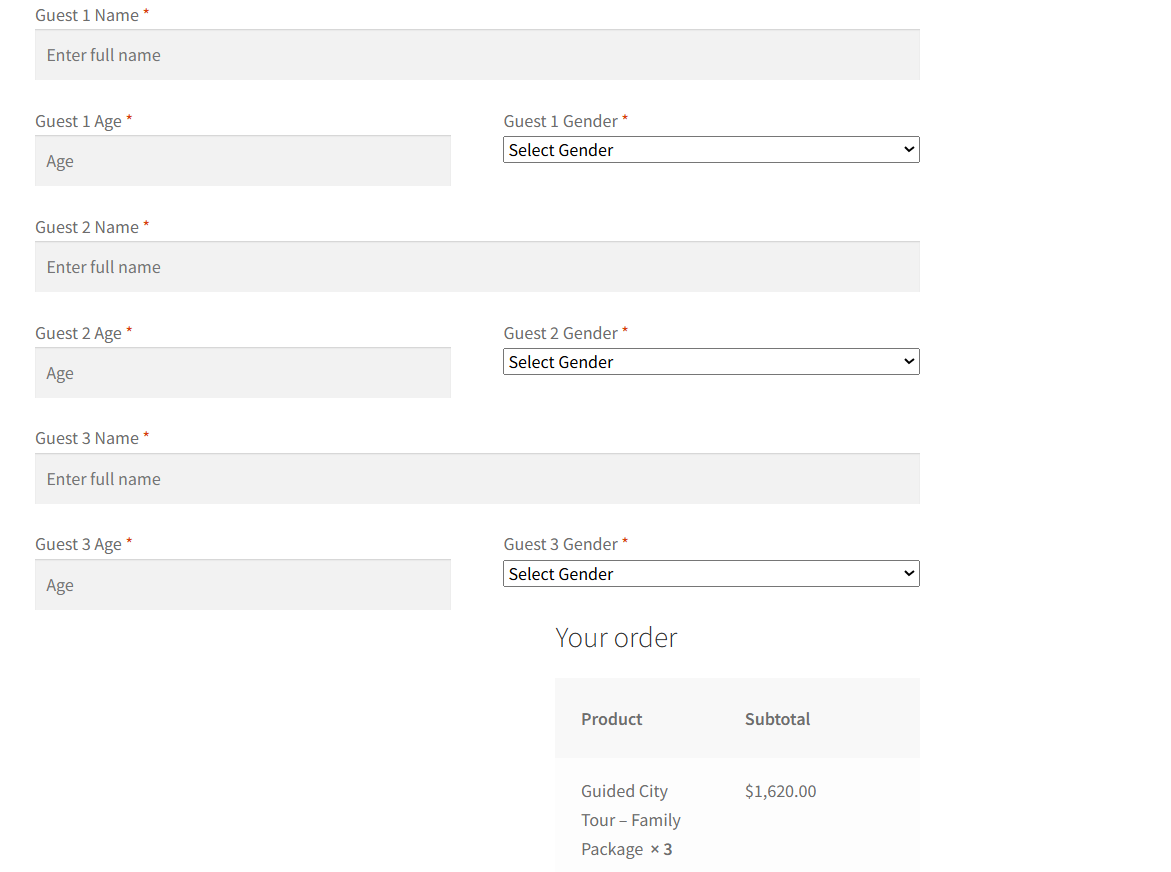
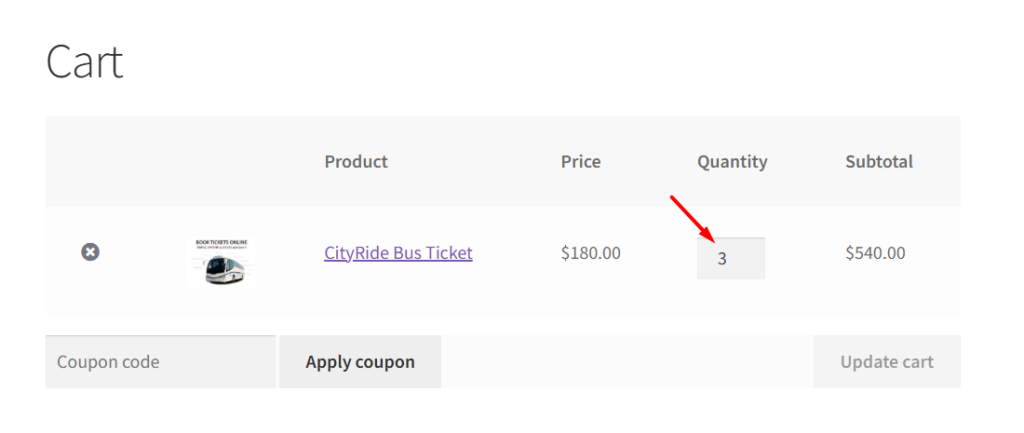
The code calculates the total quantity of items in the cart and dynamically generates guest fields for each participant. For example, if a booking product has 3 people selected in the cart, the checkout page will display 3 sets of guest fields to collect their details.
add_filter('woocommerce_checkout_fields', 'ts_add_dynamic_guest_fields');
function ts_add_dynamic_guest_fields($fields) {
    $fields['guest_details'] = array();
    $total_qty = 0;
    foreach (WC()->cart->get_cart() as $cart_item) {
        $total_qty += $cart_item['quantity'];
    }
    for ($i = 1; $i <= $total_qty; $i++) {
        $fields['guest_details']["guest_{$i}_name"] = array(
            'type' => 'text',
            'required' => true,
            'label' => sprintf(__('Guest %d Name', 'woocommerce'), $i),
            'class' => array('form-row-wide'),
            'placeholder' => __('Enter full name', 'woocommerce'),
        );
        $fields['guest_details']["guest_{$i}_age"] = array(
            'type' => 'number',
            'required' => true,
            'label' => sprintf(__('Guest %d Age', 'woocommerce'), $i),
            'class' => array('form-row-first'),
            'placeholder' => __('Age', 'woocommerce'),
            'custom_attributes' => array('min' => 0),
        );
        $fields['guest_details']["guest_{$i}_gender"] = array(
            'type' => 'select',
            'required'=> true,
            'label' => sprintf(__('Guest %d Gender', 'woocommerce'), $i),
            'class' => array('form-row-last'),
            'options' => array(
                '' => __('Select Gender', 'woocommerce'),
                'male' => __('Male', 'woocommerce'),
                'female' => __('Female', 'woocommerce'),
                'other' => __('Other', 'woocommerce'),
            ),
        );
    }
    return $fields;
}
add_action('woocommerce_checkout_after_customer_details', 'ts_display_dynamic_guest_fields');
function ts_display_dynamic_guest_fields() {
    $checkout = WC()->checkout();
    echo '<div class="guest-details"><h3>' . __('Guest Details', 'woocommerce') . '</h3>';
    foreach ($checkout->checkout_fields['guest_details'] as $key => $field) {
        woocommerce_form_field($key, $field, $checkout->get_value($key));
    }
    echo '</div>';
}
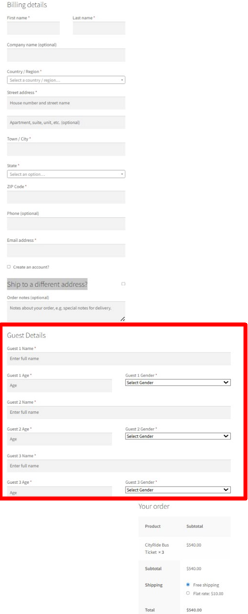
On the checkout page, customers will see fields for Guest 1, Guest 2, and Guest 3, and customers can fill in their details easily.
All guest information is saved as order meta data, so you can access it in the backend and via order emails.
add_action('woocommerce_checkout_create_order', 'ts_save_dynamic_guest_fields', 10, 2);
function ts_save_dynamic_guest_fields($order, $data) {
    foreach ($data as $key => $value) {
        if (strpos($key, 'guest_') === 0 && !empty($value)) {
            $order->update_meta_data($key, sanitize_text_field($value));
        }
    }
}
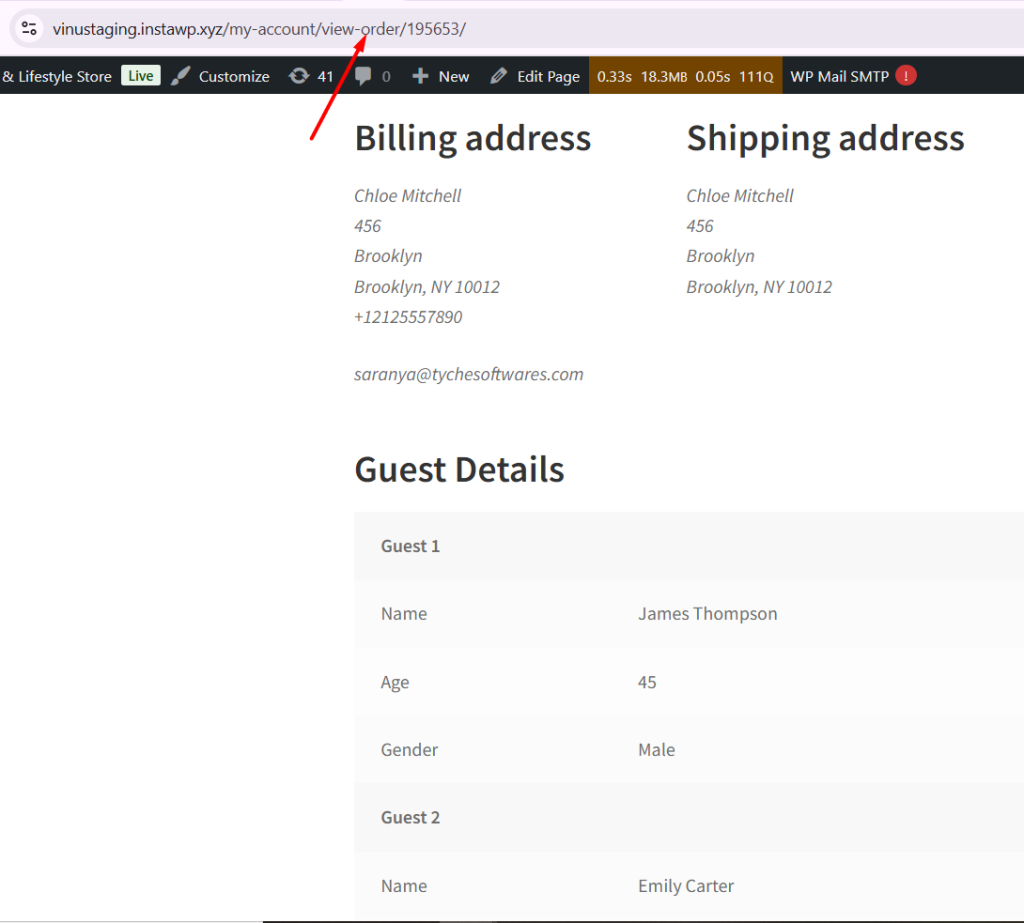
The code below will display the guest details on the Thank You Page, My Account & Admin Orders Page
/**
 * Show guest details on Thank You page and My Account (Formatted)
 */
add_action('woocommerce_thankyou', 'ts_display_guest_details_on_order', 20);
add_action('woocommerce_view_order', 'ts_display_guest_details_on_order', 20);
function ts_display_guest_details_on_order($order_id) {
    $order = wc_get_order($order_id);
    $meta_data = $order->get_meta_data();

    // Collect guest details in structured array
    $guest_data = [];
    foreach ($meta_data as $meta) {
        if (strpos($meta->key, 'guest_') === 0) {
            preg_match('/guest_(\d+)_(name|age|gender)/', $meta->key, $matches);
            if (!empty($matches)) {
                $guest_num = $matches[1];
                $field = $matches[2];
                $guest_data[$guest_num][$field] = $meta->value;
            }
        }
    }

    if (!empty($guest_data)) {
        echo '<h2>' . __('Guest Details', 'woocommerce') . '</h2>';
        echo '<table class="shop_table shop_table_responsive"><tbody>';
        foreach ($guest_data as $guest_num => $details) {
            echo '<tr><th colspan="2">' . sprintf(__('Guest %d', 'woocommerce'), $guest_num) . '</th></tr>';
            if (isset($details['name'])) {
                echo '<tr><td>' . __('Name', 'woocommerce') . '</td><td>' . esc_html($details['name']) . '</td></tr>';
            }
            if (isset($details['age'])) {
                echo '<tr><td>' . __('Age', 'woocommerce') . '</td><td>' . esc_html($details['age']) . '</td></tr>';
            }
            if (isset($details['gender'])) {
                echo '<tr><td>' . __('Gender', 'woocommerce') . '</td><td>' . esc_html(ucfirst($details['gender'])) . '</td></tr>';
            }
        }
        echo '</tbody></table>';
    }
}

/**
 * Display guest details in Admin Order page
 */
add_action('woocommerce_admin_order_data_after_order_details', 'ts_display_guest_details_in_admin');
function ts_display_guest_details_in_admin($order) {
    $meta_data = $order->get_meta_data();
    $guest_data = [];
    foreach ($meta_data as $meta) {
        if (strpos($meta->key, 'guest_') === 0) {
            preg_match('/guest_(\d+)_(name|age|gender)/', $meta->key, $matches);
            if (!empty($matches)) {
                $guest_num = $matches[1];
                $field = $matches[2];
                $guest_data[$guest_num][$field] = $meta->value;
            }
        }
    }

    if (!empty($guest_data)) {
        echo '<div class="order_data_column"><h4>' . __('Guest Details', 'woocommerce') . '</h4>';
        foreach ($guest_data as $guest_num => $details) {
            echo '<p><strong>' . sprintf(__('Guest %d', 'woocommerce'), $guest_num) . '</strong><br>';
            if (isset($details['name'])) echo __('Name:', 'woocommerce') . ' ' . esc_html($details['name']) . '<br>';
            if (isset($details['age'])) echo __('Age:', 'woocommerce') . ' ' . esc_html($details['age']) . '<br>';
            if (isset($details['gender'])) echo __('Gender:', 'woocommerce') . ' ' . esc_html(ucfirst($details['gender'])) . '<br>';
            echo '</p>';
        }
        echo '</div>';
    }
}
After placing the order:
- The Thank You page lists all guest details.
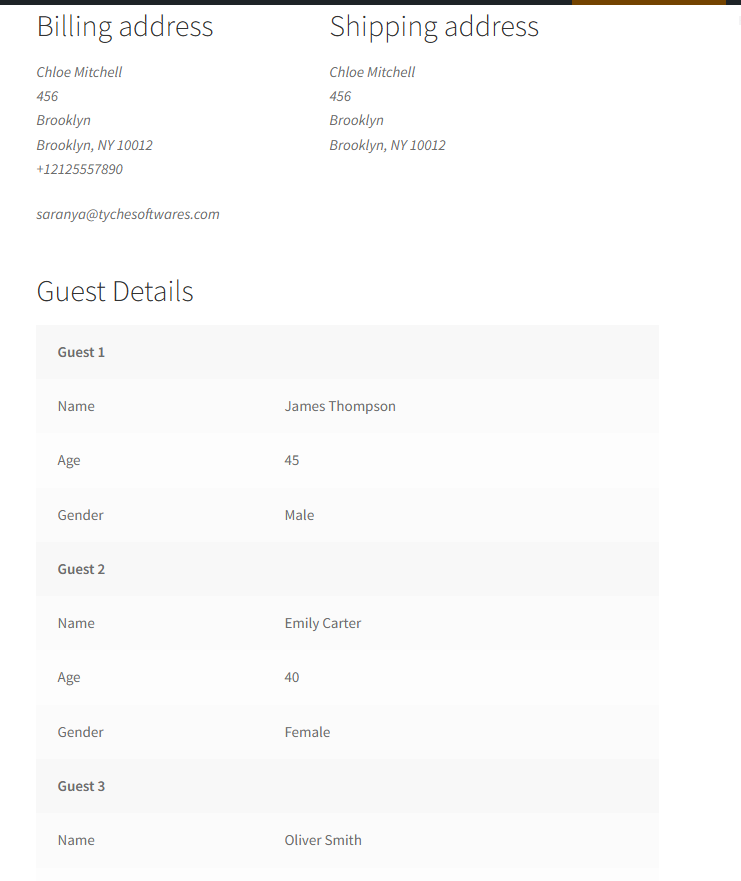
- The customer account shows guest information under the order.
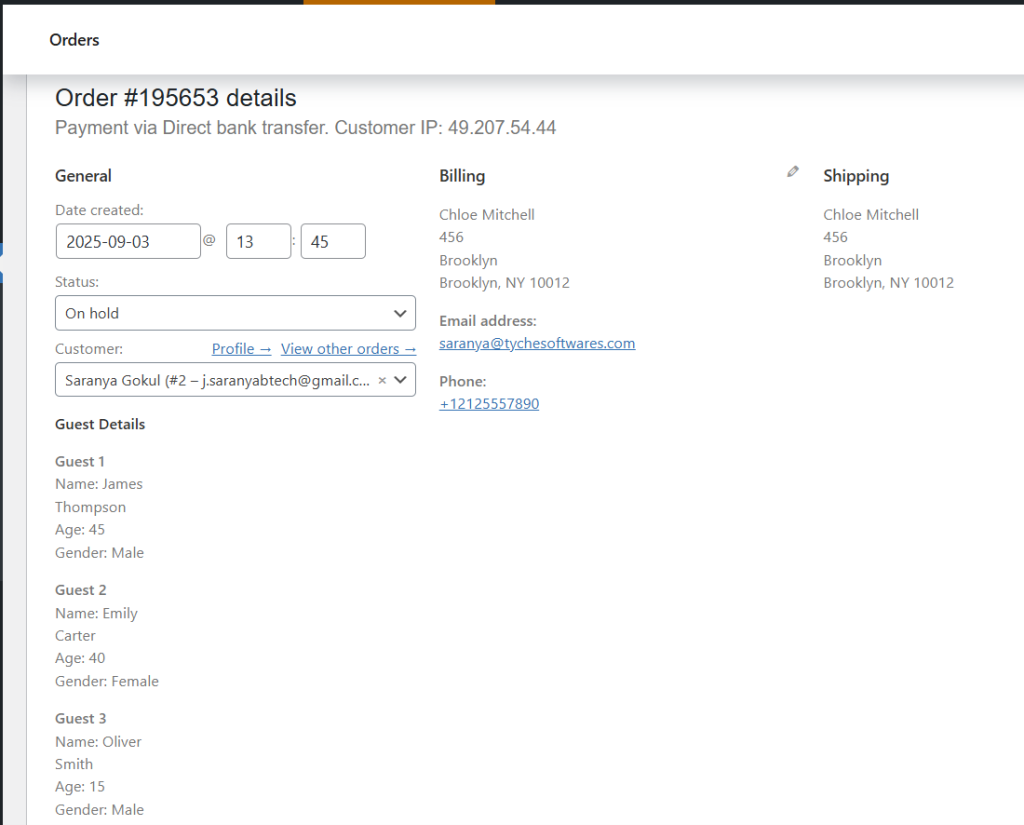
Store admins can see the guest information for each order in the WooCommerce admin order page.
Collecting guest details dynamically is a huge time-saver, but what if you could make your checkout adapt to different payment methods too? That’s exactly what ‘How to Add Custom Fields for Specific Payment Gateway in WooCommerce?’ demonstrates, giving you complete control over your checkout process.

