Table of Contents
Customizing the WooCommerce email template is a good way to modify the emails based on your store’s design or personalize the transactional emails. WooCommerce provides this functionality with their various email templates. WooCommerce sends emails to the admin & customers at different stages in the order processing cycle.
WooCommerce contains email templates for New Order, Completed order, canceled order, customer invoice, new account, & password reset among other things. You can use WooCommerce’s default templates, but you may want to style the templates according to your theme’s design. Let’s see how we can do that.
4 Ways to Customize WooCommerce Order Email Templates
There are 3 different ways in which we can change the WooCommerce email templates. Each of the 3 ways allows us to modify different aspects of the email templates. You might need to use any one of the below or a combination of the below methods to make changes to your store’s email templates:
- WooCommerce Settings – The inbuilt WooCommerce settings can be used to change the styling for the emails like background color, text color, base color, email ‘from’ name, email ‘to’ name. But you cannot make layout changes or changes in the email body with these.
- By using different hooks – If you just want to add additional content and keep the layout as it is, you can customize using hooks. You can add content in different parts of email based on different hooks.
- By overriding the templates – If you want to change the layout of the email, you will have to override the email templates. By overriding, you can change the HTML of the email templates, or change the default text which appears in the emails.
- Using the YayMail plugin – This drag-and-drop email builder allows you to change the layout and content of order emails, including the default transactional emails and the order delivery/order status templates.
Let’s dive into each of these methods.
1. WooCommerce Settings
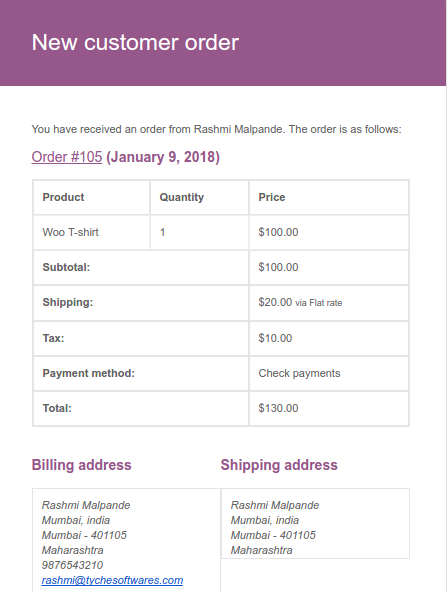
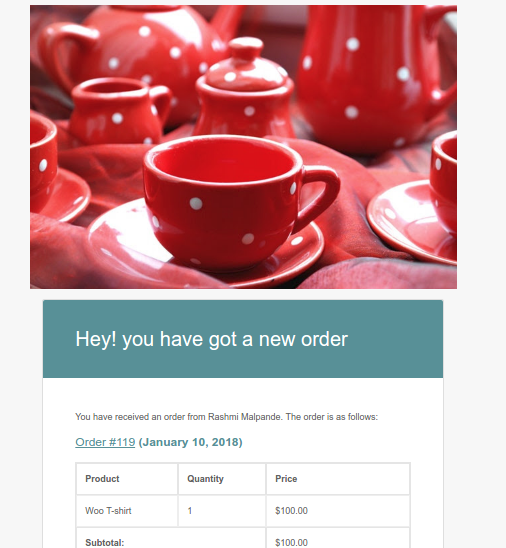
WooCommerce provides a few different settings to customize the default email template. You can find these settings in Dashboard > WooCommerce > Settings > Email. The default email template when the admin receives an email for a new order, looks like this –
The default settings for all email templates are shown below –
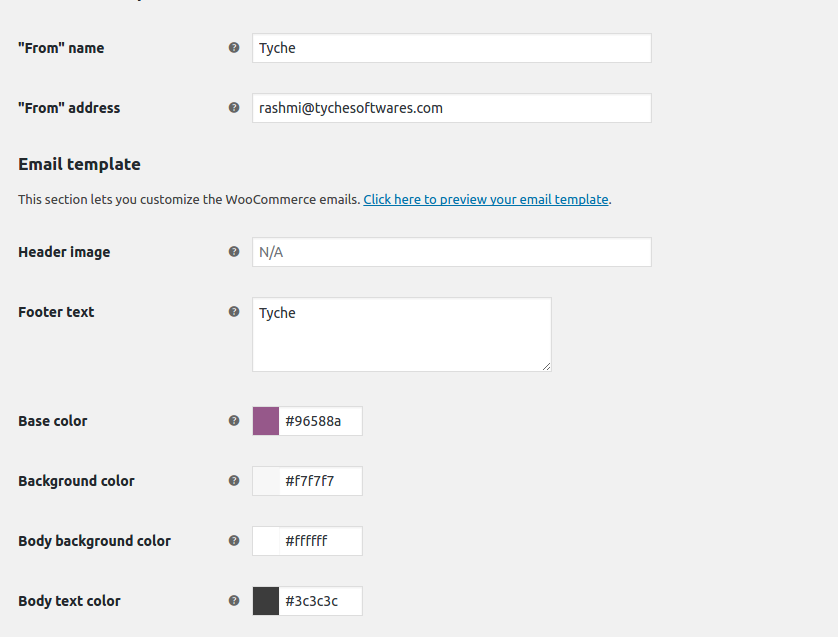
You can change the body color, background color, text color, footer text , from name & from address and also add a header image in the email.
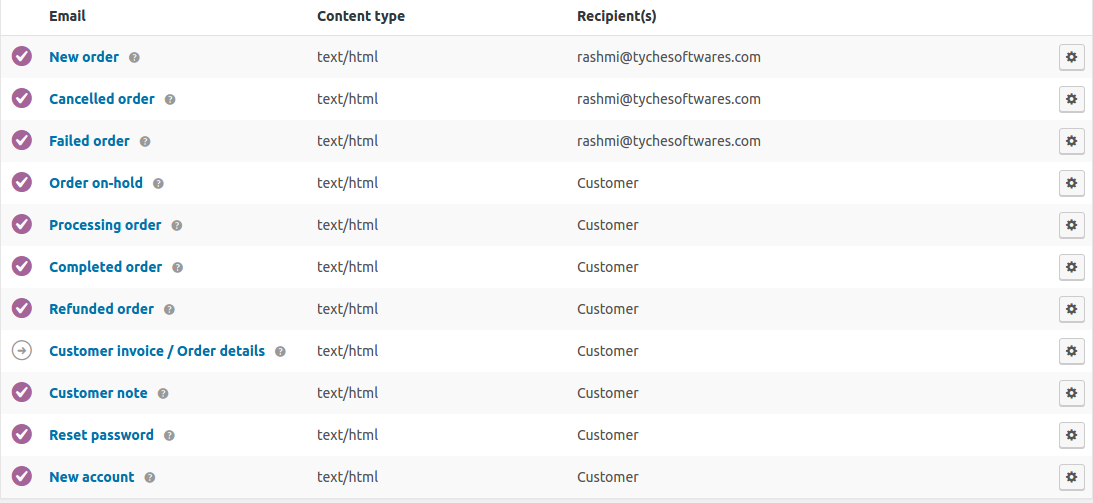
The above settings are not available at the individual email template level. Any change done here is applied to all the email templates. There are templates for new order, completed order, canceled order, failed order, processing order, refunded order, customer invoice, new account, password reset.
We will now add a header image and change the base color of the template. These styles will apply globally to all the email templates.

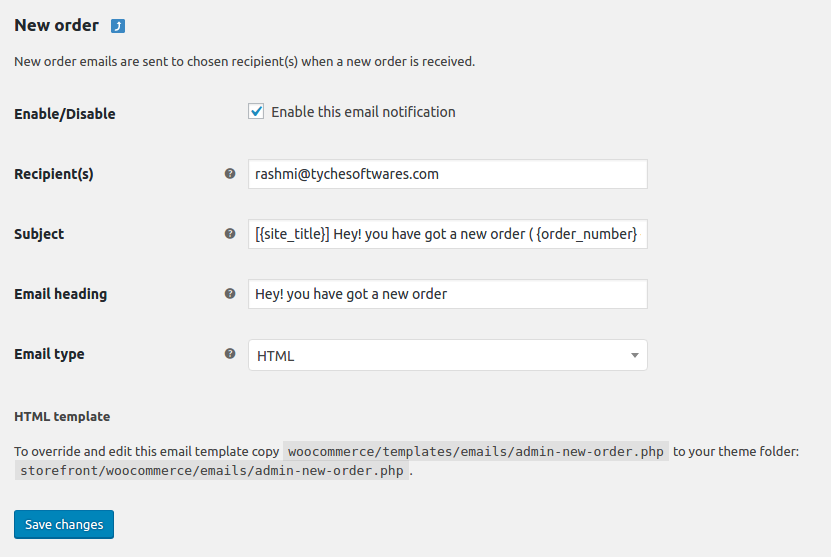
Before we get to the results, let’s have a look at different customizable options for the New Order email template for admin. Here we can enable/disable the email, change the email subject, email heading. You can use the placeholders – {site_title}, {order_number}, and {order_date}. You can open the below page by clicking on the Settings icon in the email template list available at Dashboard > WooCommerce > Settings > Email.
Let’s change the subject & heading of the email:
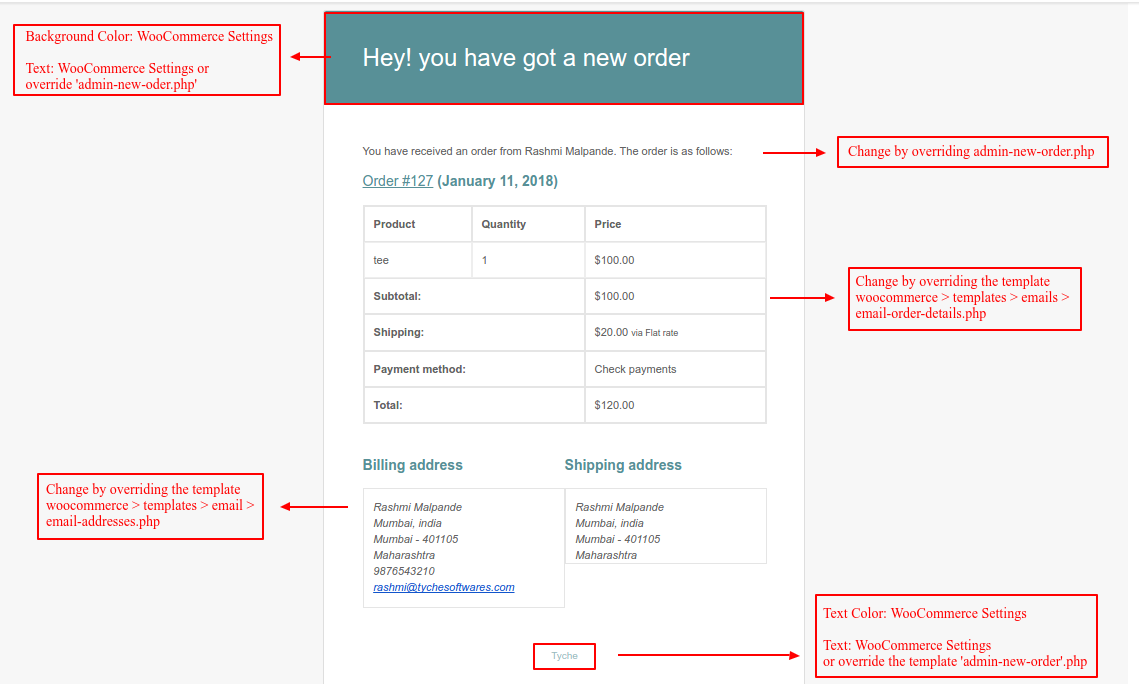
Take a look at the below screenshot. It will help you understand what we can change through WooCommerce settings and when will we have to override the templates:

This to the shop owners who are running or planning to run BOGO offers on their WooCommerce store…
BOGO deals are great for increasing your sales, but have you thought about which offers are bringing you more revenue and which offers are not performing that great?
Don’t just set a BOGO deal, track the revenue generated by your deals in real-time with the Flexi BOGO for WooCommerce plugin.
2. By using Hooks
If you want to add some additional content to the emails, you can use different hooks defined by WooCommerce.
You need to keep in mind that hooks will let you add additional content but not modify the existing text. If you want to modify the existing text, you will need to override the templates. Let’s try to add some content in various parts of the email.
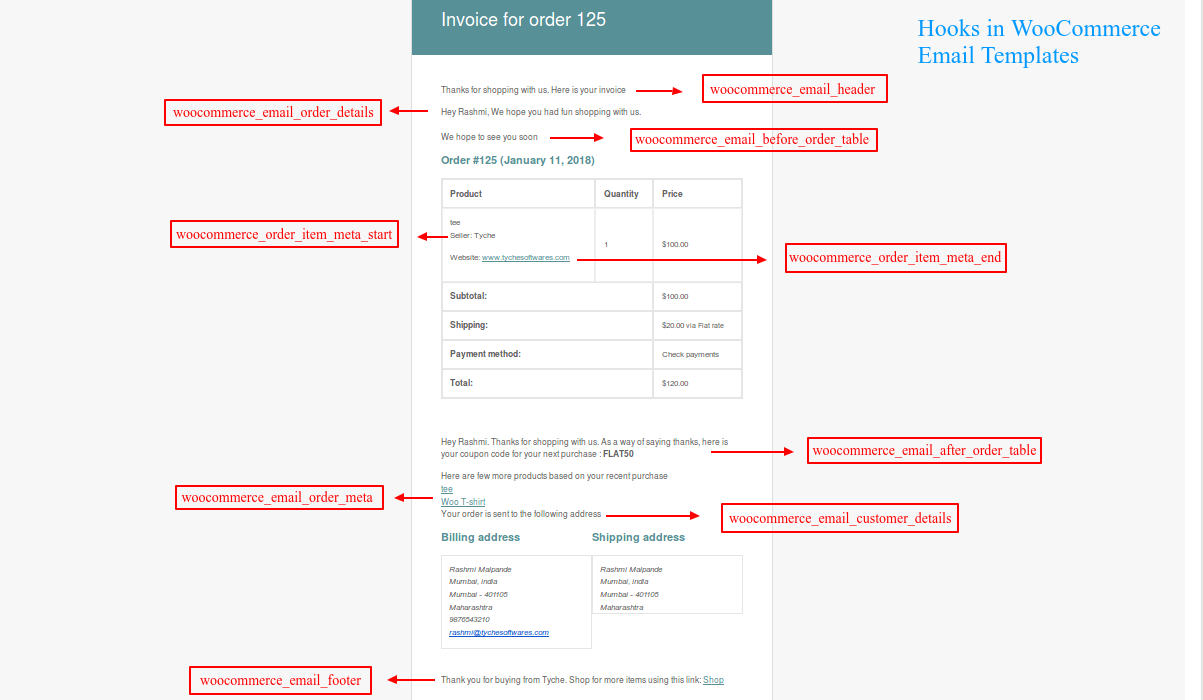
We will add some content to the Customer Invoice email template. There are various hooks we can use depending on where we want to place the content. We can use the following email hooks to add our content –
- woocommerce_email_header ($email_heading, $email)
- woocommerce_email_order_details ($order, $sent_to_admin, $plain_text, $email)
- woocommerce_email_before_order_table ($order, $sent_to_admin, $plain_text, $email)
- woocommerce_order_item_meta_start ($item_id, $item, $order, $plain_text)
- woocommerce_order_item_meta_end ($item_id, $item, $order, $plain_text)
- woocommerce_email_after_order_table ($order, $sent_to_admin, $plain_text, $email)
- woocommerce_email_order_meta ($order, $sent_to_admin, $plain_text, $email)
- woocommerce_email_customer_details ($order, $sent_to_admin, $plain_text, $email)
- woocommerce_email_footer ($email)
You can add the below code snippets in your child theme’s functions.php file or in a separate plugin file.
1. woocommerce_email_header( $email_heading, $email ):
hook is used to place the custom content just below the header. Here’s an example –
add_action( 'woocommerce_email_header', 'ts_email_header', 10, 2 );

function ts_email_header( $email_heading, $email ) {
	echo "<p> Thanks for shopping with us. Here is your invoice </p>";
}
2. woocommerce_email_order_details ($order, $sent_to_admin, $plain_text, $email):
hook places the content below the sentence – ‘You have received an order from Rashmi Malpande. The order is as follows:’ .
add_action( 'woocommerce_email_order_details', 'ts_email_order_details', 10, 4 );
function ts_email_order_details( $order, $sent_to_admin, $plain_text, $email ) {
	echo '<p>Hey '.$order->get_billing_first_name().', We hope you had fun shopping with us.';
}
3. woocommerce_email_before_order_table ($order, $sent_to_admin, $plain_text, $email):
places the content above the order details table. Let’s try a simple example-
add_action( 'woocommerce_email_before_order_table', 'ts_email_before_order_table', 10, 4 );

function ts_email_before_order_table( $order, $sent_to_admin, $plain_text, $email ) {
	echo "We hope to see you soon";
}
4. woocommerce_order_item_meta_start($item_id, $item, $order, $plain_text):
places the content below the item name in the order table. This meta will be added first before any other meta.
add_action( 'woocommerce_order_item_meta_start', 'ts_order_item_meta_start', 10, 4 );
function ts_order_item_meta_start( $item_id, $item, $order, $plain_text ){
	echo '<p> Seller: Tyche</p>';
}
5. woocommerce_order_item_meta_end ($item_id, $item, $order, $plain_text):
places the content below the item & woocommerce_order_item_meta_start. This will be added at last after all the other meta information.
add_action( 'woocommerce_order_item_meta_end', 'ts_order_item_meta_end', 10, 4 );
function ts_order_item_meta_end( $item_id, $item, $order, $plain_text ){
	echo '<p> Website: <a href="https://www.tychesoftwares.com/"> www.tychesoftwares.com </a></p>';
}
6. woocommerce_email_after_order_table ($order, $sent_to_admin, $plain_text, $email):
places the content just below the order table.
Here we will display a coupon code to the customer for the next purchase if the order is completed.
add_action( 'woocommerce_email_after_order_table', 'ts_email_after_order_table', 10, 4 );

function ts_email_after_order_table( $order, $sent_to_admin, $plain_text, $email ) {
	if ( $order->has_status( 'completed' ) ) : ?>
	<p><?php printf( __( 'Hey %1$s. Thanks for shopping with us. As a way of saying thanks, here is your coupon code for your next purchase : %2$s' ), $order->get_billing_first_name(), '<strong>FLAT50</strong>' ); ?></p>
	<?php endif;
}
7. woocommerce_email_order_meta ($order, $sent_to_admin, $plain_text, $email):
places the content after the order table and below the hook woocommerce_email_after_order_table ($order, $sent_to_admin, $plain_text, $email).
For example, we will find out the category of the order items and display products of the same category based on the customer’s order. It can help you increase the sales of your products.
add_action( 'woocommerce_email_order_meta', 'ts_email', 10, 4 );
function ts_email( $order, $sent_to_admin, $plain_text, $email ) {
	$items = $order->get_items();

    foreach ($items as $key => $item) {
        $product_name = $item['name'];
        $product_id = $item['product_id'];
        $terms = get_the_terms( $product_id, 'product_cat' );

		$args = array(
			'post_type'      => 'product',
			'posts_per_page' => 10,
			'product_cat'    => $terms[0]->slug
		);

		$loop = new WP_Query( $args );
		echo 'Here are few more products based on your recent purchase';

		while ( $loop->have_posts() ) : $loop->the_post();
			global $product;
			echo '<br><a href="'.get_permalink().'">' . get_the_title().'</a>';
		endwhile;

		wp_reset_query();
	}
}
8. woocommerce_email_customer_details ($order, $sent_to_admin, $plain_text, $email):
hook places the content before the customer billing & shipping address.
add_action( 'woocommerce_email_customer_details', 'ts_email_customer_details', 10 , 4);
function ts_email_customer_details($order, $sent_to_admin, $plain_text, $email){
	echo '<p>Your order is sent to the following address</p>';
}
9. woocommerce_email_footer($email):
hook places the content just above the footer text. Here we will add a link to our shop page.
add_action( 'woocommerce_email_footer', 'ts_email_footer', 10, 1 );
function ts_email_footer( $email ) { ?>
	<p><?php printf( __( 'Thank you for buying from %1$s. Shop for more items using this link: %2$s', 'woocommerce' ), get_bloginfo( 'name', 'display' ), '<a href="' . get_permalink( wc_get_page_id( 'shop' ) ) . '">' . __( 'Shop', 'woocommerce' ) . '</a>' ); ?></p>

<?php
}
Add the above code to your theme’s functions.php file or a plugin file. The email sent to the customer will be displayed below –
You can also add conditional logic in your emails. We will add a link to the shop page if the order is completed.
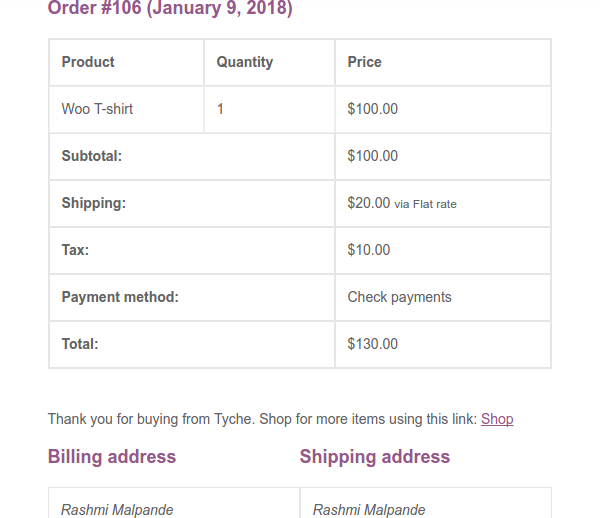
As you can see, we can place our content in different parts of the email body using different hooks and some custom code. This is just a glimpse of what we can do with the hooks. You can use these hooks to personalize the emails as well.
3. By overriding the templates
The above 2 methods do not allow us to change the layout of the WooCommerce email templates. In order to do that, you have to override the email template whose layout you wish to change. Each of the email templates is made up of different templates combined together.
Below is the template hierarchy for the New Order email template sent to the store admin. All email templates have the exact same hierarchy, with the only exception being the main template file itself (which in this case is admin-new-order.php).
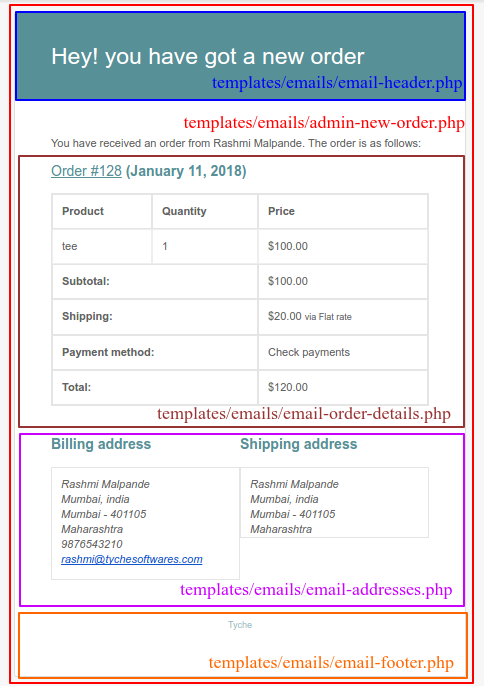
We will customize the customer invoice template which has a similar hierarchy as the admin new order template. If you want to override the customer invoice template, you first need to copy the template file from plugins > woocommerce > templates > emails > customer-invoice.php to themes > {theme-name} > woocommerce > emails > customer-invoice.php.
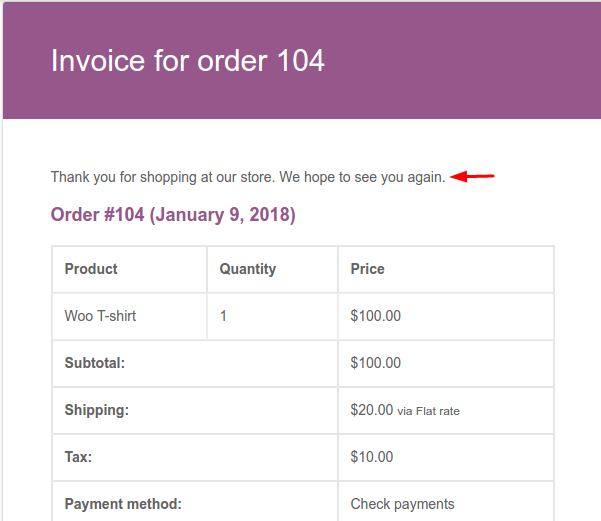
Let’s add some simple content to the customer-invoice template file. We will add a message in the email template before the order details.
add_action( 'woocommerce_email_before_order_table', 'ts_email_before_order_table', 10, 4 );

function ts_email_before_order_table( $order, $sent_to_admin, $plain_text, $email ) {
echo "Thank you for shopping at our store. We hope to see you soon";
}
In the above example, we have added our content before woocommerce_email_order_details action. Our template will look like –
Personalize the email header by displaying the First Name
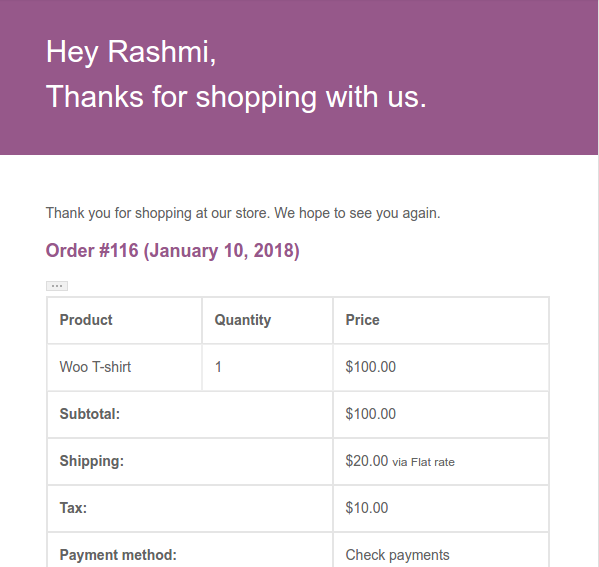
Now let’s try a bit more complex example. We will change the email heading to display the customer’s first name. You need to make these changes in the same customer-invoice.php file that you copied to your theme’s folder.
If you look at the file class-wc-emails.php , you will see this piece of code:
<?php

/**
 * @hooked WC_Emails::email_header() Output the email header
 */

//This is the custom added to display first name of the customer in the email heading
$email_heading = "Hey ". $order->get_billing_first_name(). ", Thanks for shopping with us.";

do_action( 'woocommerce_email_header', $email_heading, $email );
?>
The email_header() function displays the email-header.php template which contains the HTML markup. The email header HTML is the same for all the templates. This template displays the email heading passed to it from the email_header() function. So, if we want to change the email heading, we need to change this $email_heading variable.
As we are customizing the customer invoice template, we make the changes in the customer-invoice.php file. We have a $order object in the customer-invoice.php template. From the $order object, we can get the customer details.
The get_billing_first_name() function returns the first name of the customer from the billing address. Let’s change the heading to display the customer’s first name using this function.
This was an example of the customer invoice template. You can do the same thing with other templates.
If you want to customize the heading, you need to modify the $email_heading variable in the specific email template file. If you want to change the HTML for the header, you need to override the email-header.php template file. But remember, the header HTML is the same for all templates.
4. Customizing WooCommerce Order Emails Using the YayMail Plugin
Once you have activated the Order Delivery Date Pro, you will have these template files added to the email workflow:
- Delivery Date & Time Updated
- Delivery Reminder
- Admin Delivery Reminder
By using YayMail – WooCommerce Email Customizer Pro, it will be automatically presented in the email builder’s dropdown list.
Then, it’s up to you to customize the layout and content all the way you want. Specifically, in the “Delivery Date & Time Updated” email template, we can add these new email blocks:
- Header with logo
- Special heading with custom colors and style
- Banner image with a button
- Social channel icons and links
- Custom footer
As you can see, it’s easy to drag and drop elements and customize your WooCommerce emails without coding!
If you use our Order Delivery Date Pro WooCommerce plugin & wish to customize its emails, then you can do so with this plugin. Read our guide about customizing order delivery date WooCommerce emails here.
Conclusion
Customizing the template is a good way to modify the emails based on our store’s design or add some extra features for the customers.
But keep in mind that these template files will get deleted if you update your theme. So, just take a backup of these files whenever you update your theme.
Or a better solution is to create a child theme and create the WooCommerce folder in it. So that even if you update your theme, your changes will remain as is.
Customizing the WooCommerce emails using hooks & filters is easier if the content you want to add is not complex. Additionally, you can also create custom email templates in WooCommerce.
So, go ahead and make your emails more user-friendly, something that the customers would love to see.


Nice article, thank you for the template heirarchy image, very helpful!
Hi! Tell me please, how to add image product?
Hi Alex,
To add product images to WooCommerce email notifications, please refer to our guide, ‘How to Display the Product Image in WooCommerce Email Notifications?‘, which includes the necessary steps and code snippets to achieve this.
Thank you so much, It helped me a lot with my website. I was having trouble with the subtotal calculation being incorrect.
Thank you for the great article! I am looking to remove the brackets around the order number and order date but fail to do so. Maybe you can point me into the right direction? I cannot find where these brackets are set.
Hi Aykut,
Thanks for your comment!
To remove the brackets around the order number and order date in WooCommerce email templates, you need to customize the order email template file i.e. email-order-details.php.
Follow the steps below:-
echo wp_kses_post( $before . sprintf( __( ‘[Order #%s]’, ‘woocommerce’ ) . $after . ‘ (<time datetime=”%s”>%s</time>)’, $order->get_order_number(), $order->get_date_created()->format( ‘c’ ), wc_format_datetime( $order->get_date_created() ) ) );
Here is the output for your reference:- https://prnt.sc/yhhMQx66c2ll
Hi, I want to add some additional lines to the admin new order notification email. such as instructions to clients next steps to download items/intake forms
Hi Janey, To add additional lines to the admin new order notification email in WooCommerce, you can use the snippets below: add_action( ‘woocommerce_email_order_meta’, ‘my_custom_email_order_meta’, 10, 4 ); function my_custom_email_order_meta( $order, $sent_to_admin, $plain_text, $email ) { // Add the additional lines to the email. echo ‘<p>**Next steps for clients:**</p>’; echo ‘<ol>’; echo ‘<li>Download the items/intake forms from the following link: <a href=”https://www.example.com/link-to-download-page”>Demo Download Link</a></li>’; echo ‘<li>Fill out the forms and return them to us via email or mail.</li>’; echo ‘<li>Once we have received your forms, we will process your order and contact you to schedule a time for you to… Read more »