Lately, we have introduced different functionalities in our Booking Plugin like adding resources to our booking process and making the plugin compatible with other different WooCommerce plugins. Today we will discuss on how compatibility of Dokan Pro plugin and our Booking & Appointment Plugin for WooCommerce helps vendors sell/book their products easily and conveniently.
Brief Description on Dokan Pro plugin
Dokan is a complete Multivendor e-Commerce solution for WordPress. It has a customised storefront that supports simple, variable, grouped and bookable products. Vendors can experience easy management of products, orders, booking and sales using this plugin.
This is a commission based model where if the products added by the vendor gets booked, the decided commission gets sent to the store owner. Thus it acts as a win win situation for both parties.
Compatibility with our Booking & Appointment Plugin for WooCommerce
Dokan plugin is made compatible with our Booking & Appointment Plugin for WooCommerce, so the vendor’s added products on the store will also have the booking functionality added to it for customers to book their product or services.
Hence vendors can easily add their own bookable products and manage its booking, thereby increasing his sales.
Setting up the Dokan plugin
There are 2 versions of Dokan plugin available in the market. You need to install and activate both Lite and Pro versions of the plugin to start setting up the plugin.
Once this is done, you will find Dokan added as the menu option on the left and when you click on it, the landing page would appear as shown below:

Dokan plugin installed and activated
Once Dokan is set up, the new Vendors can now register via Register Link from the site or a new Vendor can be created from the Users menu option. Let us see how it works with both these options.
Register via Register Link:
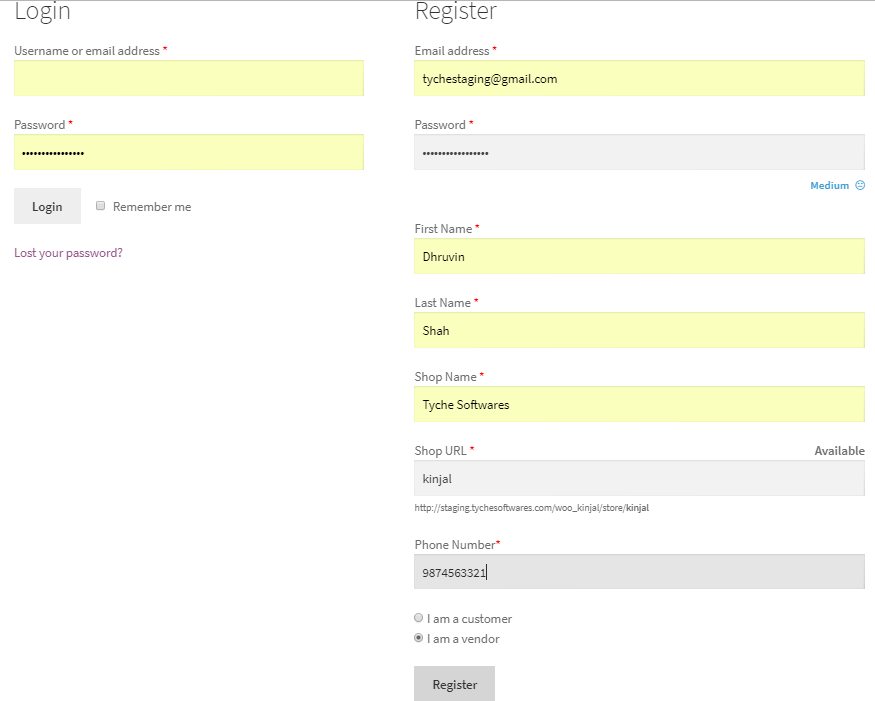
Register from the Register link
Add all the Vendor details and register as a Vendor by clicking the I am a vendor option as shown above. Click on the Register button and based on the settings of Dokan, the newly registered Vendor will either be auto approved or will need approval from Store Manager or Administrator.
From the Users menu option:

Add New User page display
On Users Add New page, add all the user details like name, website and assign a role. You can assign a role to the user by clicking on Role dropdown and select Vendor from the displayed list as shown above. Here too, according to the settings of Dokan, the approval for newly registered Vendor will take place.
Now login to the Vendor’s admin panel with his login credentials which you created on the New Users page. Upon logging in, you will be redirected to the dashboard of vendor’s side as you are logged in using the vendor credentials. The dashboard will be displayed as shown below:

Vendor’s dashboard display
Now lets start adding vendor products to the selected store you are made compatible with. For this, go to Products menu option on the left and start adding the products. This process is a replica of creating products from the Admin’s dashboard.

Adding products from the Vendor’s dashboard
All the products added from Vendor’s dashboard are vendor specific products and will be shown along with all other products listed on the website.
Let us create a product from the vendor’s dashboard. For this click on Add new product button on the right top corner of the page. You will be taken to the Add New Product page where you add in all the product details as shown below:

Adding new product details
Now click on Create Product button to finish adding this product to the store. The product details for this product will be shown on the Product’s landing page based on the vendor publishing settings as shown below:

Newly created product added on the Products page
Note: If the setting is enabled to require Admin confirmation, then this product will not be directly listed in the Products List until the Admin or Store Manager approves it.
Now let us make this product bookable from vendor’s dashboard. So click on the Update Product button and the below page will appear. Here, from the Booking tab, enable booking first and select Booking Type as Only Day -> Multiple Nights in the Booking meta box and click the Save Changes button to save these settings as shown below:
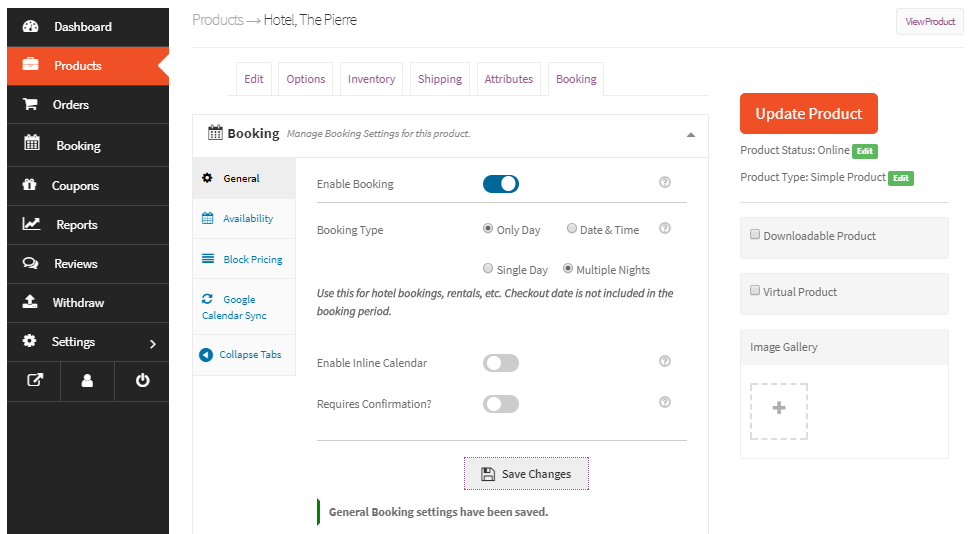
Selecting the Booking type on vendor’s dashboard
Next we need to set the availability for this product for which go to the Availability tab and add the settings as shown below:
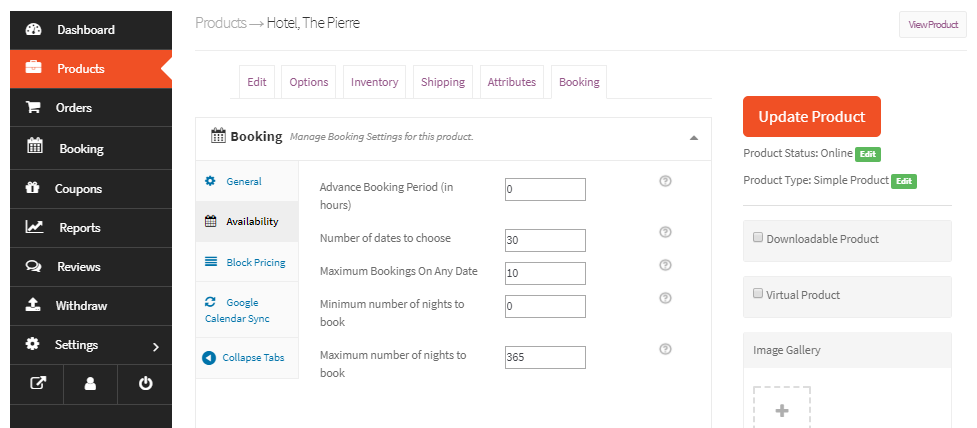
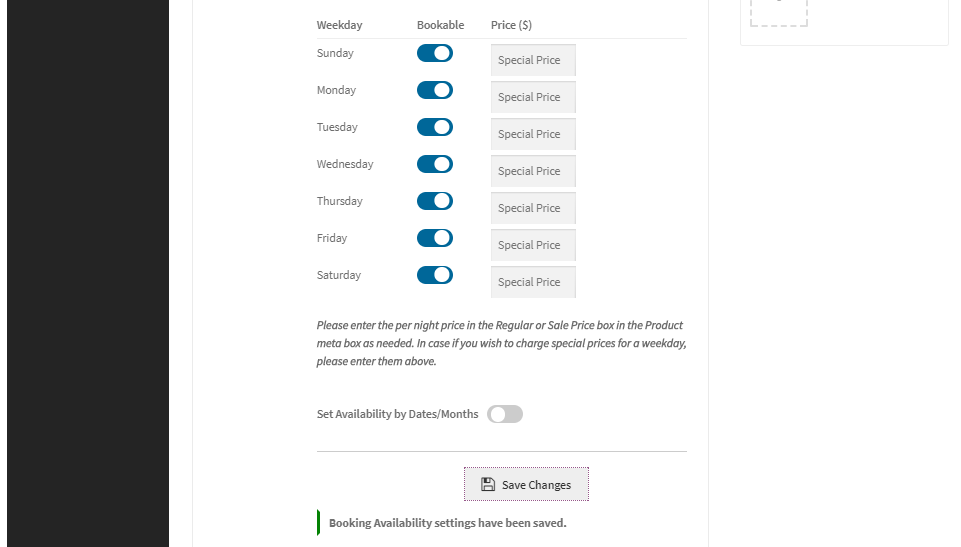
Adding availability settings
Once all the values are set, click on the Update Product button and the booking settings for this product will be saved.
Thus this product has been made bookable and it will be displayed on the Shop page as shown below. You will now be able to configure bookings and place an order for this bookable product.
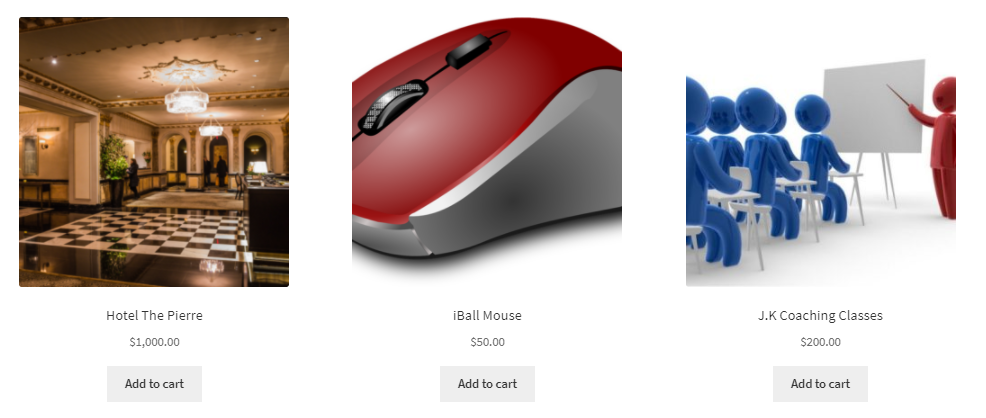
Vendor product displayed on the store
Front end booking process
Moving ahead, let us book this product now. Click on Add to cart button to start the booking process. You will be taken to the Product details page as shown below:
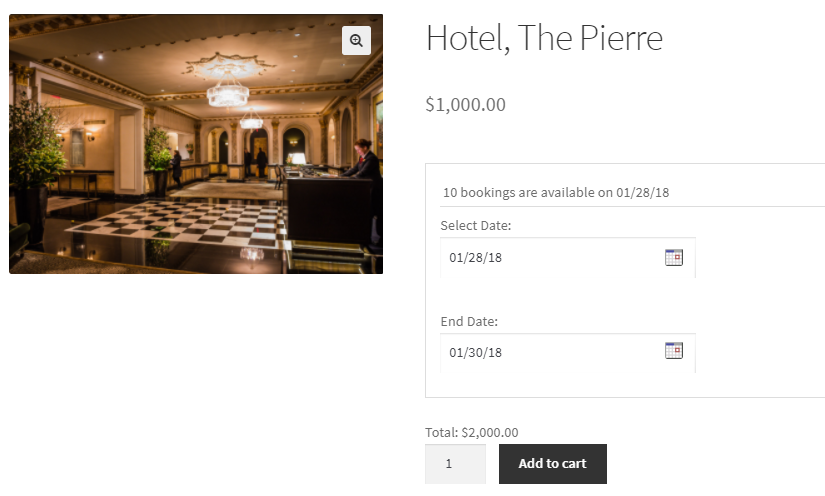
Front end of the newly added product from vendor’s side
As you can see, Hotel The Pierre is booked for 2 nights from 28th January to 30th January, 2018 for total cost of $2000. Click on the Add to cart button to book this product.
You will be taken to the Cart page where all your booking details will be displayed as shown below:
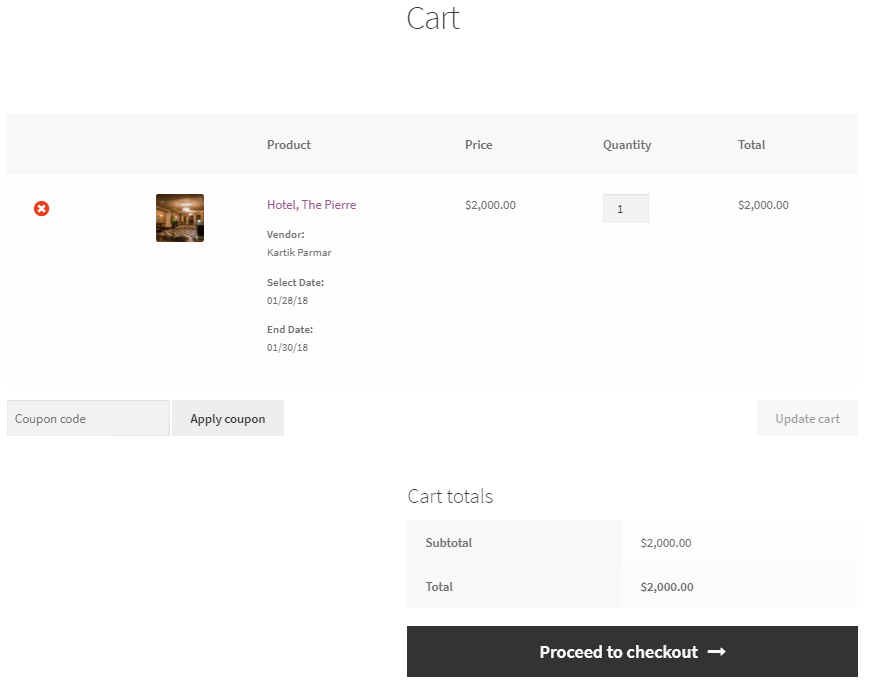
Cart page displaying details of the selected product
As you can notice in the above image, the vendor’s name is displayed because this is a vendor product. Here, if you do not wish to make any changes to the details, then click on the Proceed to checkout button to go to the Checkout page and place the order. Upon clicking, the Your order section will appear as shown below:
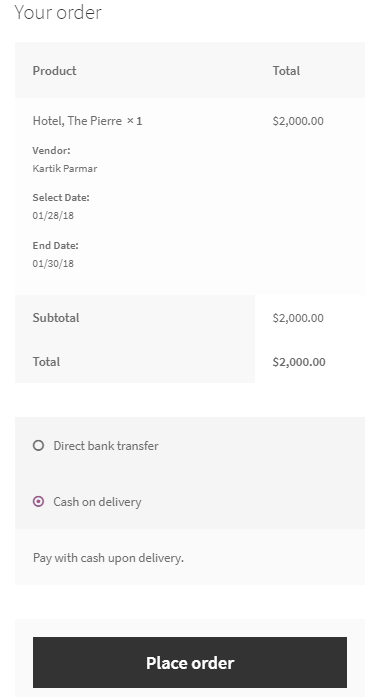
Booking details on the Place order section
Recheck all the booking details before confirming the order. Vendor’s name will be displayed on Checkout page under Your order section as well.
If all looks fine, click the Place order button to place the order. This order once booked, will be seen under the Orders menu option as shown below:
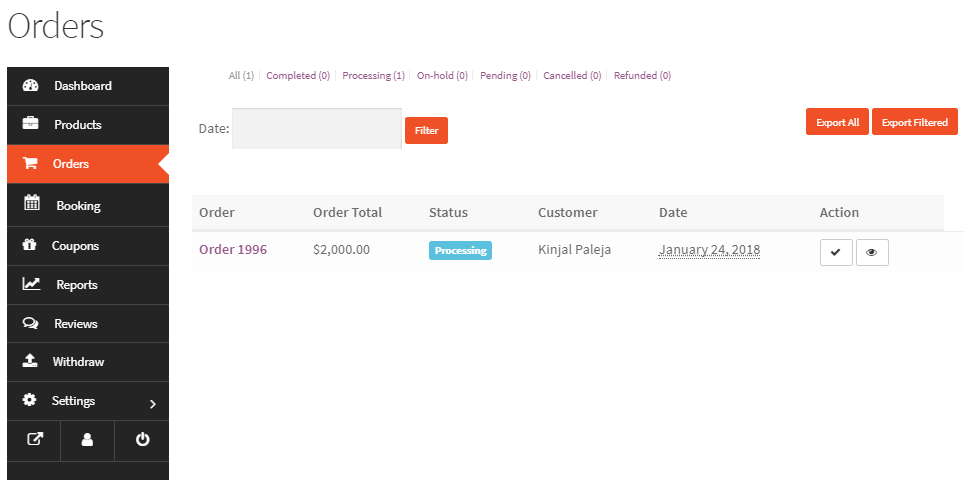
Booking details displayed on the Order confirmation page
To check the order details, you have to click on the Order Id and the details will be displayed. So now when you click on Order 1996, the following details will be shown:
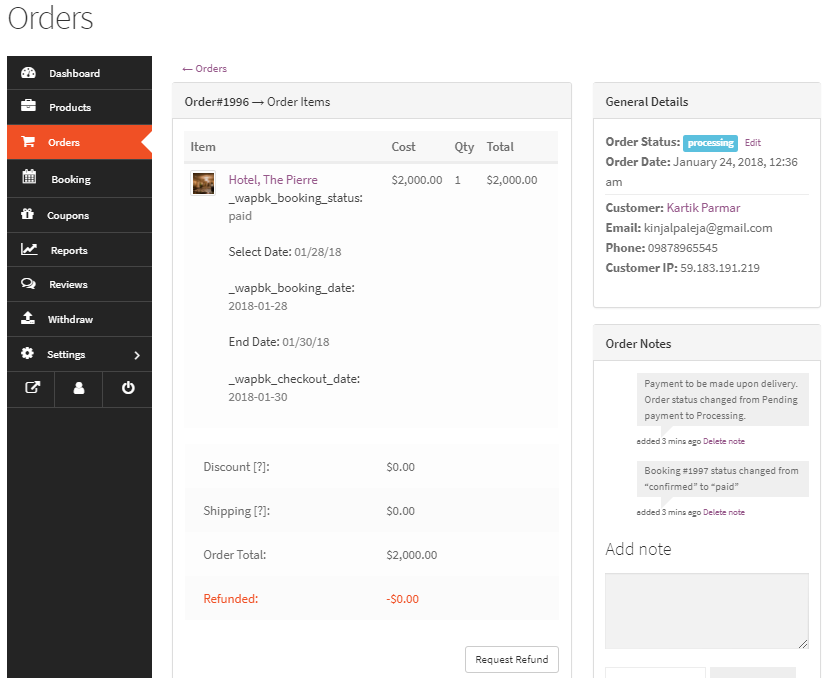
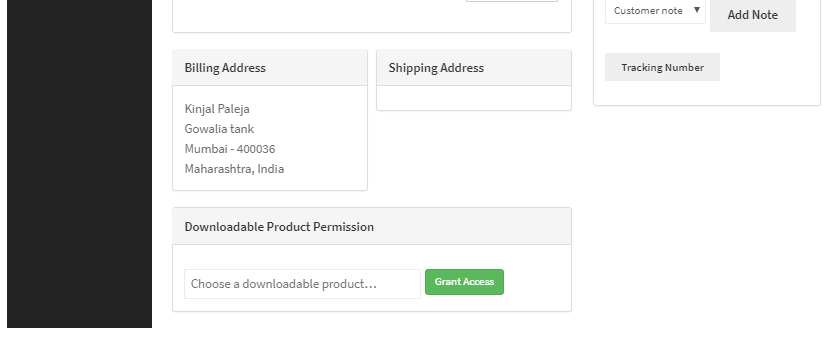
Thus your order has been placed. Now to check this booking, go to the Booking menu option and under View Bookings tab you will find this booking added as shown below:
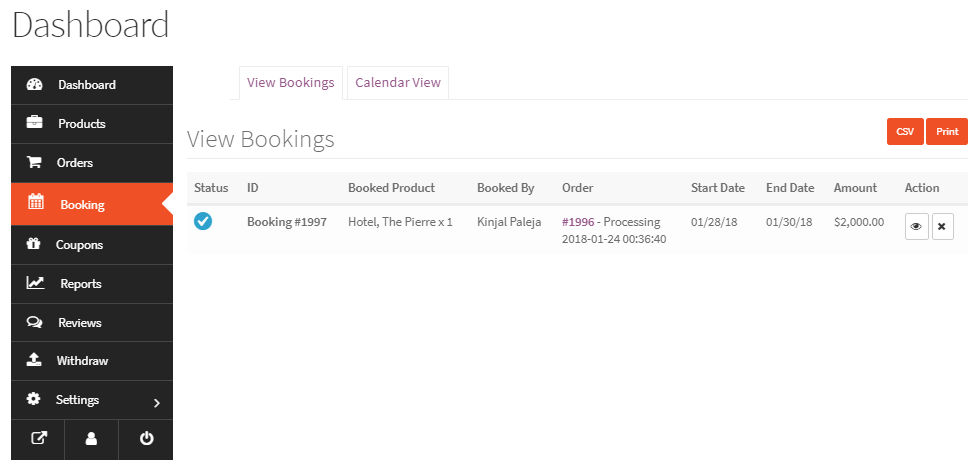
View Bookings page on vendor’s side
If you wish to make changes to this booking, you simply click the View & Edit icon as shown below:
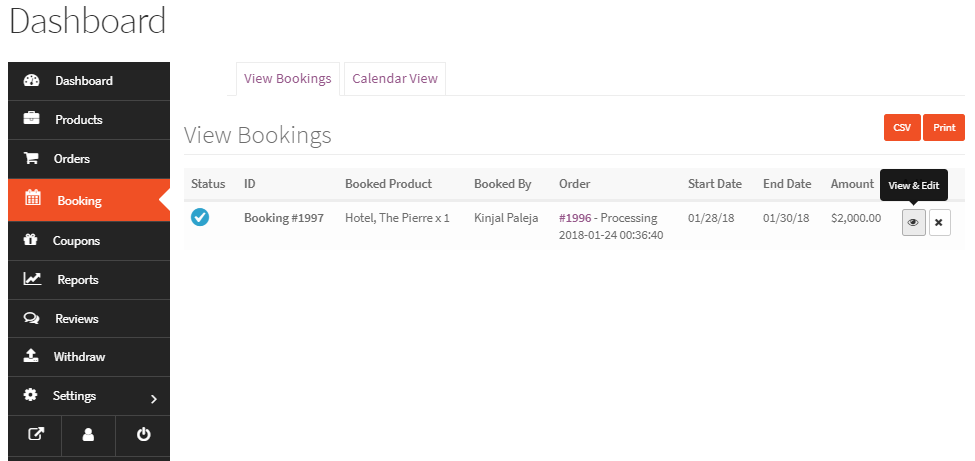
Clicking on the View & Edit button
When you click on the View & Edit button, you will get to the Edit Bookings section where you can make the desired change and click on Confirm Bookings button to save it.
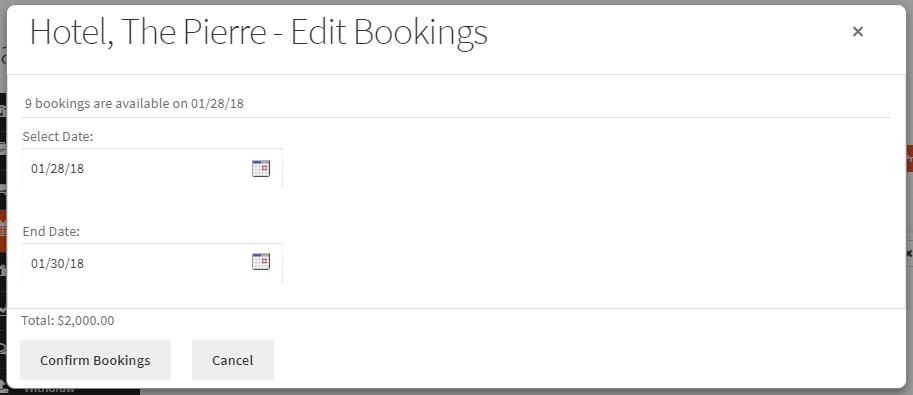
Edit Bookings page
For our above placed order for booking Hotel The Pierre for 2 nights, below is the calendar view of the booking shown under the Calendar View tab.
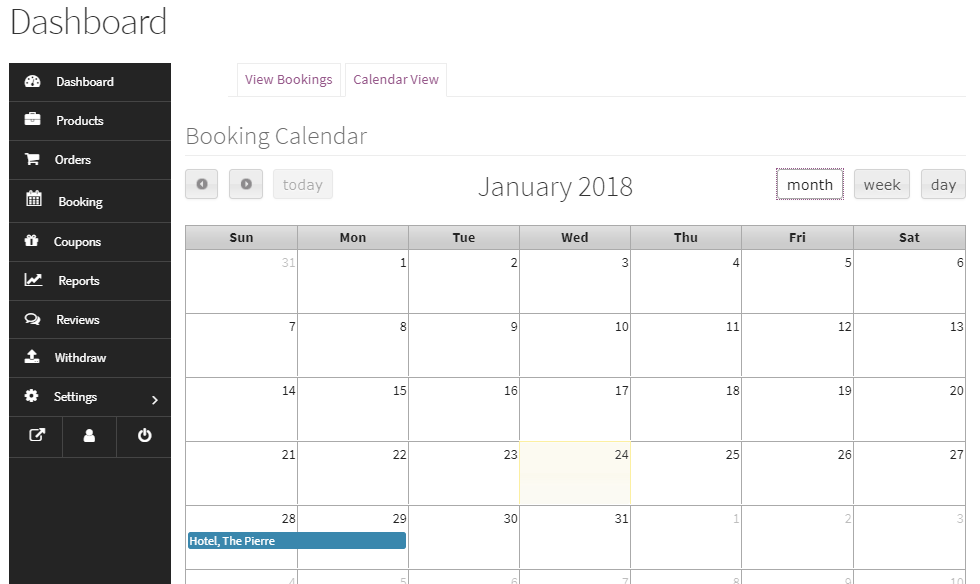
Calendar view of our booking
When you click on this product on the booking calendar, entire booking details will be displayed as shown below:
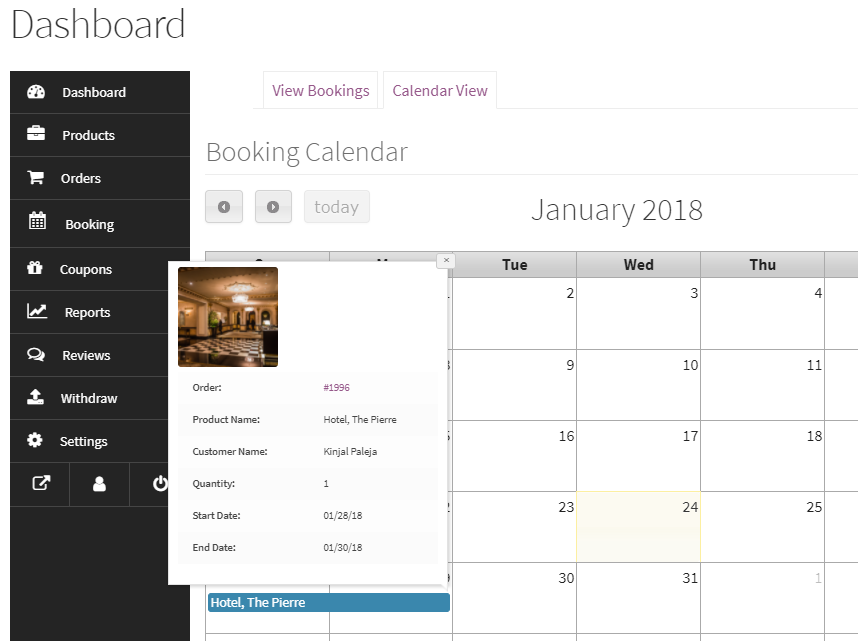
Details of the booking displayed on the booking calendar
This booking of the vendor’s product will also be added to the Booking section of the admin side as shown below:

Booking added on the admin’s side
Thus this is the entire booking process associated with vendor specific products when our Booking plugin is made compatible with the Dokan Pro plugin.
Different Views of the Edit Products Page
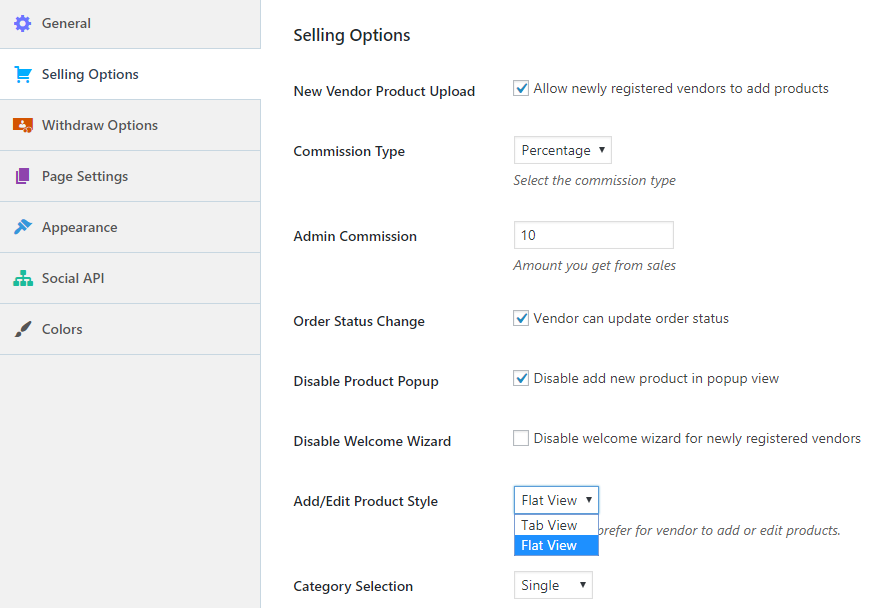
There are 2 views in which the edit page of added products will be displayed on the vendor’s side, namely Tab View and Flat View. These settings are set from the Dokan’s Settings menu option on the Admin’s side. You have to go to Selling Options tab under Settings and select the appropriate style from the Add/Edit Product Style option as shown below:
Now let us see how both these views affect the appearance of the products list on the Products page:
Tab View
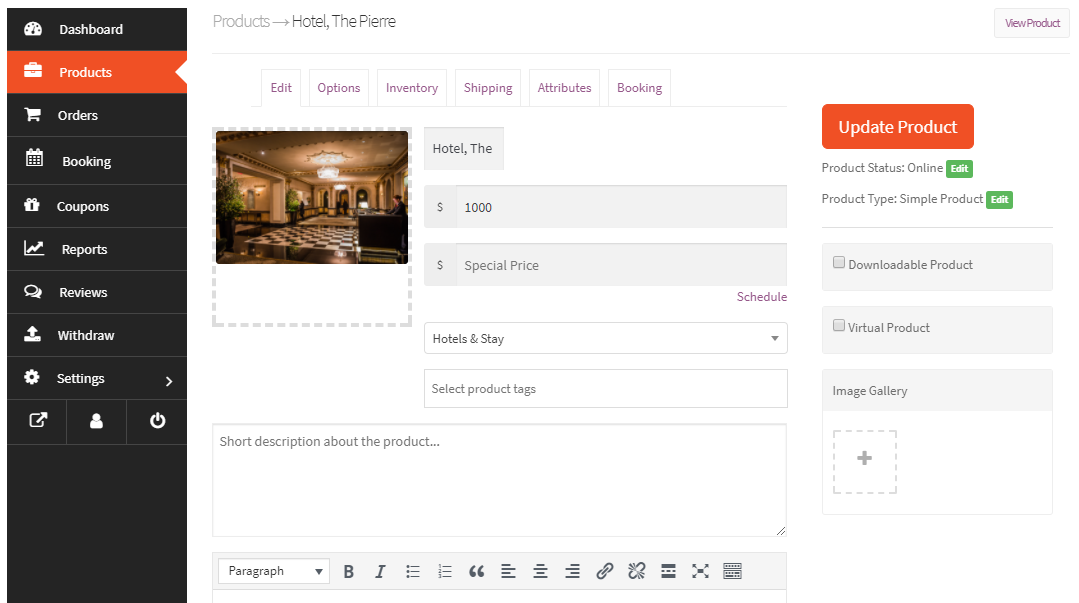
Tab View of edit products page on the vendor’s side
Flat View
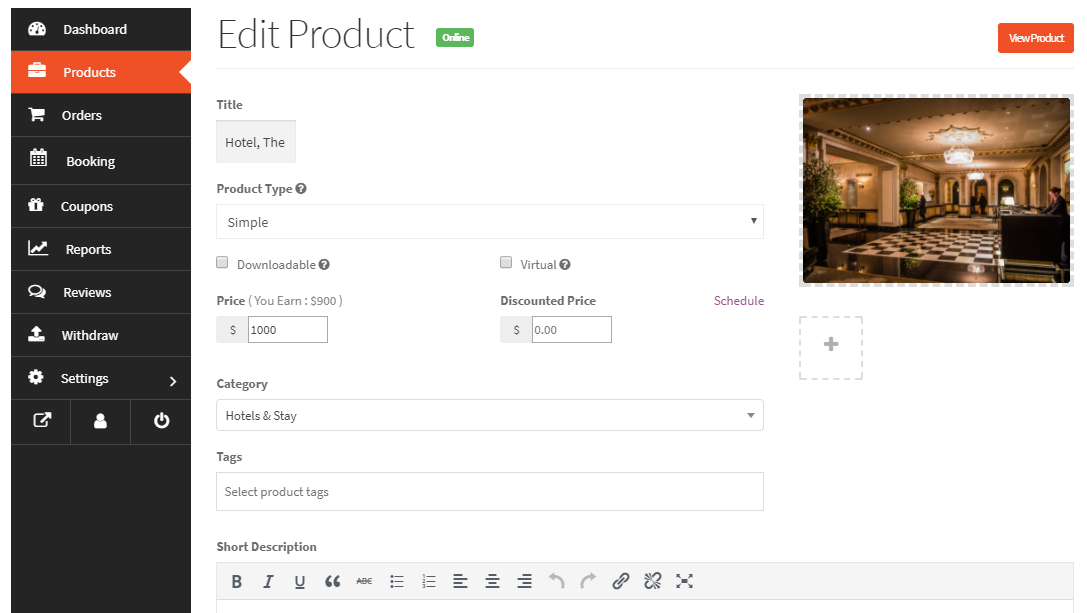
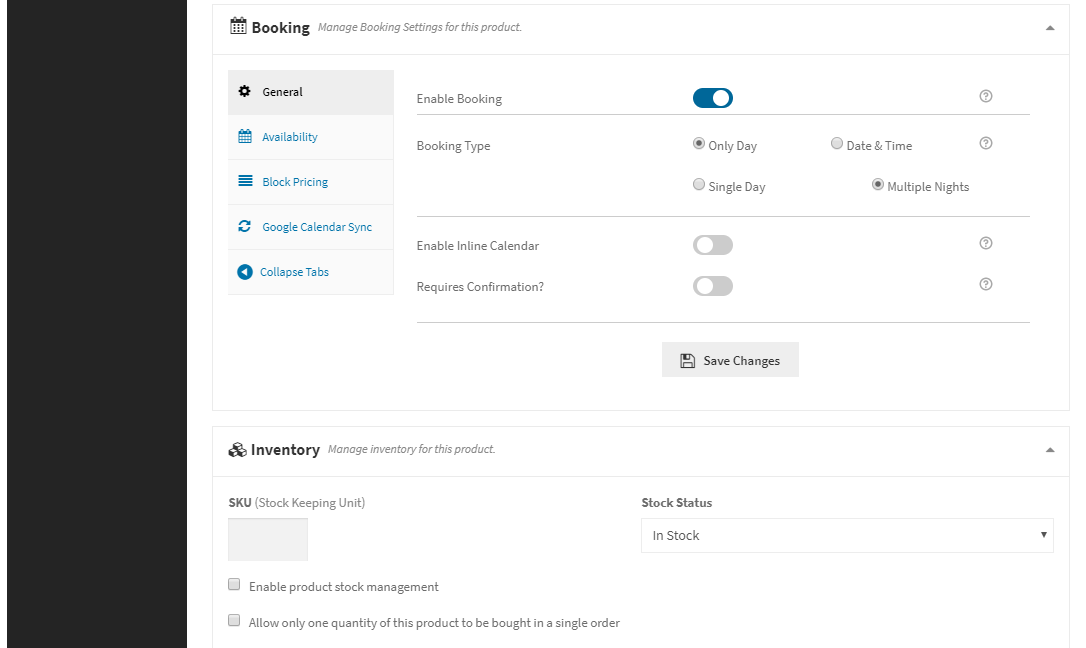
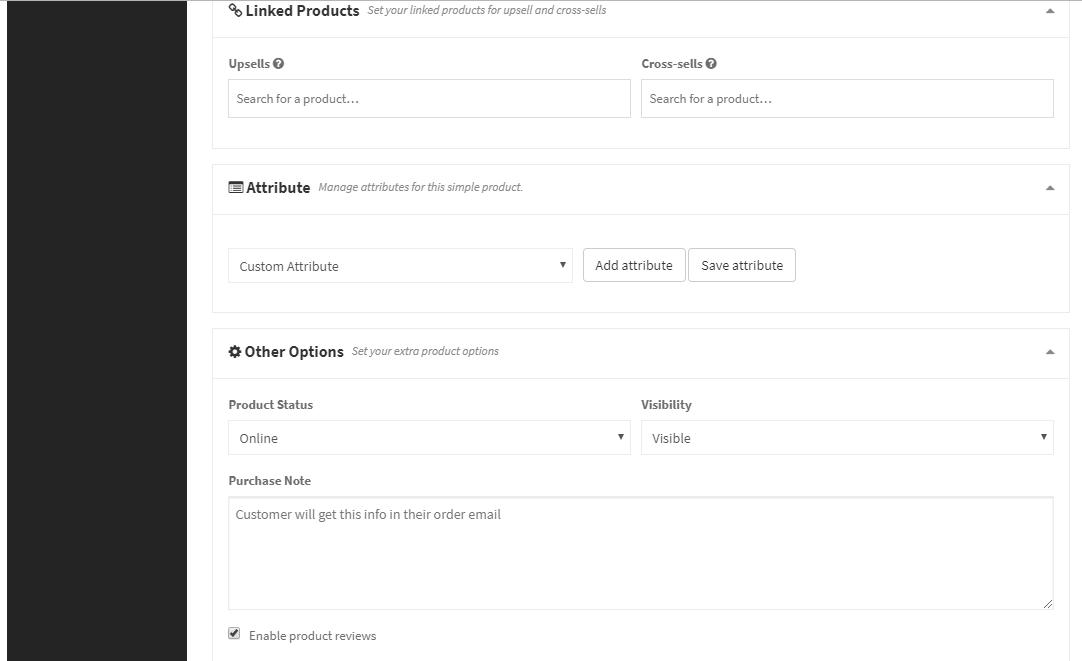
Flat View of edit products page on the vendor’s side
Conclusion
This unique addition to our Booking & Appointment Plugin for WooCommerce has made it more versatile and strong performer compared to the other booking plugins in the market.
The compatibility that we discussed in this post makes it very fruitful for vendors that would like to sell their products and services on other storefronts to increase their sales and thereby the overall online revenue. This is the best solution for managing vendor specific bookings and commission based models.
So why wait and think? Act Fast !!


