Table of Contents
As of January 2020, if we disregard English as the language that’s being most used on the internet, other languages occupy a whopping 74%. This shows that global internet users use their own language while performing tasks on the internet. Another 2020 survey called ‘Can’t Read, Won’t Buy- B2C’, found that 75% of participants want product information to be displayed in their native language. 72.4% of consumers are even more likely to buy products if they are in their native language. What does that mean for WooCommerce businesses? The answer: they need to buckle up and convert their websites into a multilingual WooCommerce store!
While appealing to any of your audience, whether global or local, it’s best to speak to them in their own language. A multilingual WooCommerce store will help you out with this exact thing. Plus, it comes with its own set of benefits. Have a look:
Why should you consider a multilingual WooCommerce store?
Here are some reasons why you should consider creating a multilingual WooCommerce store:
1. Broadens your audience
With a multilingual WooCommerce store, you have the benefit of communicating with your audience in a better way. By adding other languages to your store, you are opening it to a non-English speaking audience- which we already know occupies 74% of global internet users.
Also, don’t just think of a multilingual WooCommerce store in just international terms where you only incorporate foreign languages. Domestic or regional languages especially play an important role in increasing your audience since that’s where you are bound to receive more orders from!
2. Increased conversion rates
According to Weglot, if you sell your products and services in your customer’s native language, then they are 3 times more likely to carry out an online transaction on your site! Since your products will be available in languages other than English, naturally, it will draw in more customers. Just imagine the kind of traffic your site will receive once you implement this change. A multilingual WooCommerce store is bound to help you increase your sales.
3. Sets you apart from your competition
If everyone’s running the same race what will set you apart from the other participants? Surely a USP will help you gain a one-up over your competitors. Let’s imagine that one of your USPs is selling products and services in different languages. With it, you will be able to target customers not only from your country but also from around the world. A larger reach automatically means that you will have a higher chance of expanding your business to newer avenues. Additionally, it will easily separate you from your competitors.
4. Better SEO
We already know that Search Engine Optimization (SEO) only works when you use correct keywords targeted to a specific audience. But what if your store is unable to rank on the search engine result pages (SERPs) despite using the keywords? Yes, this is most likely to happen to your store where Google isn’t the default search engine. What could have allowed your store to reach a wider audience has stopped it simply because your store is in one language- English.
If you wish to improve your SEO by being able to rank on search engines that are not Google, it’s time you make your WooCommerce store multi-lingual. In 2019, even Google shared that 20% of all the billions of online searches were carried out in local languages. We can only imagine the kind of searches that are being made in non- English languages if we were to look at other sources. Once you have made your store multilingual, the customers who are searching for your exact products and services in their native language will be directed to your store in no time!
5. Enhanced customer experience
According to PWC, 73% of consumers think that a good experience is a key factor in influencing their loyalty towards a brand. When your store provides its services to the customers in their native language, they feel at home. It helps you make the buying process easier -from the product page to the checkout page everything would be addressed to the customer in their language. It automatically builds trust since the customer is able to easily navigate your site. The customer won’t have to think twice before making a purchase and they will even spend more time browsing your items! No longer will the customer feel insecure while taking a leap of faith on a foreign website. In addition to these benefits, using fonts or icons that are native to the customer’s language will make them feel familiar with your website.
How do I set up my multilingual WooCommerce store?
Now that you know the benefits of a multilingual WooCommerce store, it’s time to build one for your site. The best way to set up your multi-language WooCommerce site is through a plugin. Otherwise, you can even use translation applications for your site. We will be covering how you can use a paid plugin, a free plugin & then an application to set up your multilingual WooCommerce store. So, make sure to read it till the end. Let’s get started-
1) With WPML – WordPress Multi-Lingual Plugin
The WPML plugin can help you build a full-fledged multi-lingual e-commerce site at $79. Here’s how to use it:
a. Install WPML Multilingual CMS (the core plugin) and its different add-ons.
Sign up for the WPML account on their website. Then, install and activate the WPML plugin. Simply enter your site key to enable your registration. Go to Plugins > Add New > Commercial Page to install the following four WPML plugins:
- String Translation
- Translation Management
- Media Translation
- WooCommerce Multilingual
Check them in the list and click on the ‘Activate after download’ box. Click on the ‘Download’ button and you will be done.
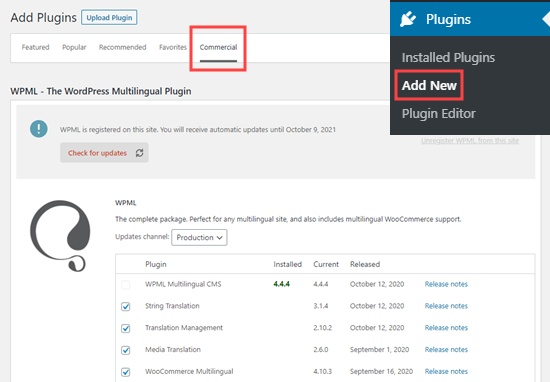
Under the WordPress admin, simply go to WPML > Languages and set up your WPML plugin. During this process, you will be asked to set up your content language, translation language, language switcher options, and so on. After completing the setup wizard for the WPML plugin, you will then see the setup wizard for the WooCommerce Multilingual plugin. Complete the process by choosing your settings for Store Pages, translation options, enabling multiple currencies, and much more. Once you are done, you can close the setup and start using the plugin.
b. Translating your content such as Pages, Post, and Custom Post types with Translation Management
Simply go to WPML > Translation Management > Translation Dashboard.
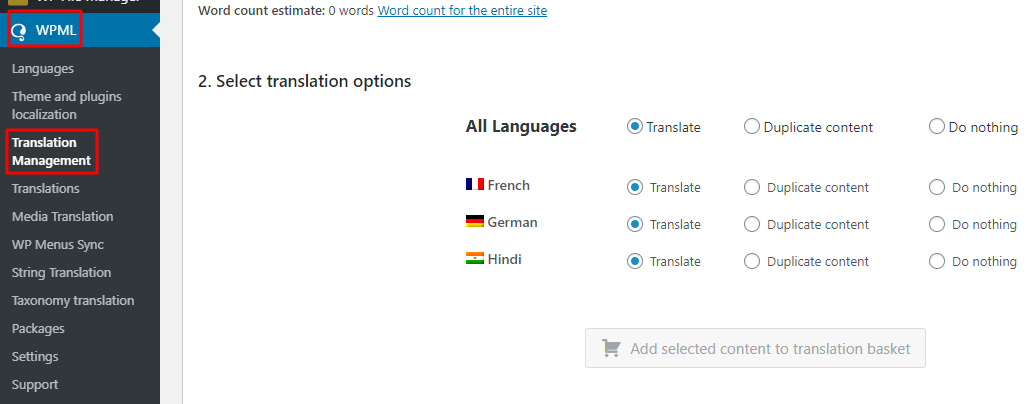

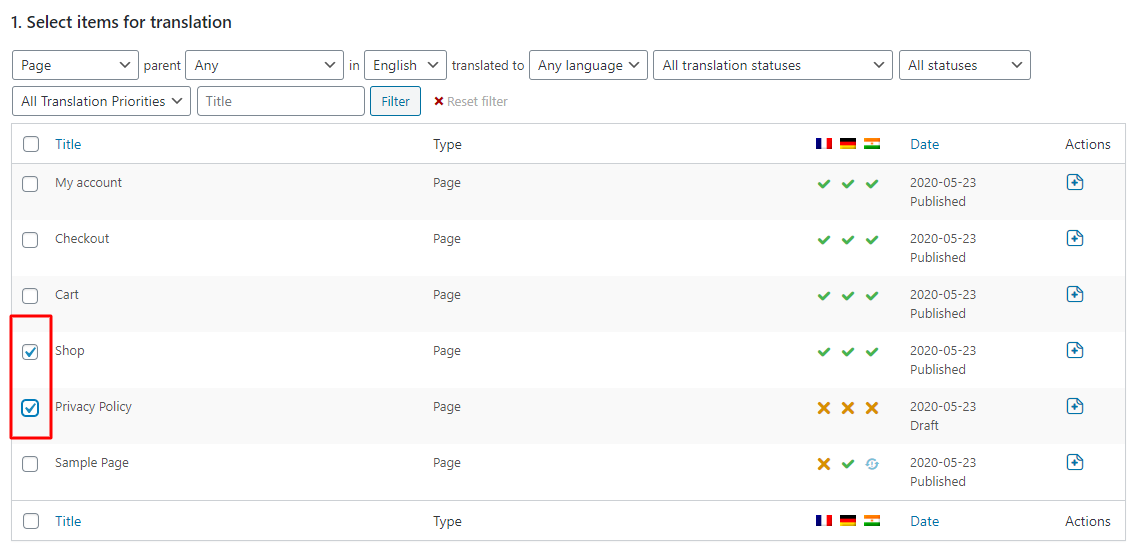
Here, you will easily be able to choose the items that you wish to translate through the ‘Filter’ settings that are mentioned just below the Translation Dashboard. On the left-hand side, you can choose the items you wish to translate. Note that the languages that you have selected during the set-up process will be displayed just before the ‘Date’ column. For example, we have chosen French, German, and Hindi.
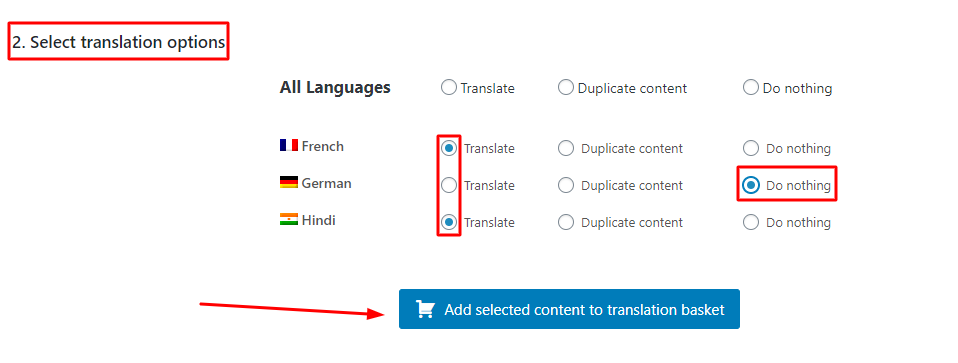
After selecting your items, scroll down to ‘Select translation options’ and choose which languages you wish to translate your selected items into. You can even choose the ‘Do nothing’ option if you do not wish to translate something. Click on ‘Add selected content to translation basket.’
Go over to the ‘Translation Basket’ setting and click on ‘Send all items for translation’. Please note that clicking on it will not actually translate your material. Rather, it will simply create a queue of items/pages that need to be translated.
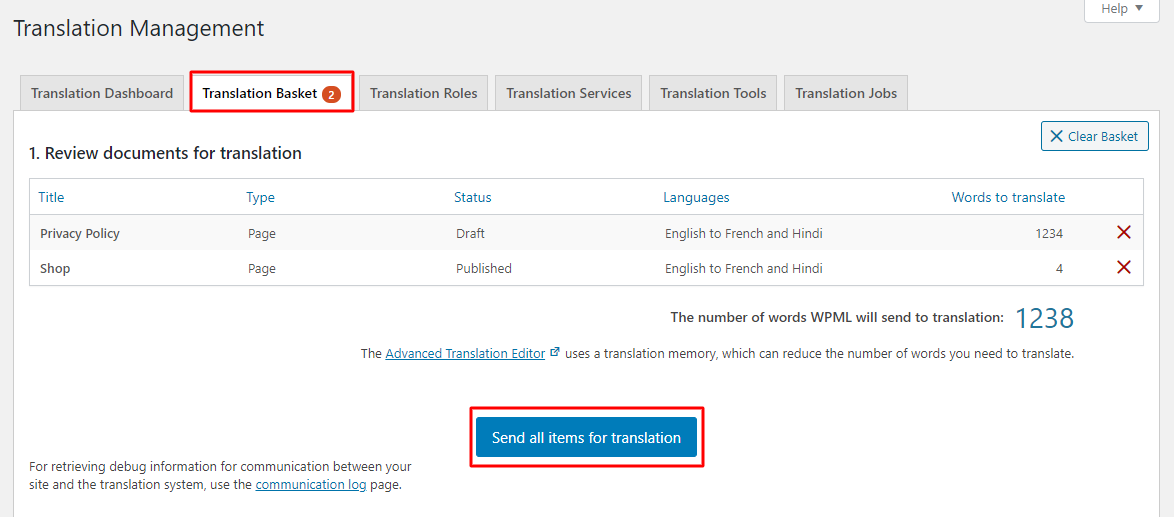
Once your content is ready you can click on the ‘Translation Queue’ option.

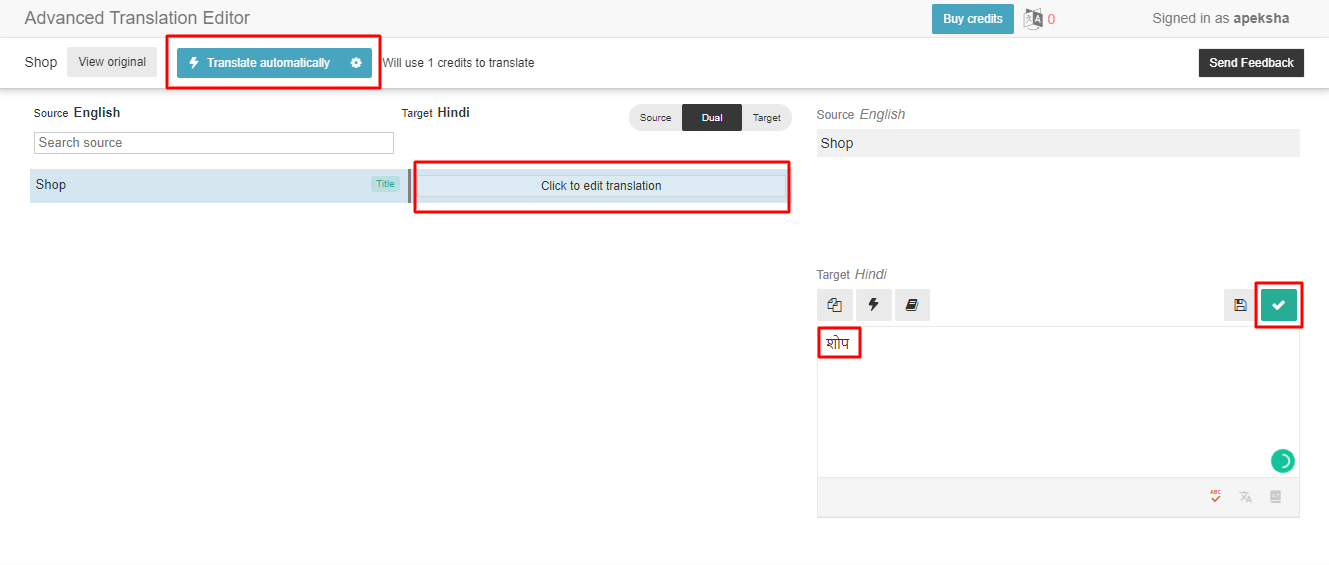
From here, you can choose the specific page you wish to translate by clicking on ‘Take and translate.’ For example, we have chosen the ‘Shop’ page.

Under the ‘Advanced Translation Editor’ you will see the Source text. Tap on ‘Click to edit translation’ and enter the translated text of the selected source text. For example, here we have entered the word शोप in the Target ‘Hindi’ language. Click on the green tick mark once you are done.
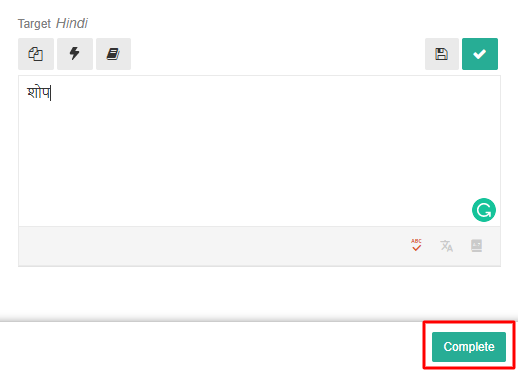
Finally, finish the process by clicking on ‘Complete.’
Here’s how the changes will appear on the front-end:
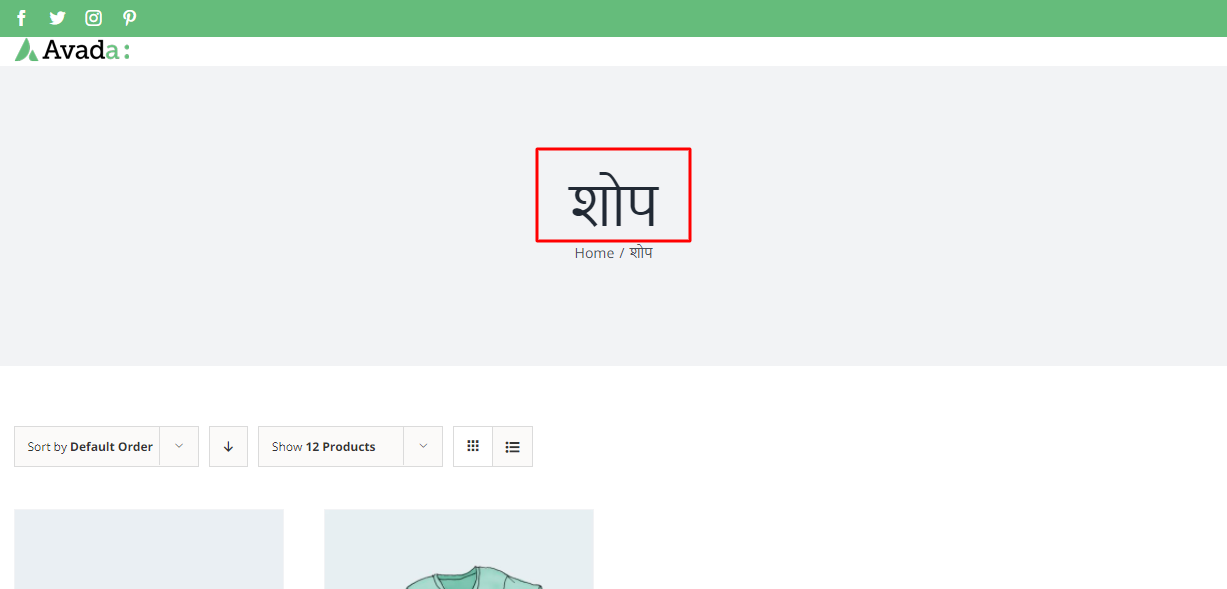
Similarly, you can translate strings and even media. Learn more here.
c. Translating your WooCommerce store with WooCommerce Multilingual
WPML has specially created the WooCommerce Multilingual plugin to help translate your WooCommerce products easily. With this add-on, you will be able to translate the product pages, Single product information, product categories, product tags, and product attributes. So let’s get started:
c. i. Translating your Products
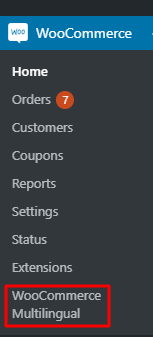
Go to WooCommerce > WooCommerce Multilingual > Products.
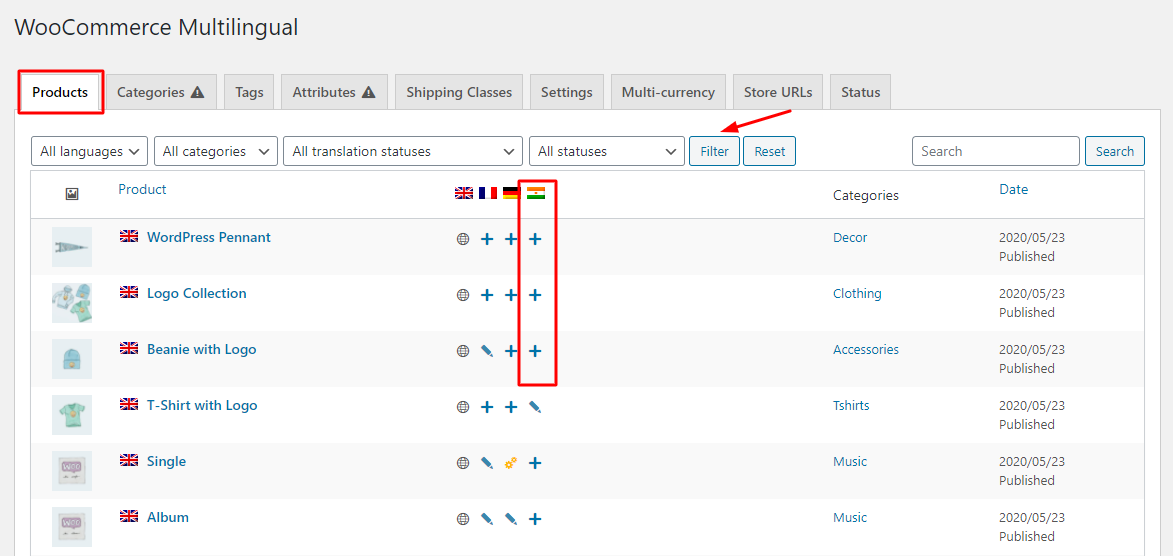
Right beside the Products, you will find your chosen languages. Under them, you can choose the ‘+’ icon of the language you wish to translate. Make sure to note that the different icons stand for different settings. For example, the pencil icon stands for editing your already translated products, the settings icon means that the translations are still in process, etc.
After clicking on the ‘+’ icon, you will be directed to the ‘Advanced Translation Editor’ settings. Here, we will follow the same procedure as we did earlier. Click on ‘Click to edit translation’ and fill in your translation in the selected language like this:
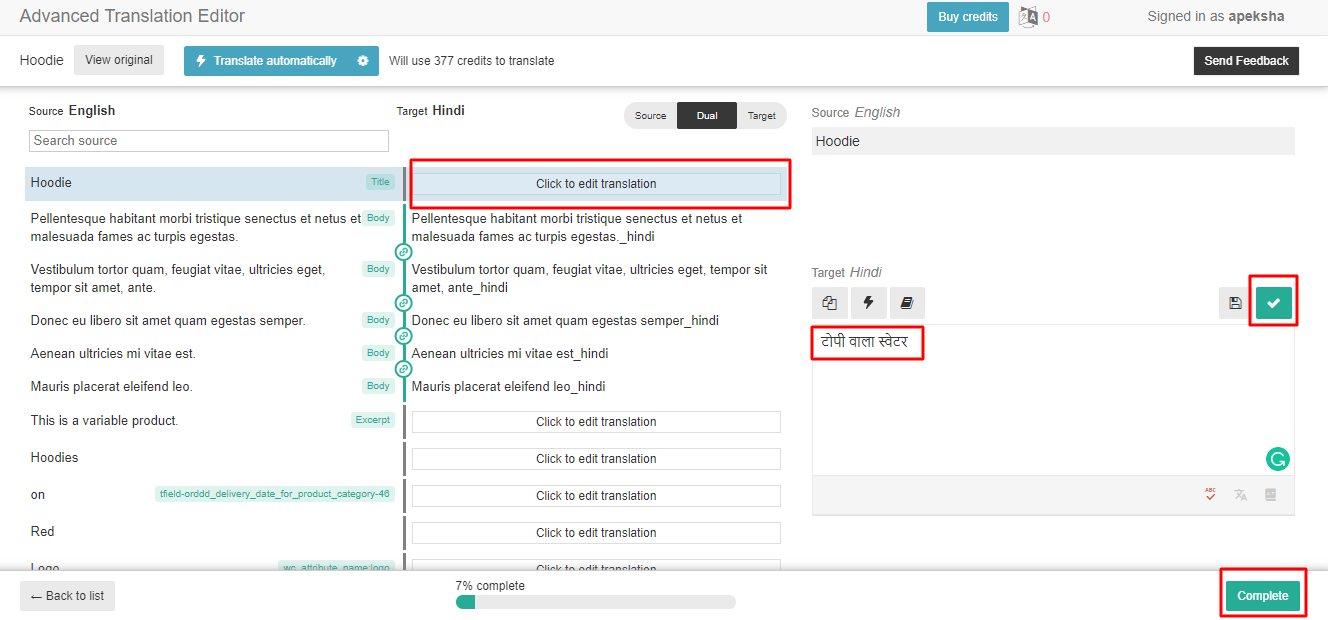
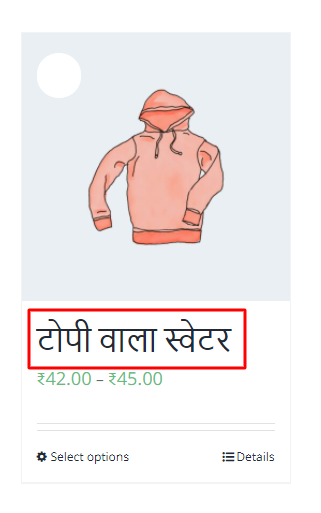
Make sure to tap the green tick mark and fill in all the other translations for that product in this manner. Click on ‘Complete’ once you are done. Here’s how the above example will appear on your website:
In a similar fashion, you can translate categories, tags, attributes, and shipping categories. You can simply figure out these translations by going to WooCommerce > WooCommerce Multilingual. We will show you one example of this by translating one of the ‘Attributes’ of the products in your store.
c. ii. Translating Attributes of variable products
Go to WooCommerce > WooCommerce Multilingual > Attributes. You can choose the attribute of any variable product you wish to translate. For example, we have selected the ‘Color’ attribute. You can even choose ‘Size’. You will get the settings according to the attribute you have selected. Once you select ‘Color’, you can choose the color you wish to translate. We will select the color ‘Blue’ and translate it to Hindi by clicking on the ‘+’ icon.
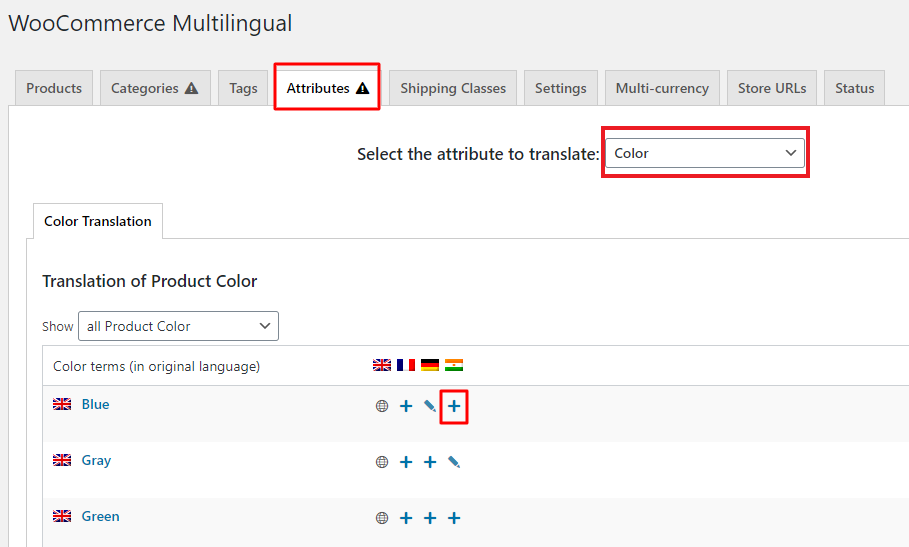
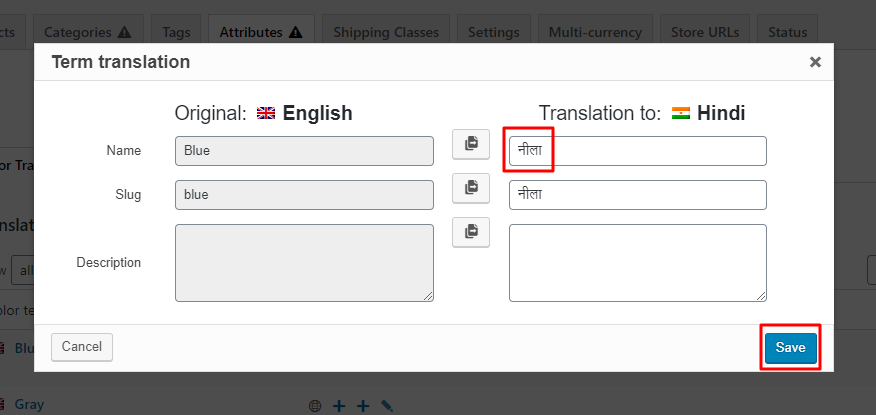
Under ‘Translation to’ you can input the translated word. The slug will be added automatically once you click on the field. Click on ‘Save’ once you are done. For example, we have translated the word ‘Blue’ as following:
Scroll down the page and click on ‘Synchronize attributes and update product variations.‘ This will synchronize all your newly translated terms with the existing ones.

Here’s how it will show on the frontend:
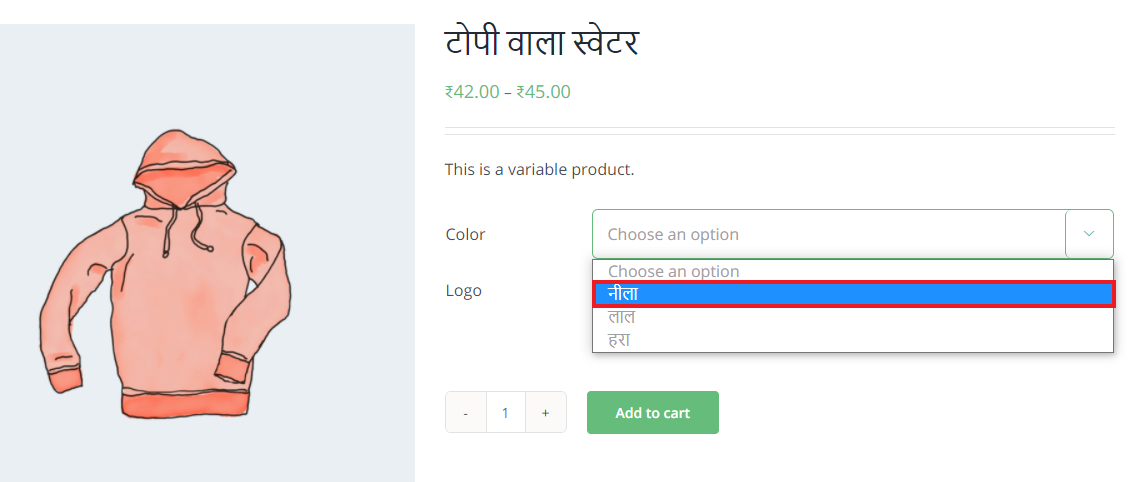
If you wish to learn about WooCommerce Multilingual and its features in detail check out its documentation here.
2) With Loco Translate plugin
Before we start how to use this plugin, you can first learn how to download translations manually.
a. Downloading translations manually
The different translated versions of WooCommerce can be easily found at translate.wordpress.org. To get started you will first need to download your Translation manually. To do this, simply go here and find the language you want from the list. Click on the title so that you are redirected to its page. For example, we have chosen ‘Korean’ here:

Once there, find the stable version of the translation.

Click on it and scroll down till you find the ‘Export’ option.

Make sure that you export a .mo file. Once it is exported, you can directly upload it under wp-content/languages/woocommerce/. After uploading the translation file, you can easily use it.
b. Here’s how you create custom translations with Loco Translate
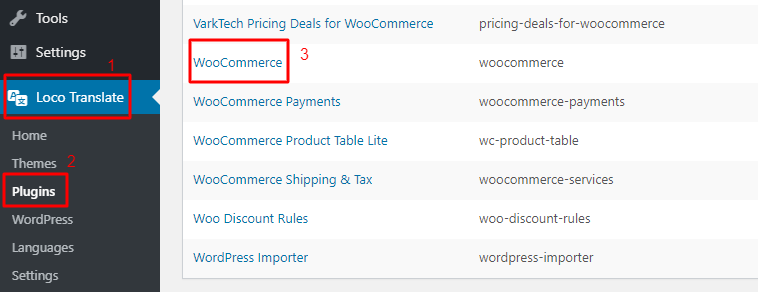
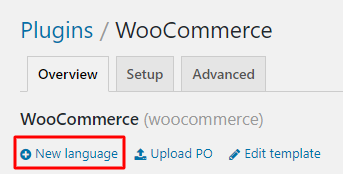
Firstly you will have to download the Loco Translate plugin from here. This free version will help you translate your themes & plugins easily. Upload it to your site by going to Plugins > Add New > Upload Plugin. Choose the downloaded file to upload and activate the plugin. Now, go to the Loco Translate > Plugins > WooCommerce > New Language link.
Under ‘Choose a language’ you can select the language you wish to translate. For example, here we have selected the Hindi language. Under ‘Choose a location’ you can pick where you wish to save your language. Loco offers three different locations to choose from, but since you are creating your own custom translations it’s best to opt for the ‘Custom’ option. Both ‘Author’ and ‘System’ locations are prone to being overridden by updates of translations from translate.wordpress.org.
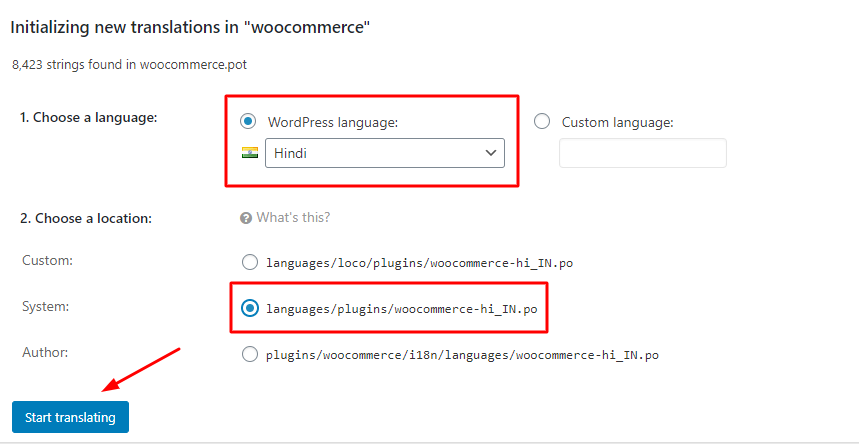
Continue by choosing the ‘Start translating’ button. You can now select the source texts and provide their custom translations.
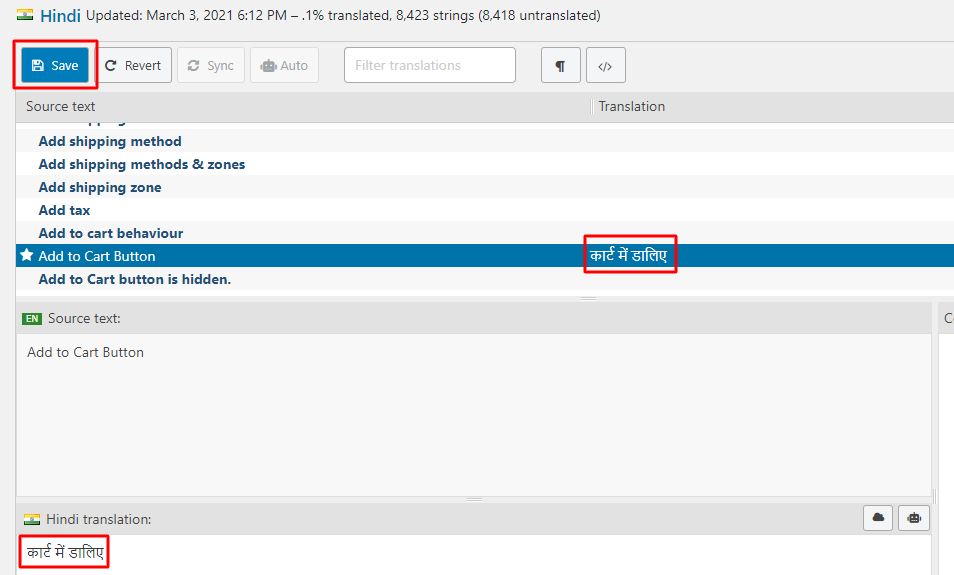
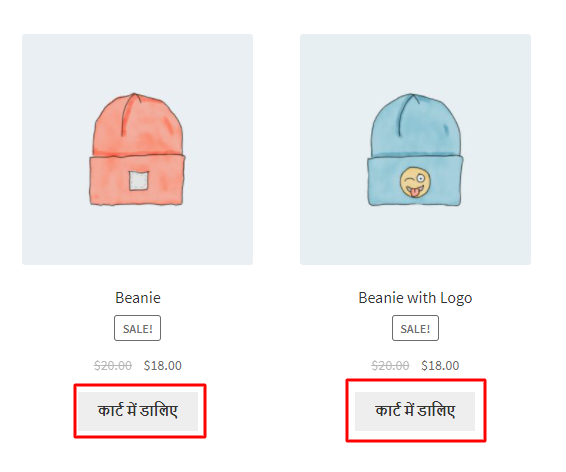
Click on the ‘Save’ button once you are done adding your custom translations. Here’s how your custom translations will appear on your WooCommerce site:
Please note that you will need to refresh the .po file to find the new strings whenever a new version of WooCommerce is updated on your site. You can click on the ‘Sync’ button to find these strings.

3) With the PoEdit application
If you are looking for a solution that can help you out with some advanced translating then PoEdit is a great application for you. However, please be aware that it is just an application and not a plugin like Loco Translate or even WPML. Here’s how you can use this application:
In order to create your POT file for your plugin, you need to open PoEdit and go to File > New.
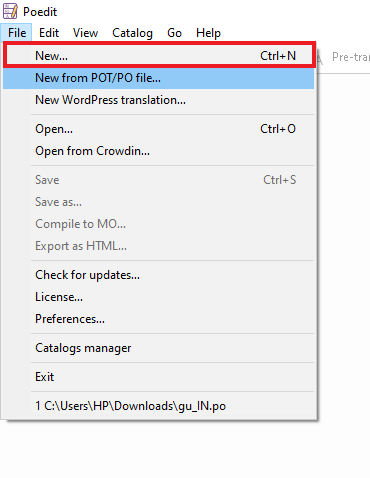
After this, you need to choose the language of your choice and click on ‘OK’. For example, we have selected ‘Gujarati.’
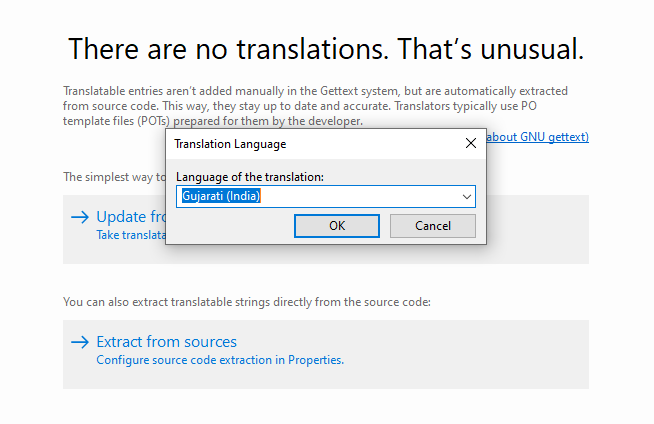
Here you will see two options as shown below:
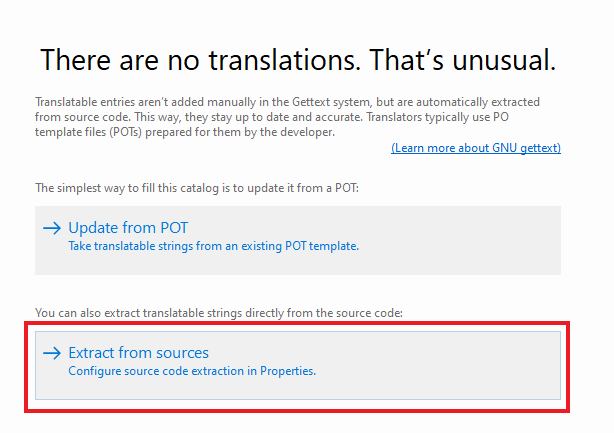
Please choose ‘Extract from Sources.’ Under ‘Translation properties’ you can add in the name of your project, its version, language team, and much more.
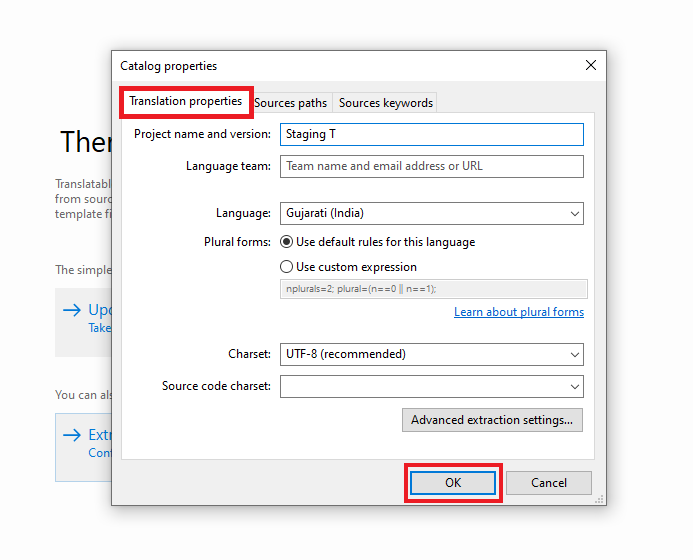
After you have filled in these details, click on ‘OK’. Then, save the file by going to File > Save. Or, you can simply locate the ‘Save’ button below the ‘View’ option.

Once you have saved your project, reopen the ‘Extract from Sources’ window and go to ‘Sources paths’. Herein, you will have to add the folder under the ‘+’ icon.
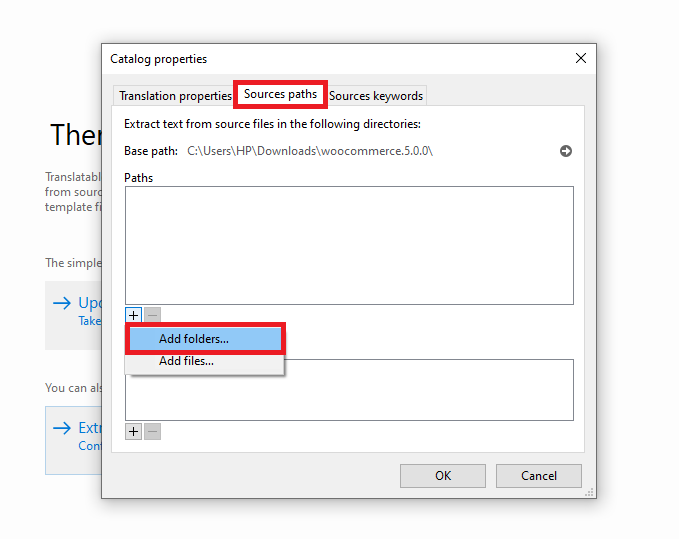
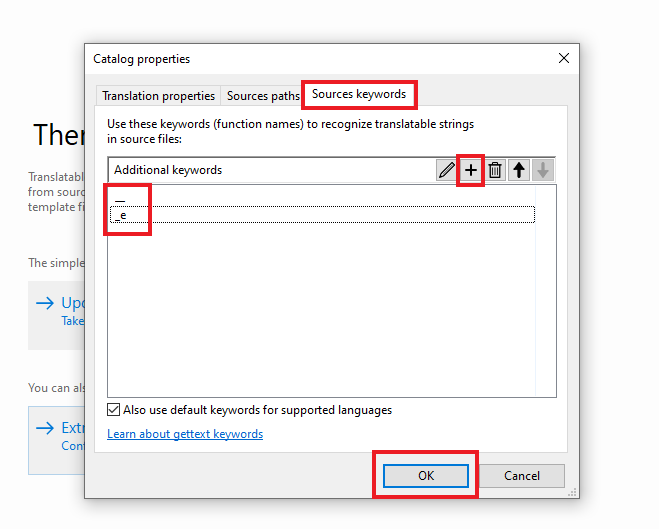
After you have selected your plugin folder, go to ‘Sources keywords’ and add the following two keywords:
Click on ‘OK’ and your strings will be extracted. Here’s what will appear:
You can start translating your Source text in the following manner:
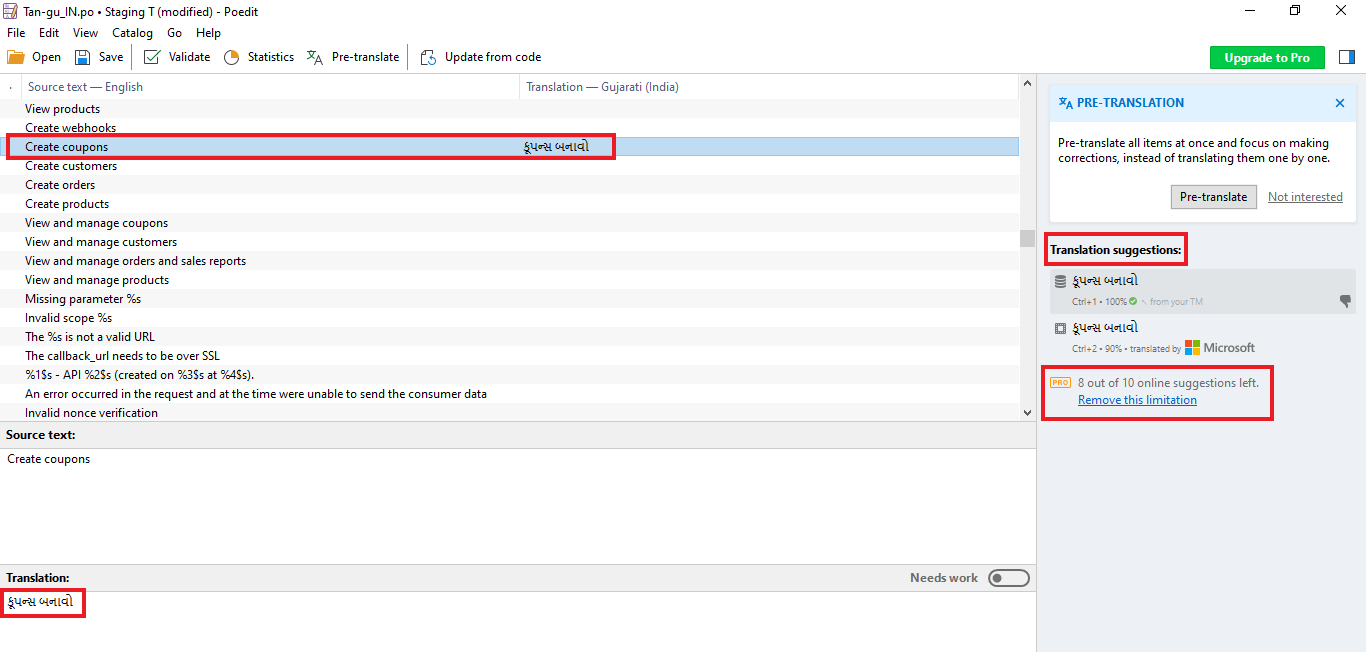
On the side, if you wish to add notes for your translators you can do so. PoEdit even comes with the option of suggesting translations. Find it located in the top right-hand corner. In the free version, you can use only 10 online suggestions. You can upgrade to their Pro version if you wish to remove this limitation. Once, you are done, you can save your file.
If you wish, you can even upload the translations that you have manually downloaded from translate.wordpress.org. Follow the previously mentioned steps and export a .po file instead. You can upload this by clicking on the ‘Edit a translation’ on the homepage of the application.
Conclusion
In today’s time, turning your WooCommerce store multilingual is as crucial as getting the basics of your online store right. Set it up correctly with the help of this guide and we are sure that you will be able to target new markets and audiences in no time.
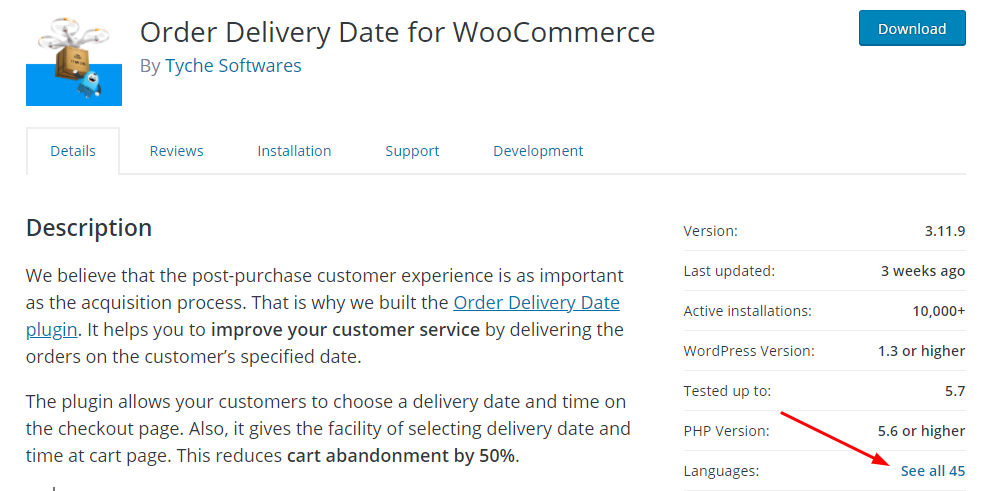
We, at Tyche Softwares, have always tried to ensure that our plugins are more accessible. Sometime back in 2015-2016, we had our entire plugin documentation translated into Spanish & Italian languages. We even kept it live for a few years! However, we were unable to maintain it & because of that, we had to take it off. But we’ve still got some good news for you! Some of our plugins (free as well as paid versions) are translated into as many as 40+ languages:
If you are also looking for WooCommerce solutions that are already translated into different languages, don’t forget to check out our range of free & premium plugins. An added bonus to them? They are perfectly compatible with WPML & Loco Translate plugins!
Now, it’s your time to start setting up your multilingual site. Which method are you planning to use? Let us know in the comments below.
Please note that some links on this post may be affiliate links. However, the information in the post reflects our personal views & recommendations without any bias.



I have used the combination of WooCommerce+WPML to convert my online shop into a few languages so that I can serve multilingual people.