Table of Contents
The checkout page is the most vital page to close sales. But the same checkout page contributes to a 70% average abandonment rate.
Simple reason – customers prefer a simple, short and sweet checkout process with minimum checkout fields. A long and complicated checkout is a strict No to end the sales process
Though there isn’t a “one size fits all” solution, the truth is for most WooCommerce stores, one-page checkout or direct checkout works better.
One-page checkout provides a quick and smooth checkout process for customers, thus curbing the abandonment rate and boosting conversions.
So what is WooCommerce one page checkout, who should use it, and how to set it up…we’ll have a closer look at them in this article.
What is WooCommerce One page Checkout?
WooCommerce one page checkout is the one where customers can add and remove products, fill in checkout details and make a payment, all from a single page, without moving back and forth.
With everything on one page, it gives users a faster checkout experience, with less interruption and more happy customers for your online business.
Btw…there’s also WooCommerce direct checkout which is also a faster checkout process where users skip the cart and land on the checkout page or land directly on the thank you page.
One-page checkout is excellent for selling specific products that require the distraction-free buying environment a single page offers.
Why WooCommerce one page checkout is better than conventional WooCommerce checkout?
Let’s be honest…
The default WooCommerce checkout is not that bad but it’s long and cumbersome. Customers have to add items to their cart, then visit their cart, then proceed to the checkout page, add details, make payment and finally purchase the product.
They even have to move back and forth to modify and review their purchase items.
As you can imagine, from landing on the website to thank you page, there are about seven steps in the funnel. And the chances of drop-offs happening are even higher with so many steps involved
Even worse, the checkout page displays a ton of fields all at once, which can scare shoppers away.
When one page checkout is enabled, all the steps are reduced to one page, allowing customers to easily make a purchase with confidence.
You can also direct traffic from your social channels and emails to your products enabled for one page checkout. This would become a high converting sales funnel for that product.
Who Needs WooCommerce One Page Checkout or One Step Checkout?
Now, FMCG stores do not require one-page checkout as people keep on adding more products and also move back and forth a lot.
However, for limited products wherein people do not look for other alternatives, you can enable one-page checkout.
One-page checkouts work particularly well for stores that sell products that aren’t very expensive and don’t require a lot of customization or review. It also works great for stores selling very few products.
To summarize, one-page checkout works perfectly for these WooCommerce stores:
- Digital products like plugins and themes
- Memberships
- SEO services
- Consultancies
- Events
- Concerts
- Books
- Audio files
Shorter funnel, time savings, customer convenience, increased revenue…what other benefits do you need from one-page checkout!
If you haven’t enabled one-page checkout on your store yet, now is the time. And how to set it up on your website is our next section.

Wondering how to bring back your Abandoned cart users?
Abandoned Cart Pro for WooCommerce is loaded with useful features that help you send an effective volume of reminders via text, email, and messenger. You can also share and manage discount codes that will encourage your customers to complete their orders.
Even better, you can stop the cart abandonment with the exit intent popup!
How to Enable WooCommerce One page Checkout?
You need a solid plugin that enables you to set up one-page checkout on your WooCommerce store. And that plugin is Cashier.
Now, Cashier is a complete checkout optimization plugin that does the work of 10+ plugins, saving you from the hassles of working with so many expensive plugins.
You get one-page checkout, checkout field editor, direct checkout and one-click checkout with Buy Now buttons, side cart and other enhancements.
Let’s concentrate on setting up one-page checkout.
Using the Cashier plugin, you can create special one step checkout pages or turn any page into one step checkout.
You can enable one-page checkout for simple, variable products (including variations) and subscriptions.
You also have the flexibility to turn on and off the one-page checkout option anytime based on your requirements.
Creating Special WooCommerce One page Checkout Pages
Create a page, select a few products and leave the rest on Cashier to create a one-page checkout for you.
Here’s how:
- Go to your WordPress admin panel > Pages > Add New.
- Give a title to this page, say ‘Special One Page Checkout’.
- On the menu bar of the WordPress / Classic editor, locate and click the ‘OPC’ option.
- You’ll get three options to choose from:
- Pre-selected products
- Product Ids
- Product categories
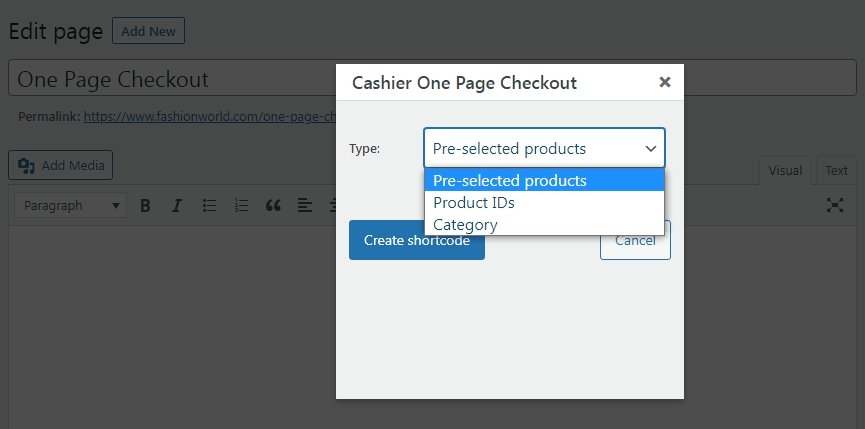
- We’ll choose ‘Pre-selected products’ options from the dropdown.
With this option, all the products you tick the one page checkout option in each product setting will automatically be eligible for one page checkout. - Click on the ‘Create shortcode’ button.
- For Gutenberg editor, you may not find the OPC option. In this case, go to any product. On the Classic editor menu, you’ll find the OPC option. Choose ‘Pre-selected products’ from the dropdown, click on the ‘Create shortcode’ button. Paste the shortcode on the ‘One Page Checkout’ page in the Gutenberg editor.
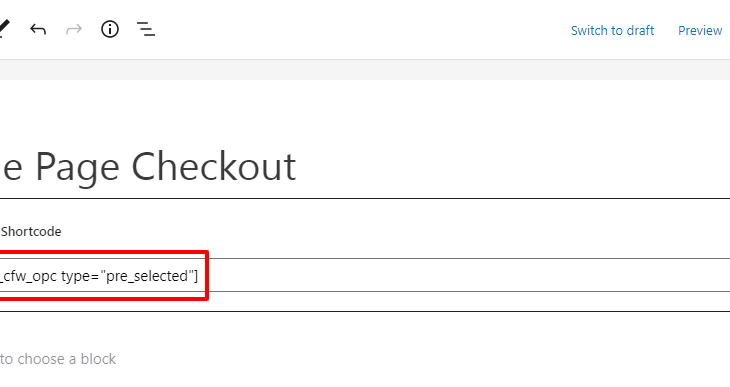
- Publish the page.
- Now go to Products. Select a product to edit it. Tick the One page checkout box. Update the product. The WooCommerce checkout shortcode will enable one page checkout option for simple and variable products (all variations). To enable it only for specific variations, the plugin will provide the One page checkout box within each variation setting.
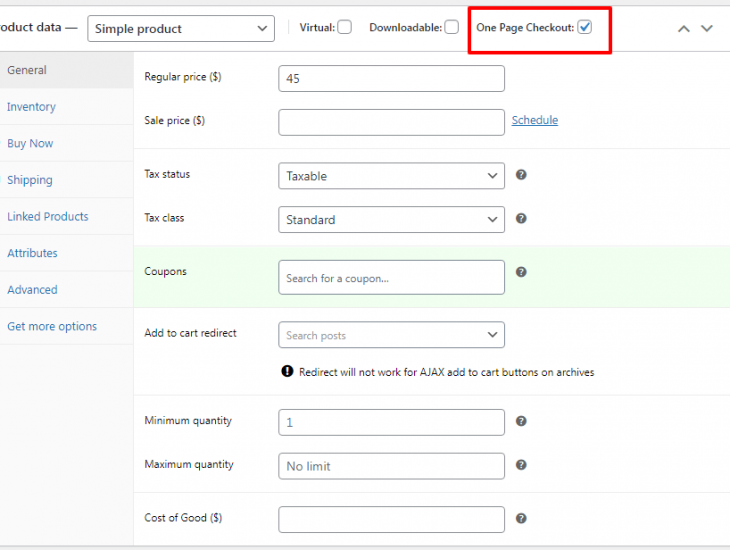
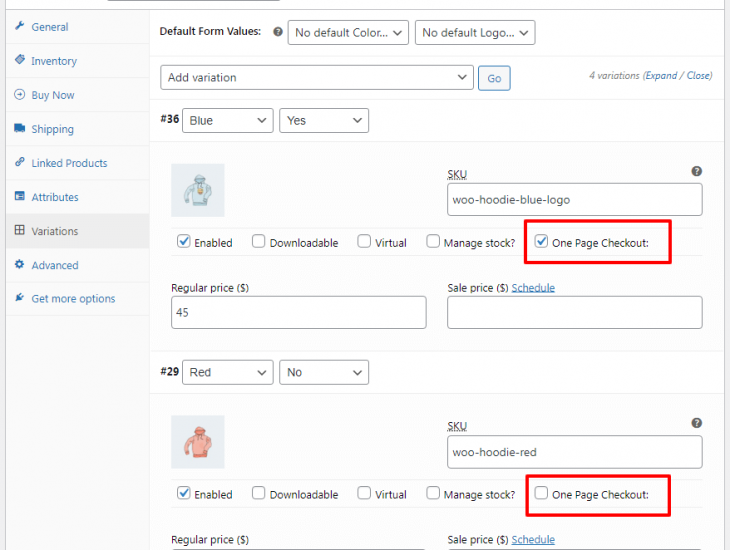
- Repeat the above step for other products you want to enable one page checkout.
That’s it.
Here’s how the one page checkout page with pre-selected products will appear on your website.
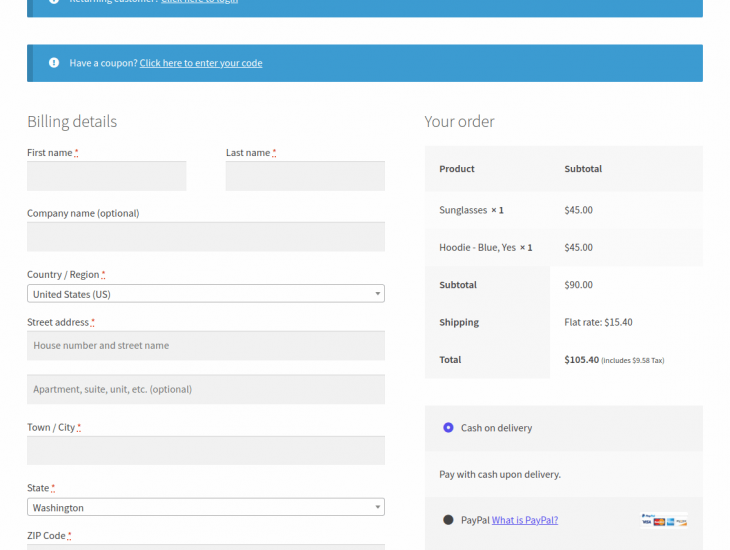
Like pre-selected products, you can set up one page checkout based on product ids and product categories.
For example, if you select product ids 270, 360 and 450 for your fiction book, mythological book and autobiography book respectively, these three books will be enabled for one page checkout.
And if you select product category as books, all your books on your store will be enabled for one page checkout. Refer to this documentation for more details.
Turn Any Page Into One page Checkout
Alternatively, if you want to directly show a one-page checkout on an existing product page, you can do that as well with Cashier.
Open any product page, click the ‘OPC’ option, choose ‘Product IDs’ from the dropdown, search and select the same product you are currently editing.
When a visitor visits that product page, a one-page checkout option will be shown below the product details.
We recommend setting this only for products like audio files and books which contains very limited product description.
Conclusion
Cashier isn’t a one-page checkout plugin, but it does a lot to optimize your checkout process.
I hope this article helped you gain the importance of WooCommerce one page checkout.
For better sales and reduced abandonment, WooCommerce one page checkout is a necessity today based on what you sell. It’s simple and users will love it too.
After all, there’s power in keeping things simple, clean and distraction-free.


Thanks for sharing the concept of WooCommerce One Page Checkout in details, keep posting such an informative posts…