Businesses that handle bookings rely heavily on date ranges to manage availability periods or associated booking dates. Consider an online store specializing in event tickets. For such specific scenarios store owners might need to keep track of when these events are happening so you can manage your ticket sales properly.
With this WooCommerce Customization, woo store owners can easily add and see the start and end dates for each event directly within the WooCommerce admin interface. Let’s find out more about how it works!
Solution: Add Custom Input Fields to WooCommerce Admin Edit Product Interface
This code adds custom date fields to the WooCommerce product editing screen in the admin dashboard. The date entered by the admin is retrieved and shown in the frontend of the product page.
add_action( 'woocommerce_product_options_general_product_data', 'ts_add_admin_product_custom_general_fields' );
function ts_add_admin_product_custom_general_fields() {
global $product_object;
echo '<div class="options_group custom_dates_fields">
<p class="form-field custom_date_from_field" style="display:block;">
<label for="_custom_date_from">' . esc_html__( 'Custom date range', 'woocommerce' ) . '</label>
' . wc_help_tip( __("This is a description for that date range fields (in a help tip)…", "woocommerce") ) . '
<input type="text" class="short" name="_custom_date_from" id="_custom_date_from" value="' . esc_attr( $product_object->get_meta('_custom_date_from') ) . '" placeholder="' . esc_html( _x( 'From…', 'placeholder', 'woocommerce' ) ) . ' YYYY-MM-DD" maxlength="10" pattern="' . esc_attr( apply_filters( 'woocommerce_date_input_html_pattern', '[0-9]{4}-(0[1-9]|1[012])-(0[1-9]|1[0-9]|2[0-9]|3[01])' ) ) . '" />
</p>
<p class="form-field custom_date_to_field" style="display:block;">
<input type="text" class="short" name="_custom_date_to" id="_custom_date_to" value="' . esc_attr( $product_object->get_meta('_custom_date_to') ) . '" placeholder="' . esc_html( _x( 'To…', 'placeholder', 'woocommerce' ) ) . ' YYYY-MM-DD" maxlength="10" pattern="' . esc_attr( apply_filters( 'woocommerce_date_input_html_pattern', '[0-9]{4}-(0[1-9]|1[012])-(0[1-9]|1[0-9]|2[0-9]|3[01])' ) ) . '" />
</div>';
?>
<script>
jQuery( function($){
$( '.custom_dates_fields' ).each( function() {
$( this ).find( 'input' ).datepicker({
defaultDate: '',
dateFormat: 'yy-mm-dd',
numberOfMonths: 1,
showButtonPanel: true,
onSelect: function() {
var datepicker = $( this );
option = $( datepicker ).next().is( '.hasDatepicker' ) ? 'minDate' : 'maxDate',
otherDateField = 'minDate' === option ? $( datepicker ).next() : $( datepicker ).prev(),
date = $( datepicker ).datepicker( 'getDate' );
$( otherDateField ).datepicker( 'option', option, date );
$( datepicker ).change();
}
});
$( this ).find( 'input' ).each( function() { date_picker_select( $( this ) ); } );
});
})
</script>
<?php
}
// Save Custom Admin Product Fields values
add_action( 'woocommerce_admin_process_product_object', 'ts_save_admin_product_custom_general_fields_values' );
function ts_save_admin_product_custom_general_fields_values( $product ){
if( isset($_POST['_custom_date_from']) && isset($_POST['_custom_date_to']) ) {
$product->update_meta_data( '_custom_date_from', esc_attr($_POST['_custom_date_from']) );
$product->update_meta_data( '_custom_date_to', esc_attr($_POST['_custom_date_to']) );
}
}
// Add custom date range to product page
add_action( 'woocommerce_before_add_to_cart_button', 'ts_display_custom_date_range', 10 );
function ts_display_custom_date_range() {
// Retrieve the custom date range for the current product
$custom_date_from = get_post_meta( get_the_ID(), '_custom_date_from', true );
$custom_date_to = get_post_meta( get_the_ID(), '_custom_date_to', true );
// Check if both dates are set
if ( $custom_date_from && $custom_date_to ) {
// Display the date range with custom styling
echo '<div class="custom-date-range" style="font-weight: bold; color: green;">';
echo '<p>Valid from: ' . esc_html( $custom_date_from ) . ' to ' . esc_html( $custom_date_to ) . '</p>';
echo '</div>';
}
}
Output
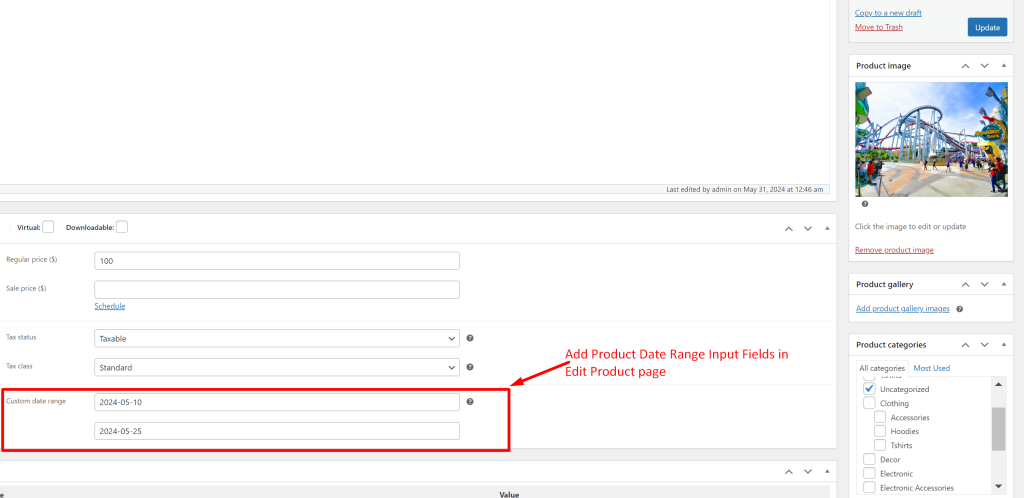
When an admin edits a product in the WooCommerce admin dashboard, they will see two additional input fields labeled “Custom date range”. Here, they can enter the start and end dates for the custom date range associated with the product.

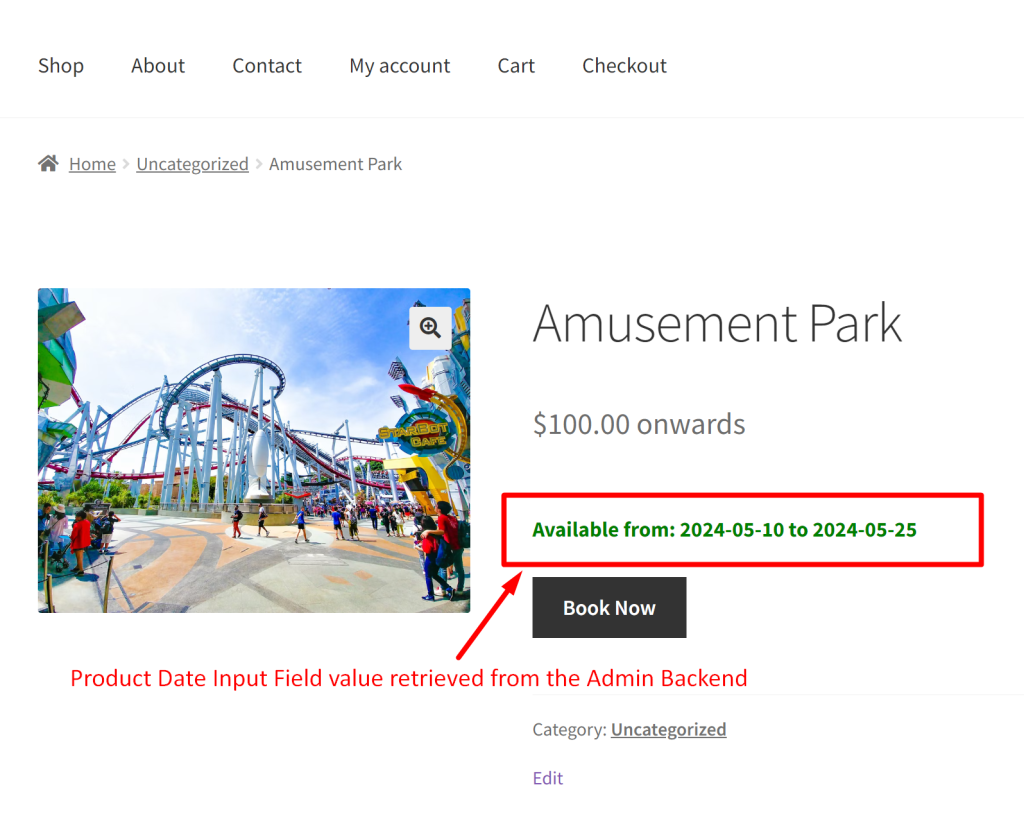
On the frontend product page, the custom date range entered by the admin will be displayed if both the start and end dates are provided. This allows customers to see the validity period of the product.

Similar to the date field integrated into the admin, you can also add a datepicker as a custom input field on the WooCommerce product page. Placing the date field on the frontend of the product page allows customers to enter their preferred delivery date.


