Capturing customer email addresses in online shopping is good for building relationships. The early capture of email addresses during the ordering process is essential to reduce cart abandonment by unknown users and retrieve their abandoned carts. This leads to a significant increase in your store sales. WooCommerce provides a method to collect email addresses on the checkout page, but one method that is often overlooked is capturing email addresses directly from URLs. This method not only obtains email addresses but also adds valuable information to your customer data.
This post will guide you on how to capture email addresses from URLs in WooCommerce.
Where to Add Custom Code in WooCommerce?
It is advisable to add the code snippets to the functions.php file of your child theme. Access the file directly from Appearance->Theme File Editor->Locating the child theme’s functions.php from the right sidebar. You can also access it from your theme’s directory file. Insert the following code snippet in functions.php. The alternative & easy option is to install & activate the Code Snippets plugin. You can then add the code as a new snippet via the plugin.
Solution: Capture Email Address From URL in WooCommerce
Imagine you want to send an email campaign to your mailing list subscribers & customers. So when they click on a link in the email, it would be nice if their mailing list email address was automatically populated on the checkout page. In such a case, you can add the email address as a parameter in the URL & upload the below code snippet on your store.
add_filter( 'woocommerce_add_cart_item_data', 'ts_save_custom_data_in_cart_object', 10, 3 );

function ts_save_custom_data_in_cart_object( $cart_item_data, $product_id, $variation_id ) {
   $topopulate = array(
      'bem' => 'billing_email',
    );
    foreach ( $topopulate as $urlparam => $checkout_field ) {
        if ( isset( $_GET[$urlparam] ) && ! empty( $_GET[$urlparam] ) ) {
          $cart_item_data[$checkout_field] = esc_attr( $_GET[$urlparam] );
      }
   }
    return $cart_item_data;
}

add_filter( 'woocommerce_checkout_fields' , 'ts_populate_checkout', 10 );

function ts_populate_checkout( $fields ) {
    $topopulate = array(
      'bem' => 'billing_email',
    );
   foreach ( WC()->cart->get_cart() as $cart_item ) {
      foreach ( $topopulate as $urlparam => $checkout_field ) {
         if ( isset( $cart_item[$checkout_field] ) && ! empty( $cart_item[$checkout_field] ) ) {
            switch ( substr( $checkout_field, 0, 7 ) ) {
               case 'billing':
                  $fields['billing'][$checkout_field]['default'] = $cart_item[$checkout_field];
                  break;
            }
         }

        }
    }
    return $fields;
}
Output
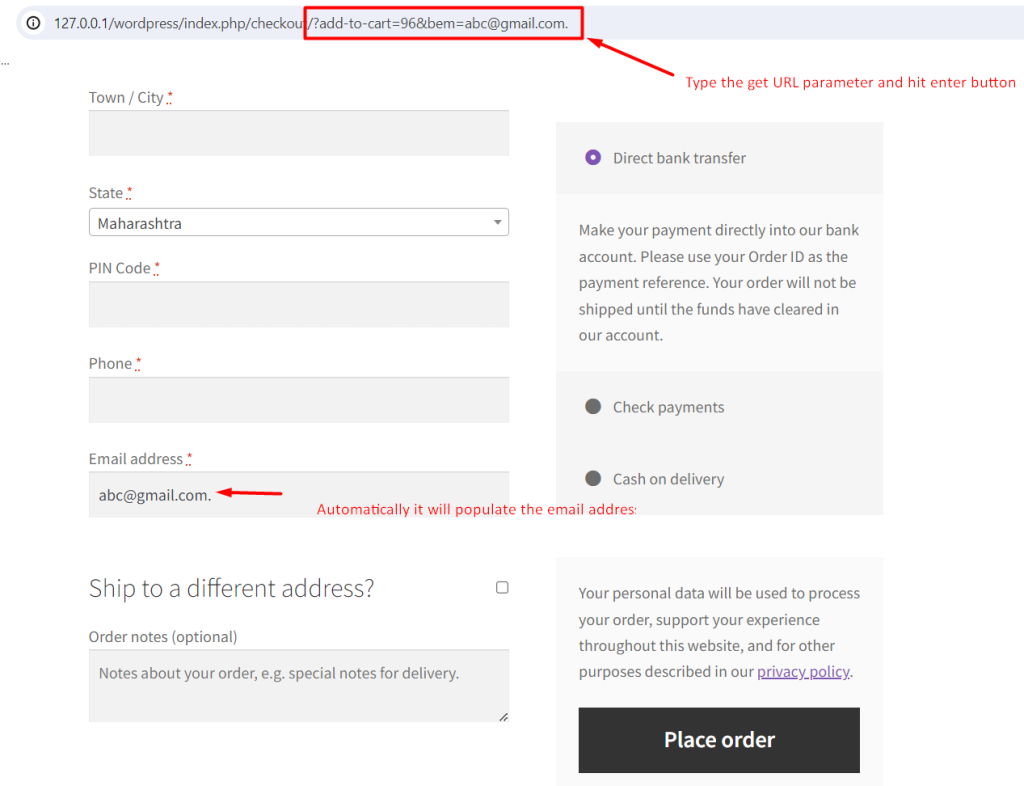
To obtain a customer’s email address, you need to add a GET parameter on either the cart or checkout page link. For instance, you can use /checkout/?add-to-cart=96&bem=abc@gmail.com. This will make the customer’s email address visible in the email address fields on the checkout page as well as in the URL. Please note that if you add the GET parameter on any other link such as the home page or product page, then the email address may not get populated on the checkout page unless further code is written to pass the GET parameter from the product page to the cart or checkout page.
In our WooCommerce Abandoned Cart Recovery plugin, when a customer receives the abandoned cart notification email & if they click on the link in the email, and then the email address is pre-populated on the checkout page. In this way, the probability of abandoned cart recovery goes higher as the customer has to enter minimal details on the checkout page.


Wondering how to bring back your Abandoned cart users?
Abandoned Cart Pro for WooCommerce is loaded with useful features that help you send an effective volume of reminders via text, email, and messenger. You can also share and manage discount codes that will encourage your customers to complete their orders.
Even better, you can stop the cart abandonment with the exit intent popup!
Code Explanation
Here’s the explanation of the code step-by-step:-
Save Custom Data in Cart Object
This function hooks into the woocommerce_add_cart_item_data filter. It adds custom data to the cart item when a product is added to the cart. The custom data includes billing email information obtained from the URL parameters ($_GET). This is useful for populating the cart with specific customer information.
Populate Checkout Fields
This function hooks into the woocommerce_checkout_fields filter. It populates the checkout fields with default values based on the cart items. The billing email fields are populated with the corresponding values from the cart items.
Conclusion
The provided code snippet enables the automatic filling of email addresses in billing address fields on the shopping cart page based on data from the website URL. This information is then transferred to the corresponding checkout fields. Alternatively, you can also capture email addresses from custom fields in the WooCommerce abandoned cart plugin that grabs emails from any custom field on the site.


2 thoughts on “How to Capture Email address from URL in WooCommerce?”
I tried your solution, but I’m getting an issue — the query parameter value isn’t being filled in the email field.
I added a log for debugging, and it prints the correct value, but the email field still doesn’t update.
My code is added in:
wp-content/themes/twentytwentyfive/functions.phpWordPress version: 6.8.3
I’ve also attached an image for your reference.
The code given in the post works for classic checkout fields, but it doesn’t automatically populate fields in the block-based checkout. This is because the block checkout renders fields using JavaScript and React on the frontend, rather than relying solely on PHP, so the ‘woocommerce_checkout_fields’ filter is not applied in the same way.