Table of Contents
We are well acquainted with the term Order Delivery Date in eCommerce scenarios. This refers to the date when the customer’s products will be shipped to them after placing an order from the shopping cart’s checkout page. We provide you with an Order Delivery Date plugin that serves this purpose.
This plugin allows customers to schedule their deliveries by selecting appropriate Delivery Date & Time for their orders. It also enables the administrator to set deliveries for specific days in the week or disable them for certain days like holidays. You can also set any charges that apply for specific deliveries.
The plugin also has a feature to allow Google Calendar Sync integration for keeping track of order delivery details upfront, thus making it convenient for users to automatically export deliveries from the plugin.
What is Google Sync and how does Google Calendar Sync work?
Google Sync is an integration process that allows you to synchronize your mail, contacts and calendars to your mobile devices. You can also set up alerts for incoming messages and upcoming events, thus ensuring easier and faster access to all that is important to you.
You can set reminders and notifications for different events including order deliveries if the notification option is enabled. Reminders are used as alarms that get triggered a few minutes before the specific event to notify you of the upcoming actions. Notifications are used to make the users aware of any changes made to the calendar events like creation of events, changes in the events or cancellation of the event, agenda creation etc.
Setting up Google Calendar for Order Deliveries
You can find Google Calendar Sync tab on the Order Delivery Date’s plugin page to setup automated export of order deliveries of your site to a Google Calendar as shown below:
 Google Calendar Sync tab
Let us look at the steps to setup this Google Calendar integration process:
- Google Developer’s Console
- Create Project
- Enable the Calendar API
- Create Credentials
- Create Service Account
- Setup the Key File Name
- Service Account Email Address
- Create Calendar
- Enter the Calendar ID
- Test the connection
- See Deliveries in your Google Calendar
- Troubleshooting
Step 1: Google Developer’s Console
You need to go to the Google Developers Console to setup a project and enable the settings in order to use the integration to Google Calendar.
Step 2: Create Project
To create a new project, click on Projects->Create Project button. A popup will be displayed asking for Project Name and Project ID. Here enter a Project Name of your preference.
Step 3: Enable the Calendar API
Once the project is created, the project folder is loaded. You now need to go to the Library link on the left-hand menu and choose Calendar API as shown below. Then click on Enable.
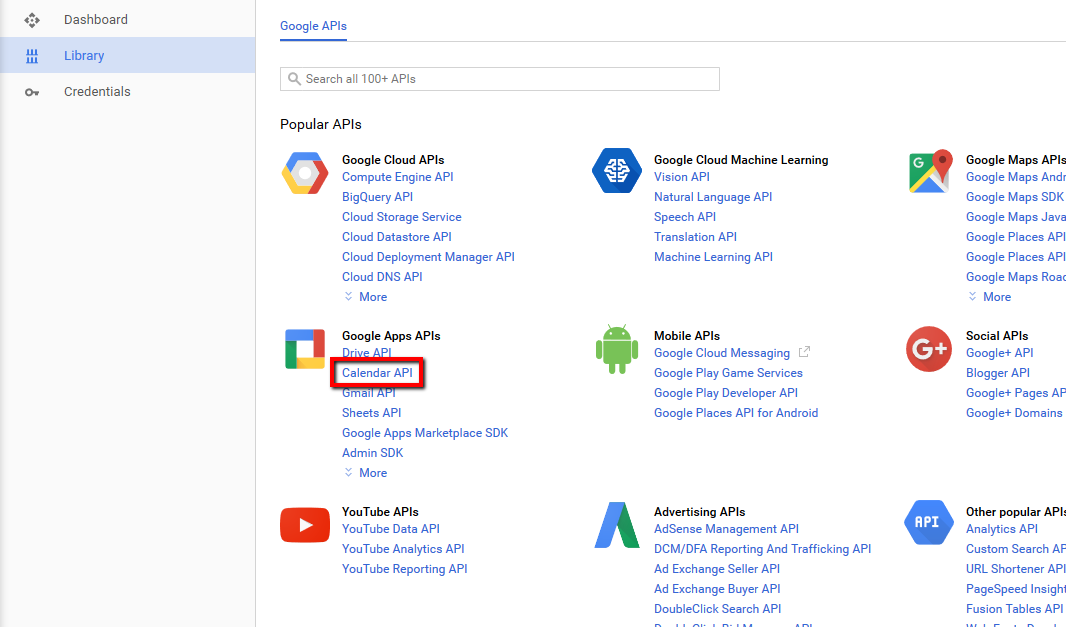
Calendar API
Step 4: Create Credentials
A notification will be displayed informing you that you may need to create credentials. So click on the Create credentials button as shown below:

Create Credentials Button
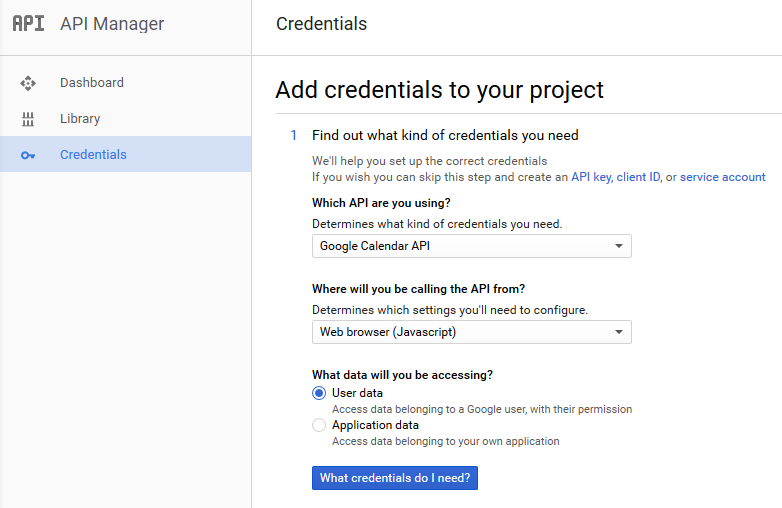
Add Credentials
Alternatively, go to API Manager->Project->Create Credentials. Click on Create Credentials->OAuth Client ID.
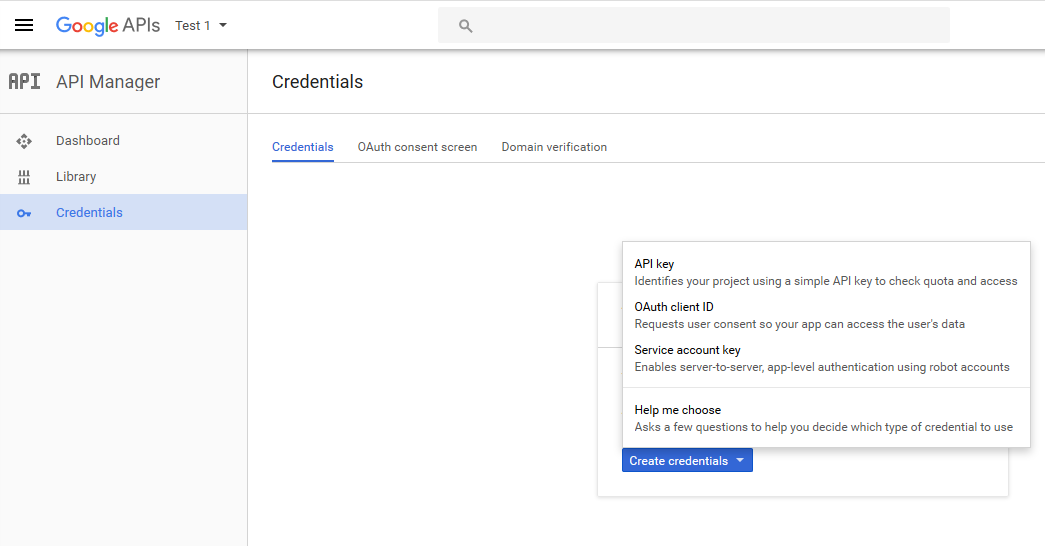
OAuth Client ID
Here go to OAuth consent screen and enter a Product Name of your preference (e.g. Order Delivery) and save. You can enter extra customization options as well.
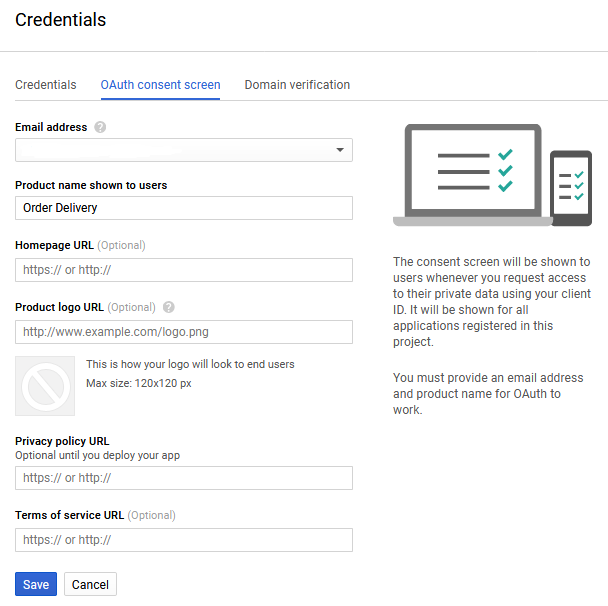
OAuth Consent Screen
Once saved, go to Create Credentials-> OAuth Cliend ID and set the Application Type as Web Application. Now enter a Name of your preference and click on Create as shown below.
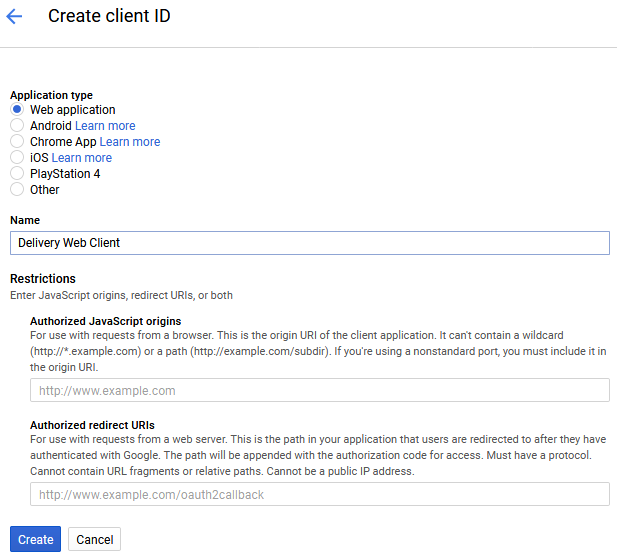
Create Client ID
This will generate the OAuth Client.

Wondering how to bring back your Abandoned cart users?
Abandoned Cart Pro for WooCommerce is loaded with useful features that help you send an effective volume of reminders via text, email, and messenger. You can also share and manage discount codes that will encourage your customers to complete their orders.
Even better, you can stop the cart abandonment with the exit intent popup!
Step 5: Create Service Account
To create a service account, first click on Create Credentials->Service Account Key and then set the Key Type to P12 and click on Create.
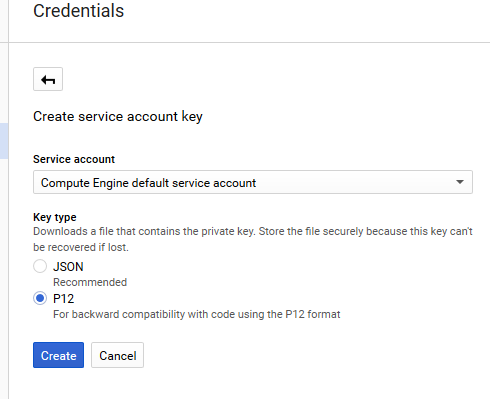
Service Account
This will open a pop-up window asking to save the file. Please save the file. This file needs to be uploaded to wp-content/plugins/order-delivery-date/includes/gcal/key/ using the FTP client program. This file is required as you will grant access to your Google Calendar account even if you are not online. So this file serves as a proof of your consent to access your Google calendar account.
Step 6: Setup the Key File Name in Order Delivery Date Settings
Copy the Key File Name (excluding the .p12 extension) in Order Delivery Date->Settings->Google Calendar Sync->Key File Name (as shown in the below image)
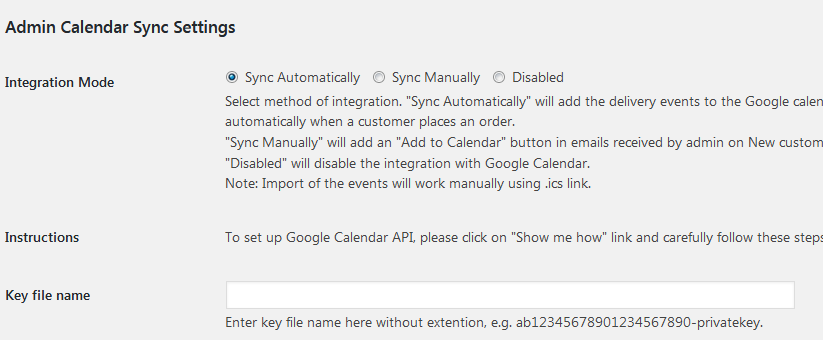
Enter Key File Name
Step 7: Service Account Email Address
Now to enter the service account email address, go to Create Credentials->Manage Service Accounts.

Manage Service Accounts
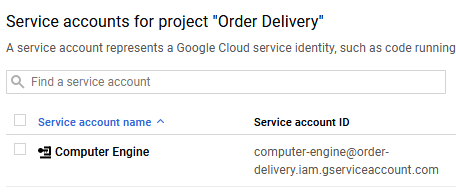
Service Account ID
Copy the Service Account ID (as shown above) and save it in Order Delivery Date->Settings->Google Calendar Sync->Service Account Email Address field (as shown below).
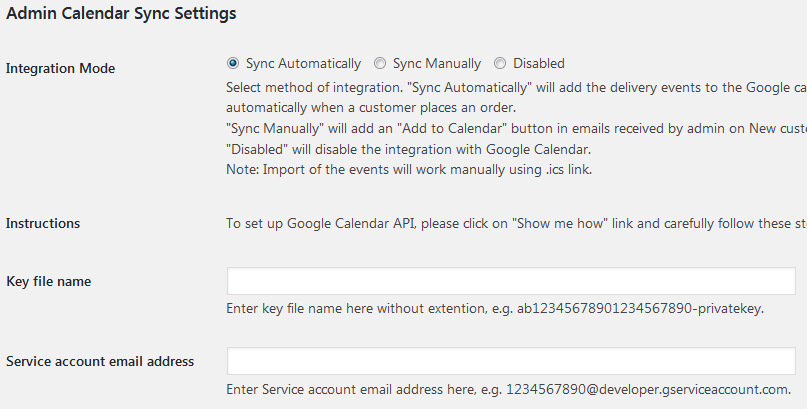
Enter Service Account Email Address
Step 8: Create Calendar
Now to create a calendar, first go to My Calendars->Create New Calendar. Please try not to use the Primary Calendar. Give the Calendar a name of your preference and ensure that the Calendar Timezone matches the WordPress Timezone on your site.
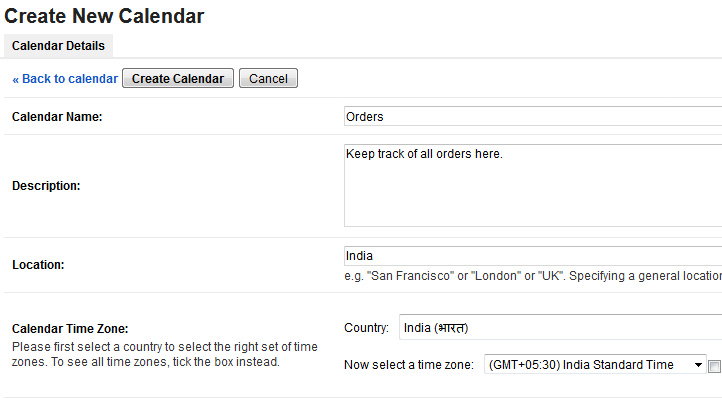
Create New Calendar
There will be ‘Share with specific people’ option below Timezone where you need to enter the email address entered in Service Account Email Address field. Set the Permission Settings to ‘Make changes to events‘ and click Add Person. This will ensure that the application can create new events. Lastly click on Create Calendar.

Share With Specific People
Step 9: Enter the Calendar ID
Once the calendar is created, copy the Calendar ID from Calendar Settings-> Calendar Details as shown below:

Calendar ID
Copy this ID to Order Delivery Date->Settings->Google Calendar Sync->Calendar to be used as shown below:
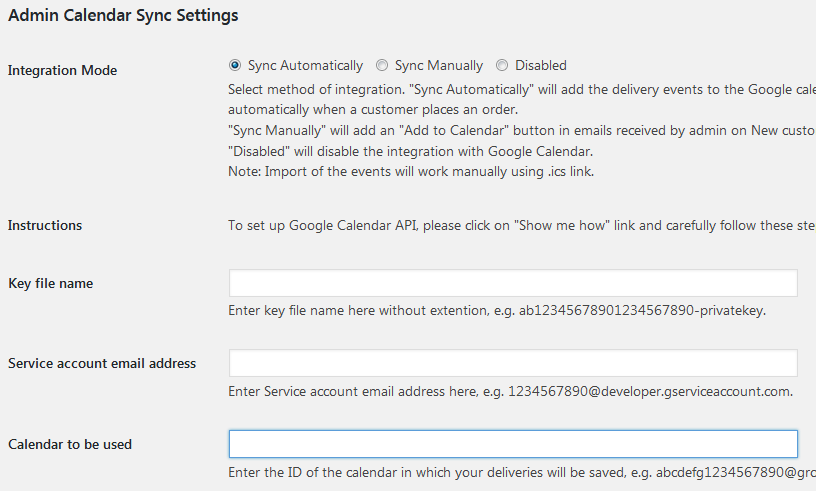
Enter Calendar ID
Step 10: Test the connection
Save the above settings in Order Delivery Date->Settings->Google Calendar Sync and click the Test Connection link. This should add a current dated event in your calendar as shown below:

Current Dated Event
See Order Deliveries in your Google Calendar
Once the settings are done, the plugin will export all your order delivery details to the calendar as soon as an order is placed. Below image is an example of how your order delivery details will appear in Google calendar:

Exported Delivery Details
The event will contain the order and client details based on the merge tags inserted in Order Delivery->Settings->Google Calendar Sync->General Settings.
Troubleshooting
Error: invalid_client – no application name

This error can happen when trying to connect to the Google API for the first time. To solve this, go to the Google Developer Console and select your project, then go to API & auth->Consent and fill in the PRODUCT NAME field.
Conclusion
Exporting deliveries automatically to Google Calendar Sync ensures easier and faster access to all your deliveries on the suitable devices. We also provide manual sync of the deliveries to any other calendar using ICS files. We will be discussing this in our future posts.
FAQ
1. What information about deliveries is sent to the Google Calendar?
When a new delivery has been placed on your site, the event summary and event description is created based on the settings in Order Delivery Date->Google Calendar Sync->Event Summary (name) and Event Description fields.
A variety of merge tags are available. You can setup the description and summary to best suit your needs. In a scenario where no settings have been saved, the default values for both the fields are used.
2. Are deliveries added to the Google Calendar automatically synced to the delivery calendar on my site?
Yes, the plugin provides 2 way sync. Settings are required for import. If the import is setup at the global level i.e. Order Delivery Date->Google Calendar Sync->Import Events, then the events are imported and new orders with the delivery dates will be created with pending payment status. Admin has to add the necessary customer details and products to the orders.
3. Test Connection failed. What should I check first?
If you have followed all the steps above and yet the test connection has failed, the first thing to check for is the orddd-log.txt file.
If it contains a message indicating that the event could not be inserted as the calendar was not found, then the most likely reason for this could extra leading and trailing spaces in Order Delivery Date->Google Calendar Sync->Calendar to be used field.
If it contains a message indicating access to the calendar was forbidden, then it could be possible that the Service Account email address permission has defaulted to ‘See all event details’ instead of ‘Manage changes to events’ in the Sharing options for the calendar.
If all of the above is set correctly and yet the events are not being created, please feel free to contact us.
4. Which ICAL feed address should be used for Import?
If the calendar is a private calendar, then please use the ICAL feed from the ‘Private Address’ field in the Calendar Settings.
If the calendar is a public calendar, then please use the ICAL feed from the ‘Calendar Address’ field in the Calendar Settings.


