In v4.6.0 of Booking & Appointment Plugin for WooCommerce, we have released three important features as listed below:
i. Resources
ii. Integration with Dokan
iii. Integration with WC Vendor
In this post, we will see how the Resources work and how you can utilise it for your online business.
Introduction
We have so far seen how a service can be booked and availability of it is only effective for that particular service. But with this functionality, you can add a resource to multiple services and share the availability of it among all. This means the availability of resources is global across all bookable products.
Let’s take an example of a Role, this we refer to as an Expert of a Beauty Salon who can be booked for a specific occasion like birthday or christmas party, for several hours. Also the same resource can provide services for multiple nights for a destination wedding as well. Hence more than one service can be provided by the same resource but not at the same time.
Similarly, as an instance for a Product, we would refer to a Party Hall which can be booked for different events at different times. Like the same hall can be booked for birthday parties, corporate events or marriages etc. but not all at the same time.
Moving further, for better understanding of how resource functionality can work with different businesses, let us learn about how adding settings and assigning the resources works with 3 booking types that we provide in our plugin.
Adding Resource and Assigning it to the product
Adding new Resource:
You can add/edit resource from Bookings -> Resources submenu.
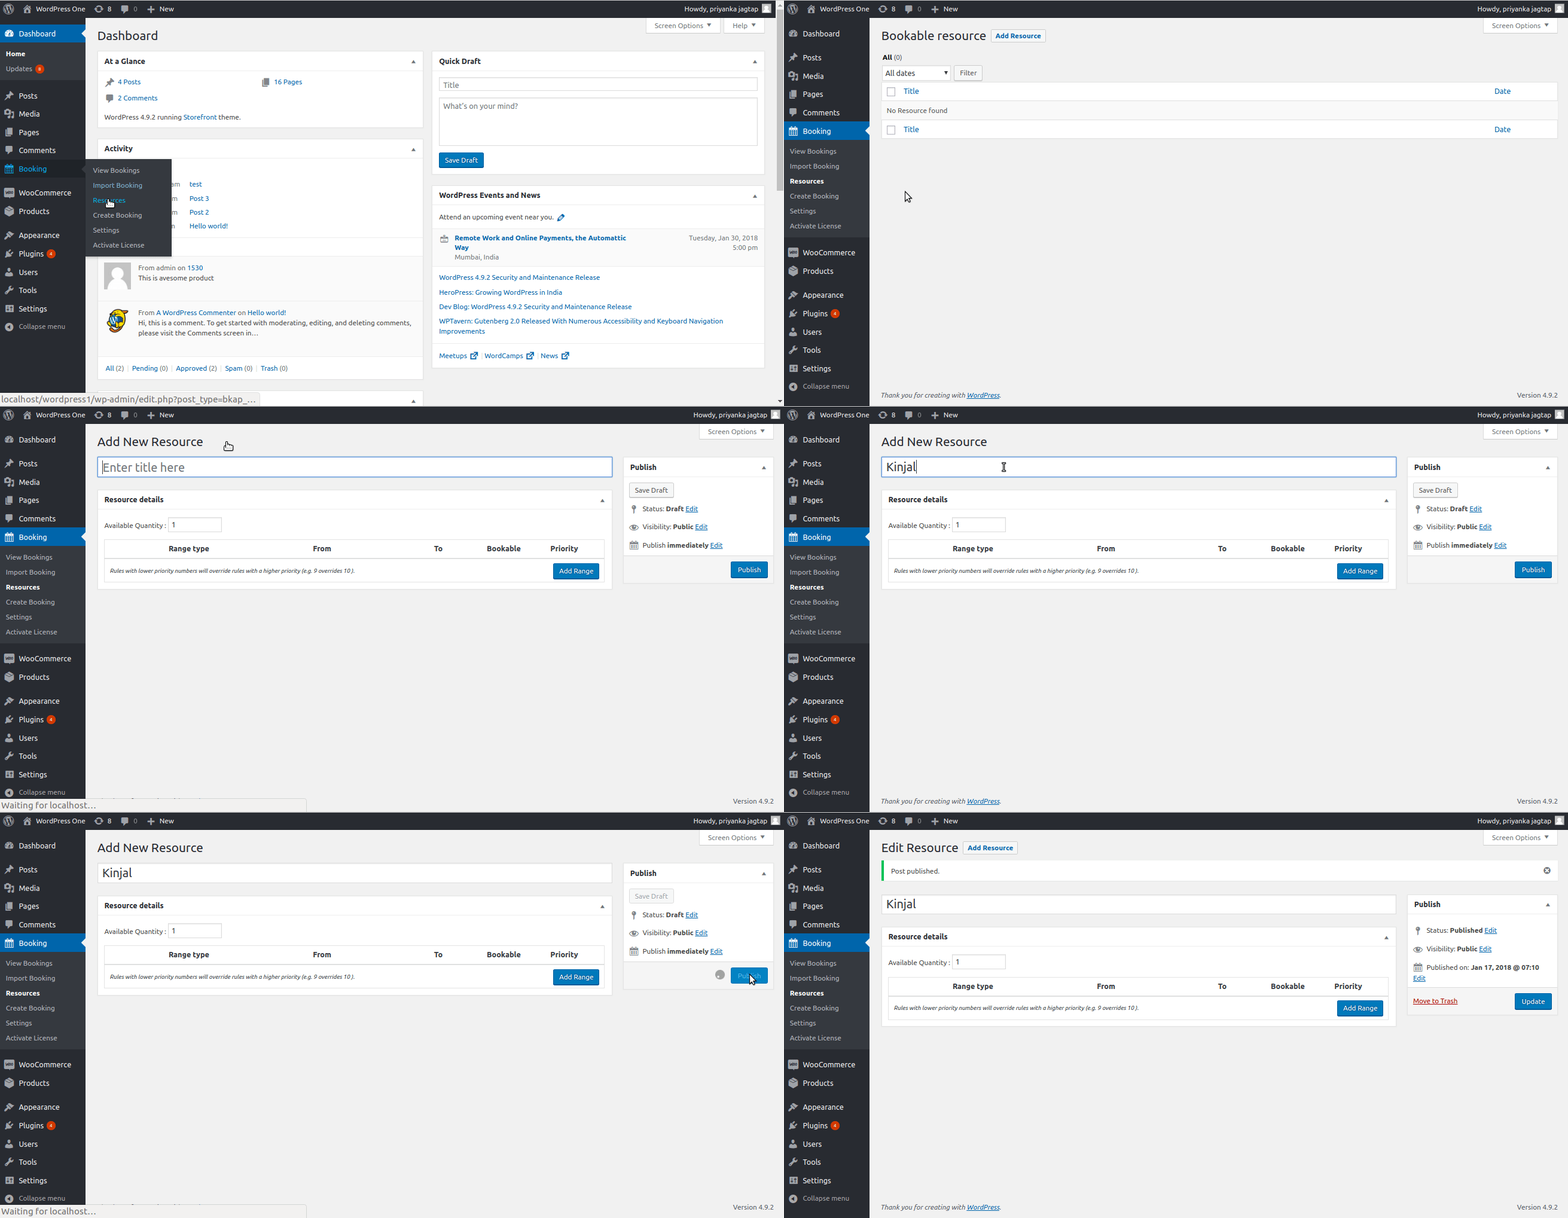
Adding resources at global level
Assign the resource to the product:
On the Edit Product page, under the Booking meta box, there is an option called Booking Resource. Enabling this option will allow to add the resource to that product.
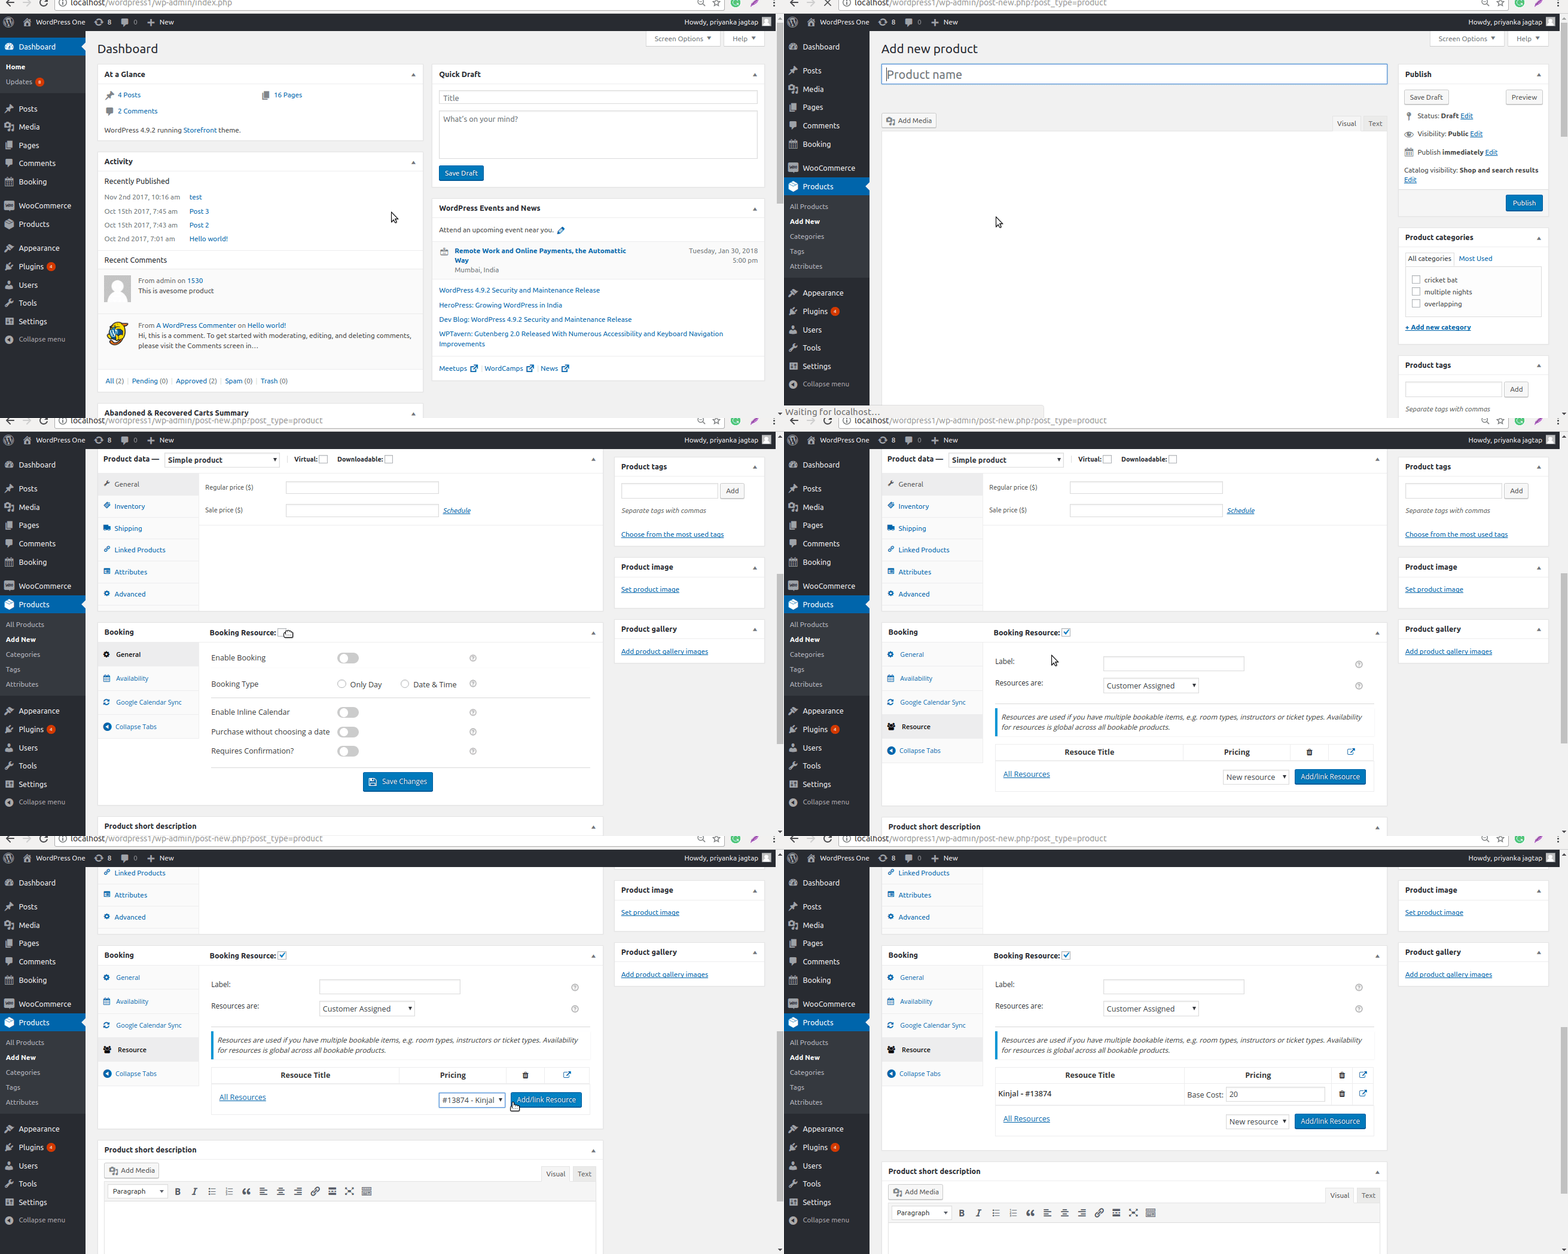
Assigning a resource to the product
Now let’s see how the Resource can be used for all three booking types we provide in our plugin.
Type 1 – Single Day Booking
Product Name – One Day Bridal Package
Here you can add a resource/person that provides service for the whole day. Depending upon the availability of the resource, maximum bookings can be taken for that day.
Type 2 – Multiple Nights Booking
Product Name – Outdoor Wedding Booking
Here you can add a resource/person that provides service for one or more than one night. The resource can be charged for the entire specified period of booking or on per day basis.
Type 3 – Time Slot Booking
Product Name – Reva Beauty Salon
Here you can add a resource/person that provides service as per time slots assigned. Services are booked as per availability of the resource.
How does this work?
To utilize Resource feature you need to update the Booking plugin to the v4.6.0 and higher version.
Once the Booking plugin is updated to latest version, on the Edit Product page, a new checkbox of Booking Resource will be added in the Booking meta box. When you tick this checkbox, a new tab Resource will be added as shown in the below screenshot:

Adding Resource tab in the booking meta box
So now let’s understand how resources can be booked as per availability for each of these instances.
Type 1 – Single Day Booking
In this instance, we will create a product named One Day Bridal Package. We will enable the Booking option and select Booking Type as Only Day -> Single Day. As we have ticked the Booking Resource checkbox, Resource tab is added to the meta box as shown below. Click on the Save Changes button.

Selecting booking type as Single Day
Now let us add availability settings by going to the Availability tab and adding values as shown below:

Adding Availability settings
Note: Always set maximum bookings greater or same as resource availability because resource availability value will be considered first.
Now moving ahead, let us add the resource details to this product. For this, go to Resources tab as shown below:
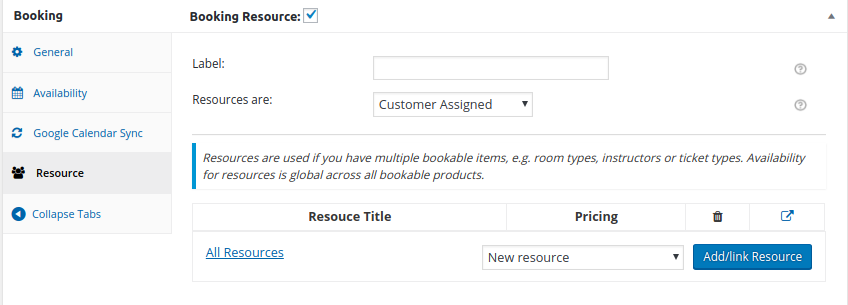
Resources tab display
There are three resource options available as stated below:
i. Label: You can set the label of resource dropdown that appears on the front end product page.
ii. Resource are: You can allow your customer to select the available resource or the resource can automatically get assigned to the service when it is booked.
iii. Resource table: Here, you can add an already created resource. Also, you can directly create a new resource and add it to the service.
Now go to Resource tab and set the label as Resource to be booked and select Customer Assigned option as resource type. In the Resource table, select Kinjal from the resource dropdown and add it by clicking on Add/Link Resource button. Once added, you can set the resource base price as $30 as shown below.
Note: The base cost is an additional amount to be paid from the usual price for this product to the resource.
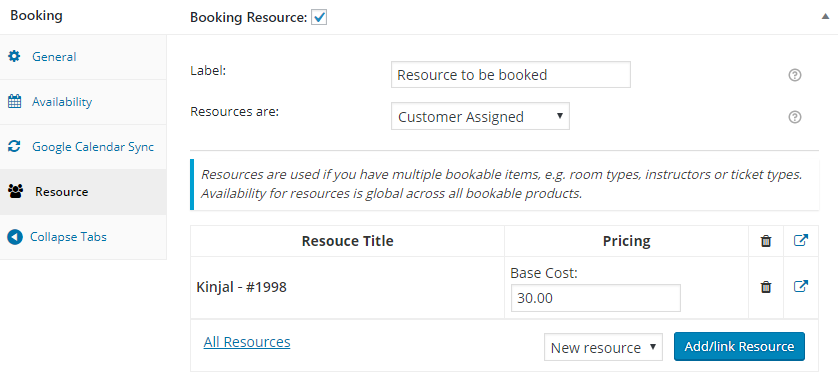
Adding settings for the resource Kinjal
Once you have saved all the booking details, availability settings and resource details, click on the Publish button to make this product live for the customers to book.
Below is how the front end of the products page for One Day Bridal Package product will appear:

Front end of product with resource to be booked assigned
As you can see, there is a dropdown for selecting the resource because the resources are Customer Assigned in the back end. The selected resource name appears on the product page with its base cost displayed as Kinjal – (+30.00) in the above screenshot.
Let us select the date for booking and add the product to cart.

Selecting the date to book the resource
The resource Kinjal is selected for 17th January, 2018 and the total cost for the booking will be $130 as the Regular Price is $100 and Kinjal’s additional charge (eg. conveyance etc) for the service is $30.
As you can see, 1 bookings are available on 01/17/18 message is being displayed for selected booking date. This is because Kinjal’s availability is set to 1 in the Booking-> Resources-> Kinjal-> Available Quantity option in Resource details meta box.
Now click the Add to cart button. The product will be added to the Cart and its details will be displayed as shown below:

Booking details on the Cart page
If you see, the booking and resource details are displayed under the product name.
Here, if you do not wish to make any changes to the details, then click on the Proceed to checkout button to go to the Checkout page and place the order. Upon clicking, the Your order section will appear as shown below:

Booking details on the Place order section
Recheck all the booking details before confirming the order. If all looks fine, click the Place order button to place the order. You will now be taken to the Order confirmation page where your Order details will be displayed as shown below:

Booking details displayed on the Order confirmation page
This is how we can assign a resource to a single day product for booking service for the selected date.
Type 2 – Multiple Nights Booking
On similar terms, let us book service for multiple night product and assign the same resource to it.
Firstly add a new product Outdoor Wedding Booking and set a regular price for it as $300. Now enable the Booking option and select Booking Type as Only Day -> Multiple Nights and save changes as shown below:

Enable booking and select booking type as Multiple Nights
Now enable the Booking Resource option to display the Resource tab in Booking meta box for assigning a resource to this product. Assign an appropriate resource from the Resource tab and add its base cost as explained in the Single product One Day Bridal Package. So, let us assign same resource Kinjal and add her base cost as $50 as shown below:
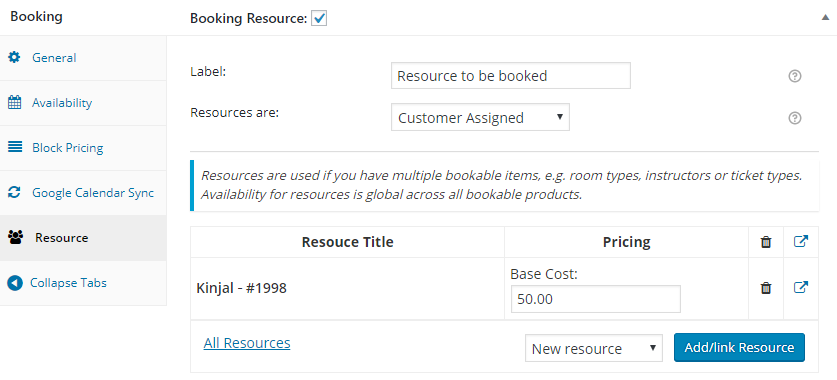
Selected same resource Kinjal for Multiple Nights product
Now let us add the availability settings by clicking the Availability tab and adding the values as shown below:

Availability settings added
Since this is a multiple night product, you can also add Fixed Block Booking and Price By Range Of Nights feature along with Resource feature.
Thus all the features of multiple nights product will be applicable here and the resource added to the product will be displayed on the front end as shown below:
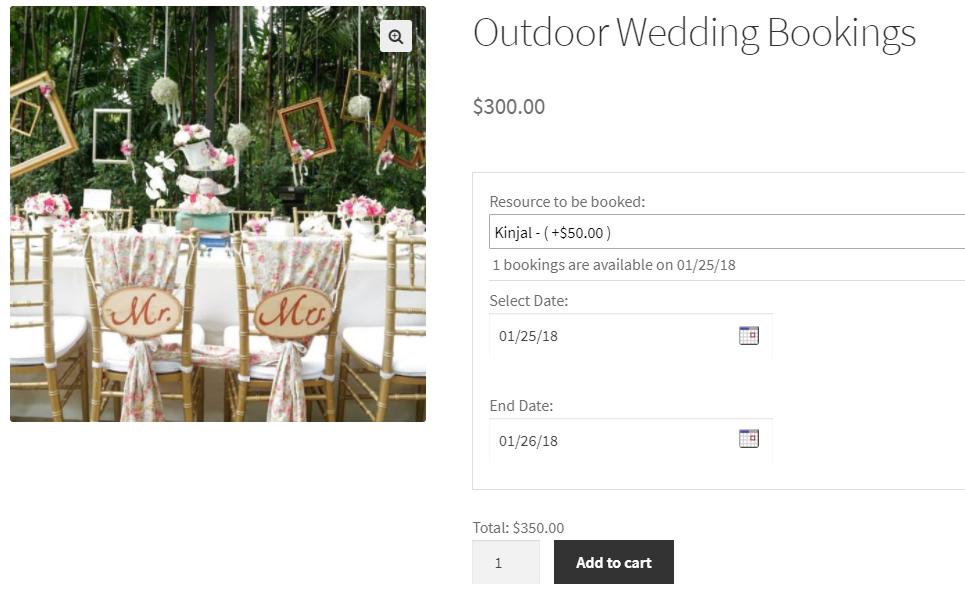
Front end of multiple nights product – Outdoor Wedding Bookings
Here we have selected Kinjal for Outdoor Wedding Booking from 25th January to 26th January, 2018 and the cost for this service booked is $350, where the additional resource charge of $50 is added in the total.
Now click the Add to cart button. The product will be added to the Cart and its details will be displayed as shown below:
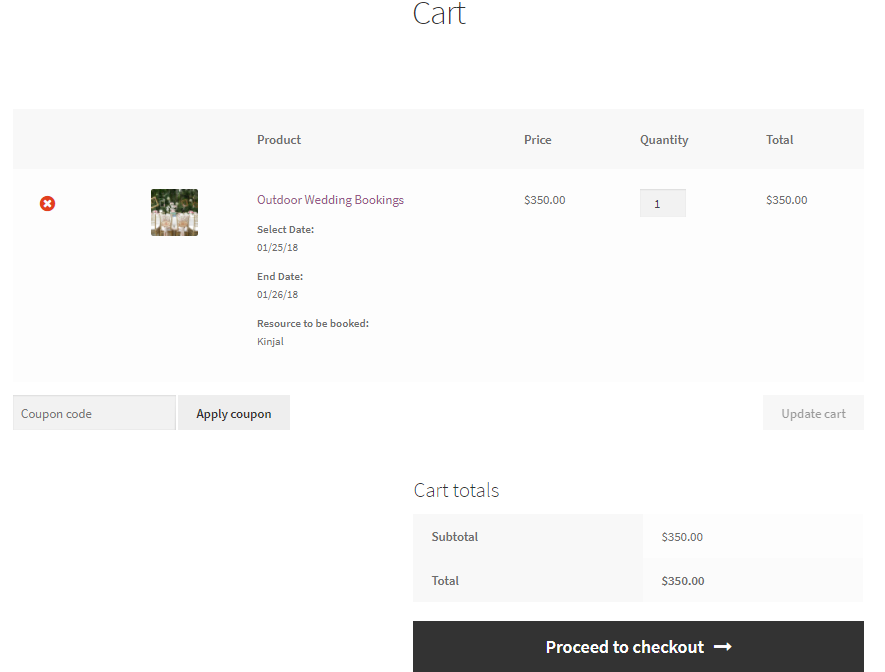
Cart page showing booking details
Here, if you do not wish to make any changes to the details, then click on the Proceed to checkout button to go to the Checkout page and place the order. Upon clicking, the Your order section will appear as shown below:
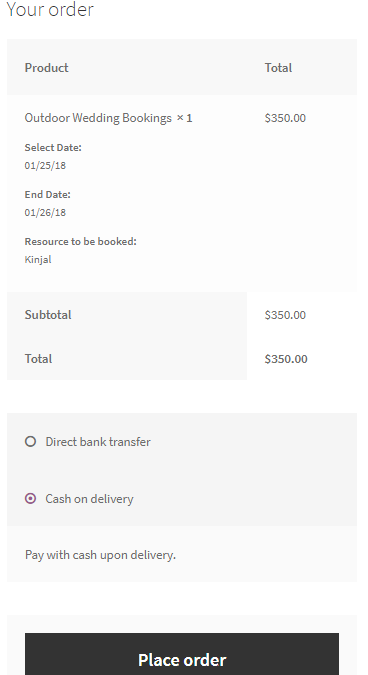
Booking details shown on the Checkout page
Recheck all the booking details before confirming the order. If all looks fine, click the Place order button to place the order. You will now be taken to the Order confirmation page where your Order details will be displayed as shown below:
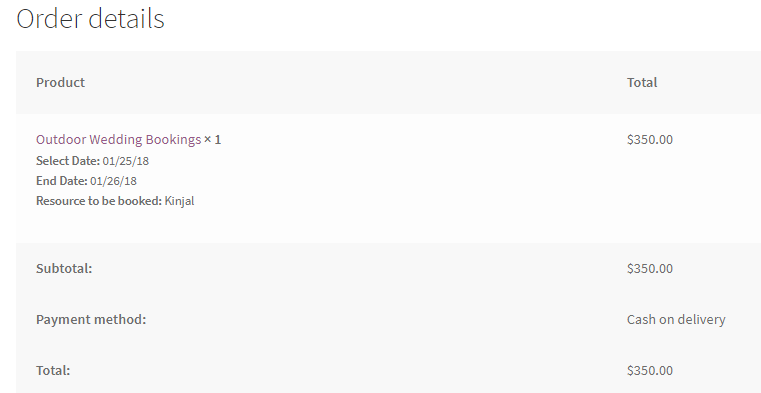
Order Confirmation page showing booking details
This is how we can assign a resource to multiple night product for booking services for the selected dates.
The above instance showed how the cost for a resource is calculated for the full duration of the booked dates. But if you want to charge a resource on per day basis, you can enable the setting Charge Resource cost on a Per Day Basis option from General Settings tab under Bookings-> Settings-> Global Booking Settings page as shown below:

Selecting the option for charging on Per Day basis
According to this setting, the resource’s cost will be multiplied with the number of days booked and the total price will be calculated.
Type 3 – Time Slot Booking
Now we shall discuss how to add resource to a booking which is based on time slots. For this we will first make a bookable product named Reva Beauty Salon and add its regular price.
Enable Booking option and select Booking type as Date & Time. Also enable Booking Resource to add resource to the product and click on Save Changes button as shown below:

Enabling booking and setting booking type as Date & Time
After this, add availability details from the Availability tab which is set to 10 bookings per weekday and also add time slots for taking bookings. Let us add 2 time slots for all weekdays with maximum bookings set to 5. Time slots added are from 9am to 11am and 1pm to 3pm with additional price of $100 for each timeslot as shown below:

Adding availability and timeslot details
Let us now add the resource from the Resource tab, like we did in the previous 2 examples. Here again will add same Kinjal as the resource and add her base cost as $30.

Added resource as Kinjal and her base cost as $30
Thus our product is ready to take bookings now. The front end of Reva Beauty Salon will appear as below on the Products page:

Product displayed on the front end
Now add the booking details as shown below:

Product displayed on the front end
Here we have selected Kinjal to be booked for 19th January, 2018 for 1pm to 3pm timeslot. Hence the total cost for this booking will be $100 + $30 (Kinjal’s charge) = $130. Click on Add to cart button to proceed the Cart page where the product will be added and its details will be displayed as shown below:

Cart page showing all booking details
Here, if you do not wish to make any changes to the details, then click on the Proceed to checkout button to go to the Checkout page and place the order. Upon clicking, the Your order section will appear as shown below:

Checkout page displaying all booking details
Recheck all the booking details before confirming the order. If all looks fine, click the Place order button to place the order. You will be now taken to the Order confirmation page where your Order details will be displayed as shown below:

Order details showing on Order confirmation page
Finally the product with the selected timeslot has been booked.
All the 3 orders which we just booked above will appear on the View Bookings page with booking details and name of the resources added as shown below:

View bookings page showing added products with resource name
As you noticed in all the above examples and screenshots, that when a resource was added, its name appeared at various places like:
- Product Page
- Cart Page
- Checkout Page
- Order Received Page
- View Bookings Page
Other than these, there are additional sections/pages where the resource name will be displayed other than the booking process as shown below: (Below we have taken screenshot of Timeslot booking example for product Reva Beauty Salon)
1. Order section on My Account page

Resource name displayed on the Orders section of My Accounts page
2. Email Notification for order

Email notification showing the resource name added
3. Calendar View of all bookings

The resource booked for Reva Beauty Salon appears on the calendar
Validations
Now heading towards the main part where validations apply. This means as per the functionality of the plugin, one resource can provide different services but not at the same time.
We have added Resource – Kinjal to all 3 examples explained above, let us see how her availability appears on the booking calendar for the customers to select and how they are restricted in selecting her for different services for the same day.
There are 2 types of validations:
- Availability message validation
- Cart Page validation
Availability message validation
Availability message is displayed above the booking field and it will give information of the availability of the product for selected booking details.
Suppose a customer has already added the booking to cart and then revisits the product page and selects the same resource and booking details, then the availability notification message will be displayed that the booking is already added in the cart.
Say we book resource Kinjal for 20th March, 2018 for One Day Bridal Package product. Then again when we select the same product and same booking details and if it has reached her maximum availability, then the message will show up as You have all available spaces for this date in the cart. Please visit the cart to place the order as shown below:

Resource selected for One Day Bridal Package product
Now say the Order is placed for 20th March, 2018 for Kinjal:

Order details showing up for the booking
The Availability Quantity for this resource – Kinjal is set to 1 for each day as shown below:

Maximum bookings to be taken for each day is 1
Now if some other customer comes to book the same product for Kinjal for same date 20th March, 2018, then the booking calendar will show this date disabled as the availability for Kinjal for the given date is set to 1.

Resource booked for 20th March, 2018
As you have noticed, 20th March 2018 is shown booked on the booking calendar because Kinjal is booked for One Day Bridal Package for the same date already.
Cart Page validation
In this case, say a customer adds a particular resource and booking details for a service in the cart. Now if the same resource with different service is already present in the cart with maximum available quantity for the selected dates, then such an action should be validated.
Example – Customer has booked Kinjal for Outdoor Wedding Bookings from 1st February 2018 to 19th February, 2018. Now if the customer tries to select One Day Bridal Package for the same dates and same resource, then a notification message will appear on the Product page as shown in the below screenshot:
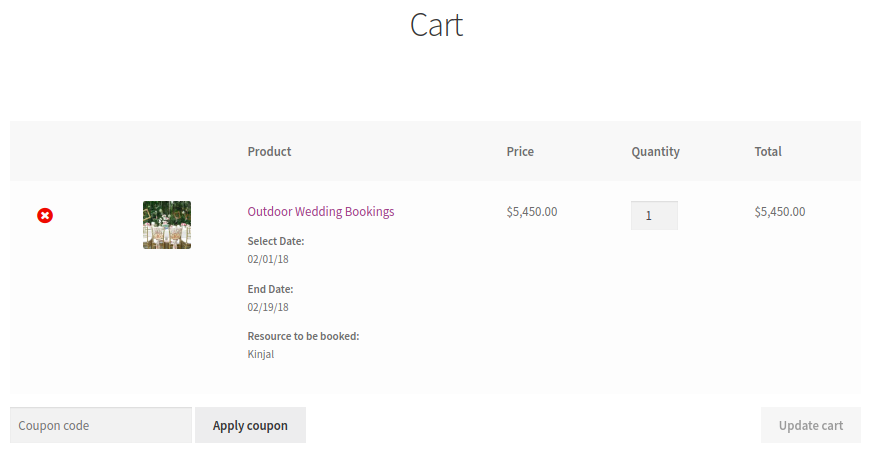
Cart shows resource Kinjal
Now if you try to add One Day Bridal Package for 9th February 2018 then it will show You have all available spaces for Kinjal on date 02/09/18 in your cart. Please visit the cart to place the order error message as shown in below screenshot.
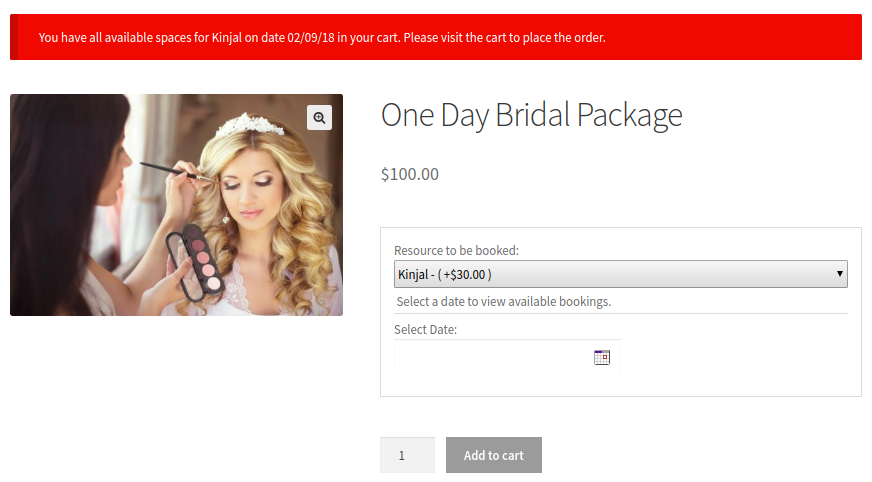
Cart showing error message
On the Cart page, when a customer tries to increase the quantity for the product for more than resource’s availability, then a notification message appears as shown below:
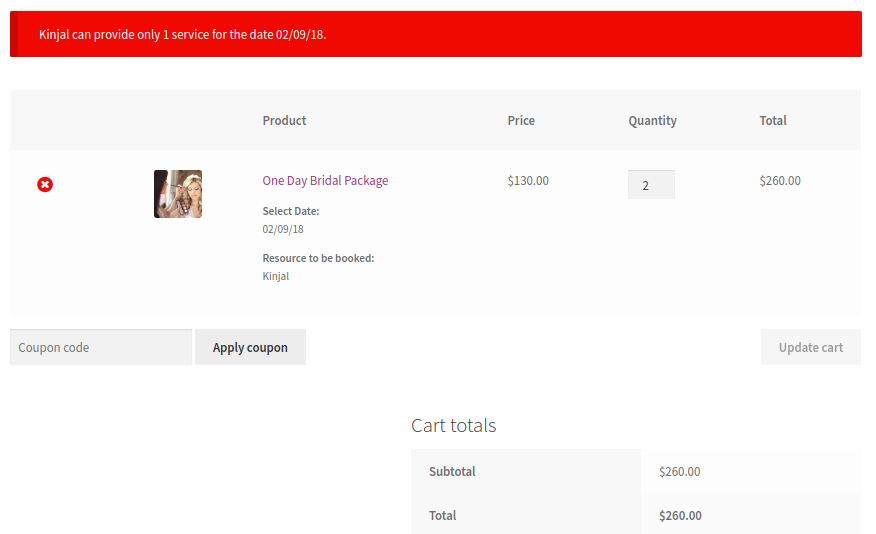
Notification message appears when quantity exceeds
As shown in the above screenshot, Kinjal is available only for 1 quantity and if the customer tries to increase the quantity more than that, then the notification message gets displayed as Kinjal can provide only 1 service for the date 02/09/18.
Resources Page Explanation
Now let us explore the Resources page and understand the different settings on this page. A typical resources page will look as shown below:

Resources page listing all the resources
There are different resources listed on this page and to edit them, simply mouse hover as shown above. Let us set Kinjal’s resource page and add different settings for her. The Edit Resource page for Kinjal will look as shown below:

Resource Edit page appearance
Here you can set the total availability for the resource and also add different settings in the Range Type. As you can see there are 4 different range types, you can set her availability as per date range, months, weeks or days.

Resource Edit page options
You enable the Bookable option when you want to show Kinjal’s availability and keep it disabled to show that Kinjal is not available for selected dates on the booking calendar. Thus you can add holidays for her as well as show when she will be available for the services. These resource settings will reflect on all products in the shop.
Let us understand all 4 Range types with an example.
Date Range:

Adding date range for the resource
We have selected the range of dates from 15th February to 18th February, 2018 when Kinjal will not be available to provide the service. Hence the bookable option is kept disabled and priority is set to 10.
Let us see how this will reflect on the front end of the product on the booking calendar.

The dates are disabled on the booking calendar
As you can see above, because Kinjal was set to not provide services from 15th January to 18th January 2018, these dates are showing disabled in the booking calendar.
Range of months:

Range of months setting for the resource
Now let us select the Range type as Range of months and add whole months of February and March bookable for Kinjal. Also its priority is set to 9.
Note: The resource setting for range type which has lowest priority set will be considered first.
Therefore as seen in the above screenshot, Range of months priority is lower than that of Date range, hence settings of Range of months will be considered. This means all the dates for months February and March will be shown available on the booking calendar for Kinjal as shown below:

All dates for month of February is shown available
Thus, even when Kinjal was set as not available from 15th January to 18th January,2018 as per the first example, here she is shown available because of the priority settings.
Range of weeks:
In Range of weeks, you can either assign the full week for availability or make it disabled for booking, by enabling or disabling the bookable option.
Here we are making Kinjal non-bookable for Week 8 of the year and setting the priority to 8 as shown below:

Adding details to Range of weeks
Now since the priority of Range of weeks is lower than Date range and Range of months, the settings of Range of weeks will be considered.
This means Week 8 of the year which is from 19th February to 25th February, 2018 will be shown as not available for booking for Kinjal as shown below:

Week 8 of the year is shown disabled on the calendar
Range of days:
In Range of days, you can have specific days of the week set for availability or set as non-bookable. Here we have set all Tuesdays and Wednesdays unavailable for Kinjal to be booked as per the priority settings which is set to 7.

Range of days settings added for the resource
Now let us check how these settings would reflect on the front end for Kinjal.

Tuesdays and Wednesdays disabled on booking calendar
The above screenshot shows that Kinjal is unavailable for all Tuesdays and Wednesdays for this service. This means despite of all other settings, Range by days was considered because its priority was set lowest than the other Range types.
Thus Resources page for setting Range type plays a vital role in adding the resources availability for booking.
Conclusion
In today’s consolidated post on Resources, we explored every smallest of the settings associated with this new functionality of our Booking & Appointment Plugin for WooCommerce. This newly added feature will prove to be the best solution for businesses where they provide different services and have to manage huge resources.
We have covered every aspect of service industry and keeping in mind its core requirements, have introduced this new and powerful version of Booking plugin.
So why waste time lingering around the web for other solutions.
Come Grab the Power today!!!


