


Ever wondered how to create a custom email template that is visible in WooCommerce->Settings->Emails and can be managed and customized the same way as all other WooCommerce emails?
This post will guide you through WooCommerce’s inbuilt email templates structure & also understand how to create custom email templates in WooCommerce.
This can be done very easily using 2 WooCommerce email classes, WC_Emails and WC_Email. These are the 2 main email classes. The WC_Emails class is present in woocommerce/includes/class-wc-emails.php. The WC_Email class is present in woocommerce/includes/emails/class-wc-email.php.
Apart from these, they have email classes for each of the emails and the templates as well. Some of the email classes present are class-wc-email-new-order.php, class-wc-email-failed-order.php and so on. All of these email classes are present in woocommerce/includes/emails/ folder.
The templates for these are present in woocommerce/templates/emails/ folder. The html templates are present in the folder itself, whereas the plain text templates are present in woocommerce/templates/emails/plain/ folder.
WC_Emails sends all the transactional emails. It loads all the available emails to be sent out when triggered (yes, we need to write those triggers for our custom emails!).
The WC_Email class is the one that is extended by each of the email template classes to add emails to WooCommerce. This is the class that helps us configure all the emails provided by WooCommerce.
It lists the emails in the Email Notifications page in WooCommerce->Settings->Emails.
In-Built WooCommerce Email Templates
Below is a list of emails included in WooCommerce by default:
- New Order – this notifies the store admin when a new order is placed on the website.
- Cancelled Order – This notifies the store manager of orders that have been cancelled.
- Failed Order – this notifies the store manager of a failed order.
- Order On-Hold – this contains order details and is Triggered when the order status is changed to “On-Hold” and goes straight to the customers.
- Processing Order – sends to the customer and contains details of the order. The function is triggered when the order status is changed to “Order Processing”.
- Completed Order – sends to the customer and contains details of the order. Triggered when the order status is changed to “Order Complete”.
- Refunded Order – sends to the customer when an order is refunded.
- Customer Invoice – sends to the customer and contains order information and payment links.
- Customer Note – sends out to customers when a store owner adds a note to the order.
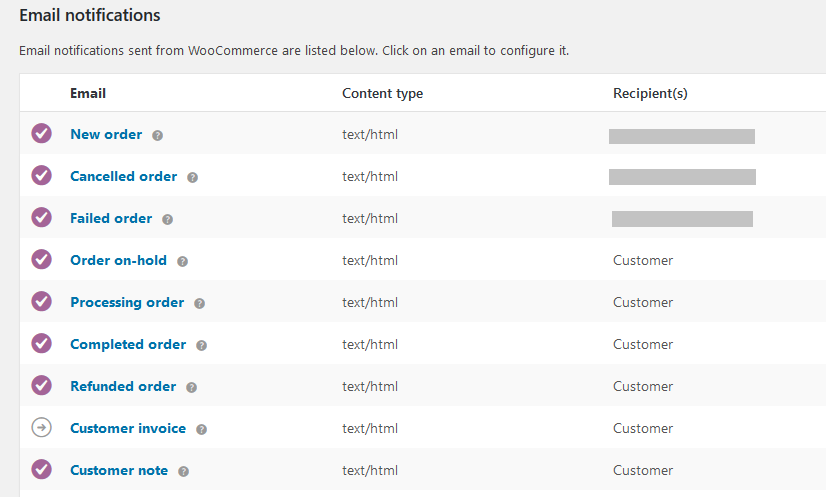
You can customize the WooCommerce template order emails that can be configured by clicking on the email title.
The above is the page where we can configure the settings for the New Order email, which is sent to the admin when a new order comes through.
When we create a custom email that extends the WooCommerce classes, we also are able to take advantage of all the WooCommerce email features.
The advantages of extending these WooCommerce classes and their functionality are many. Such as:
- It allows your users to easily enable/disable the email template (You don’t need to provide any additional setting for the same).
- Users can add, edit recipients as desired.
- It can be customized the same way as any other WooCommerce email (so you don’t have to teach them how to do it 🙂 )
- You don’t need to write any CSS for the emails. Since they inherit the WooCommerce class, you just need to create the email content.
Here are the different components of a custom email that must be configured for it to be sent:
- Creating an email manager file.
- It will add the custom email trigger/s.
- It will queue up the custom email class.
- Creating the email class file.
- It will be a custom class that extends the WC_Email class.
- It will contain details like the ID, title etc.
- A list of the fields that will help the user configure the email like recipient, email subject, email heading and so on.
- Some functions related to sending the email (like getting the template, email subject and so on).
- The email templates. It is advisable to have 2 email templates.
- An HTML template.
- A plain text template.
Want to skip the above steps? Don’t worry, we have got you covered. We’ve bundled these files into a ready-to-use plugin named ‘notify-pending-emails’ plugin and it is advisable to put the custom email files in such a stand-alone plugin. You can download the plugin from the github repository and follow these steps as given below.
- Download the plugin.
- Upload it to your WordPress site.
- Activate the plugin in your dashboard.
- Go to WooCommerce > Settings > Emails. You can see the new custom email created.

In another case, if you want the below files to be added to any of your existing plugins then you can place the below files in the right folders as instructed in this post. This is an image of how the files should actually be placed.
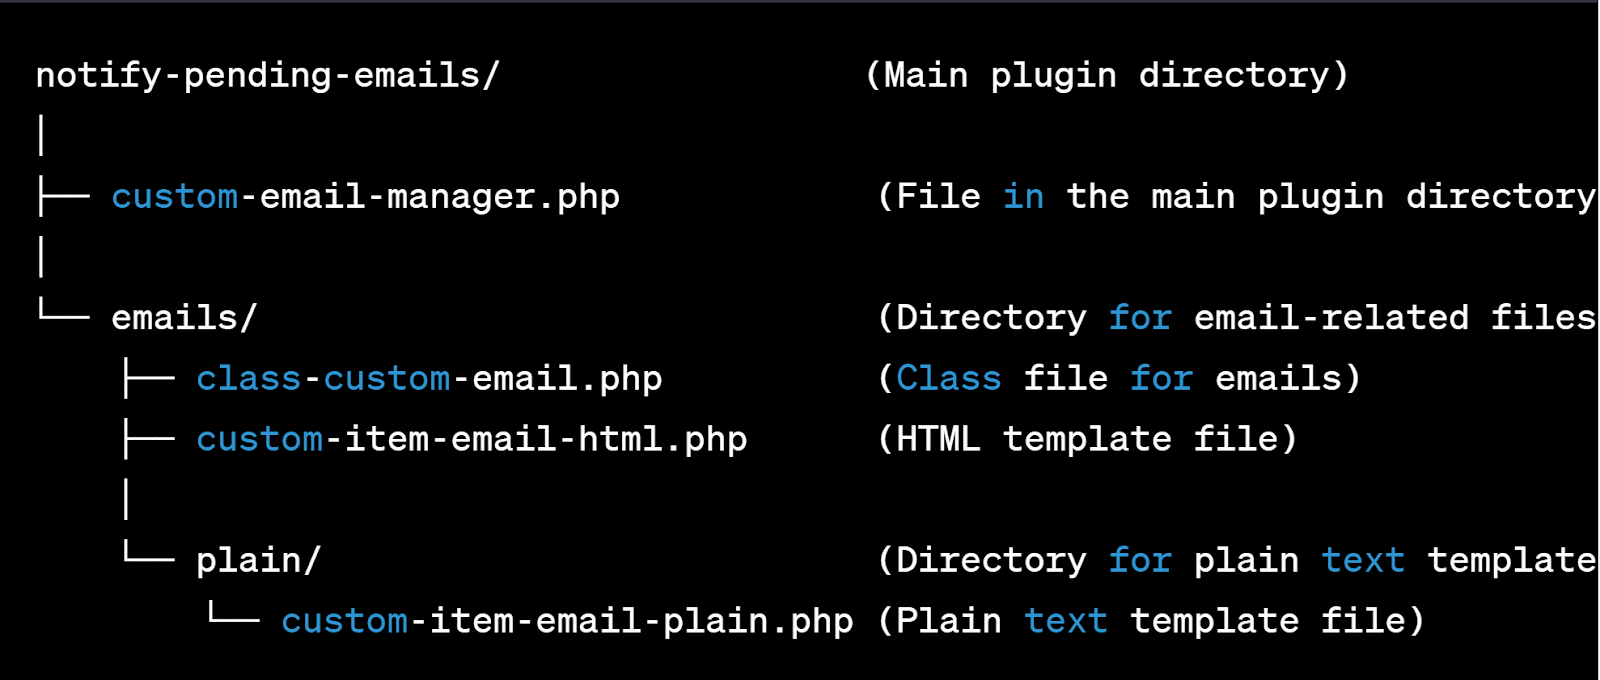
In the below example, we will create a new custom email that will be sent to the admin for each item in an order, when the order status is changed to Pending Payment.
Step-by-Step Guide on How to Create WooCommerce Email Templates
Follow these simple steps to create your own Woocommerce email template:
Step 1. Creating the Email Manager
The first thing that you need to do is create an email manager class. This class would queue up all your custom emails in the WooCommerce email queue. So in our case, it will queue up the pending payment notification email. Copy the below file custom-email-manager.php and place it in the main plugin directory folder of your stand-alone plugin.
<?php
/**
 * Handles email sending
 */
class Custom_Email_Manager {

	/**
	 * Constructor sets up actions
	 */
	public function __construct() {

	    // template path
	    define( 'CUSTOM_TEMPLATE_PATH', untrailingslashit( plugin_dir_path( __FILE__ ) ) . '/templates/' );
	    // hook for when order status is changed
	    add_action( 'woocommerce_order_status_pending', array( &$this, 'custom_trigger_email_action' ), 10, 2 );
	    // include the email class files
	    add_filter( 'woocommerce_email_classes', array( &$this, 'custom_init_emails' ) );

	    // Email Actions - Triggers
	    $email_actions = array(

		    'custom_pending_email',
		    'custom_item_email',
	    );

	    foreach ( $email_actions as $action ) {
	        add_action( $action, array( 'WC_Emails', 'send_transactional_email' ), 10, 10 );
	    }

	    add_filter( 'woocommerce_template_directory', array( $this, 'custom_template_directory' ), 10, 2 );

	}

	public function custom_init_emails( $emails ) {
	    // Include the email class file if it's not included already
	    if ( ! isset( $emails[ 'Custom_Email' ] ) ) {
	        $emails[ 'Custom_Email' ] = include_once( 'emails/class-custom-email.php' );
	    }

	    return $emails;
	}

	public function custom_trigger_email_action( $order_id, $posted ) {
	     // add an action for our email trigger if the order id is valid
	    if ( isset( $order_id ) && 0 != $order_id ) {

	        new WC_Emails();
    		do_action( 'custom_pending_email_notification', $order_id );

	    }
	}

	public function custom_template_directory( $directory, $template ) {
	   // ensure the directory name is correct
	    if ( false !== strpos( $template, '-custom' ) ) {
	      return 'my-custom-email';
	    }

	    return $directory;
	}

}// end of class
new Custom_Email_Manager();
?>
We need to use the filter woocommerce_email_classes to include our email classes.
We also need to queue up our email triggers here. This has been done in the construct itself.
The email actions are triggered using the add_action for each value in the $email_actions array where we hook into the send_transactional_email function from the WC_Email class.
So in our case, custom_pending_email and custom_item_email are the email triggers. The custom_pending_email will be triggered when an order status is changed. We pass the Order ID in here. The function attached to this hook is in the class-custom-email.php file. This function then gets the Item ID for all the items in the order and triggers the custom_item_email hook for each of the items.
The filter woocommerce_template_directory is a part of the WC_Email class. It is run when trying to get the template from the theme. Hence, we need to make sure we pass the correct directory name as needed.
Step 2. Creating the Email class
Next, create an email class for each of your custom emails. This class will extend the WC_Email class.
<?php
/**
 * Custom Email
 *
 * An email sent to the admin when an order status is changed to Pending Payment.
 *
 * @class       Custom_Email
 * @extends     WC_Email
 *
 */
class Custom_Email extends WC_Email {

    function __construct() {

        // Add email ID, title, description, heading, subject
        $this->id                   = 'custom_email';
        $this->title                = __( 'Custom Item Email', 'custom-email' );
        $this->description          = __( 'This email is received when an order status is changed to Pending.', 'custom-email' );

        $this->heading              = __( 'Custom Item Email', 'custom-email' );
        $this->subject              = __( '[{blogname}] Order for {product_title} (Order {order_number}) - {order_date}', 'custom-email' );

        // email template path
        $this->template_html    = 'emails/custom-item-email.php';
        $this->template_plain   = 'emails/plain/custom-item-email.php';

        // Triggers for this email
        add_action( 'custom_pending_email_notification', array( $this, 'queue_notification' ) );
        add_action( 'custom_item_email_notification', array( $this, 'trigger' ) );

        // Call parent constructor
        parent::__construct();

        // Other settings
        $this->template_base = CUSTOM_TEMPLATE_PATH;
        // default the email recipient to the admin's email address
        $this->recipient     = $this->get_option( 'recipient', get_option( 'admin_email' ) );

    }

    public function queue_notification( $order_id ) {

        $order = new WC_order( $order_id );
        $items = $order->get_items();
        // foreach item in the order
        foreach ( $items as $item_key => $item_value ) {
            // add an event for the item email, pass the item ID so other details can be collected as needed
            wp_schedule_single_event( time(), 'custom_item_email', array( 'item_id' => $item_key ) );
        }
    }

    // This function collects the data and sends the email
    function trigger( $item_id ) {

        $send_email = true;
        // validations
        if ( $item_id && $send_email ) {
            // create an object with item details like name, quantity etc.
            $this->object = $this->create_object( $item_id );

            // replace the merge tags with valid data
            $key = array_search( '{product_title}', $this->find );
            if ( false !== $key ) {
                unset( $this->find[ $key ] );
                unset( $this->replace[ $key ] );
            }

            $this->find[]    = '{product_title}';
            $this->replace[] = $this->object->product_title;

            if ( $this->object->order_id ) {

                $this->find[]    = '{order_date}';
                $this->replace[] = date_i18n( wc_date_format(), strtotime( $this->object->order_date ) );

                $this->find[]    = '{order_number}';
                $this->replace[] = $this->object->order_id;
            } else {

                $this->find[]    = '{order_date}';
                $this->replace[] = __( 'N/A', 'custom-email' );

                $this->find[]    = '{order_number}';
                $this->replace[] = __( 'N/A', 'custom-email' );
            }

            // if no recipient is set, do not send the email
            if ( ! $this->get_recipient() ) {
                return;
            }
            // send the email
            $this->send( $this->get_recipient(), $this->get_subject(), $this->get_content(), $this->get_headers() );

        }
    }

    // Create an object with the data to be passed to the templates
    public static function create_object( $item_id ) {

        global $wpdb;

        $item_object = new stdClass();

        // order ID
        $query_order_id = "SELECT order_id FROM `". $wpdb->prefix."woocommerce_order_items`
                            WHERE order_item_id = %d";
        $get_order_id = $wpdb->get_results( $wpdb->prepare( $query_order_id, $item_id ) );

        $order_id = 0;
        if ( isset( $get_order_id ) && is_array( $get_order_id ) && count( $get_order_id ) > 0 ) {
            $order_id = $get_order_id[0]->order_id;
        }
        $item_object->order_id = $order_id;

        $order = new WC_order( $order_id );

        // order date
        $post_data = get_post( $order_id );
        $item_object->order_date = $post_data->post_date;

        // product ID
        $item_object->product_id = wc_get_order_item_meta( $item_id, '_product_id' );

        // product name
        $_product = wc_get_product( $item_object->product_id );
        $item_object->product_title = $_product->get_title();

        // qty
        $item_object->qty = wc_get_order_item_meta( $item_id, '_qty' );

        // total
        $item_object->total = wc_price( wc_get_order_item_meta( $item_id, '_line_total' ) );

        // email adress
        $item_object->billing_email = ( version_compare( WOOCOMMERCE_VERSION, "3.0.0" ) < 0 ) ? $order->billing_email : $order->get_billing_email();

        // customer ID
        $item_object->customer_id = ( version_compare( WOOCOMMERCE_VERSION, "3.0.0" ) < 0 ) ? $order->user_id : $order->get_user_id();

        return $item_object;

    }

    // return the html content
    function get_content_html() {
        ob_start();
        wc_get_template( $this->template_html, array(
        'item_data'       => $this->object,
        'email_heading' => $this->get_heading()
        ), 'my-custom-email/', $this->template_base );
        return ob_get_clean();
    }

    // return the plain content
    function get_content_plain() {
        ob_start();
        wc_get_template( $this->template_plain, array(
            'item_data'       => $this->object,
            'email_heading' => $this->get_heading()
            ), 'my-custom-email/', $this->template_base );
        return ob_get_clean();
    }

    // return the subject
    function get_subject() {

        $order = new WC_order( $this->object->order_id );
        return apply_filters( 'woocommerce_email_subject_' . $this->id, $this->format_string( $this->subject ), $this->object );

    }

    // return the email heading
    public function get_heading() {

        $order = new WC_order( $this->object->order_id );
        return apply_filters( 'woocommerce_email_heading_' . $this->id, $this->format_string( $this->heading ), $this->object );

    }

    // form fields that are displayed in WooCommerce->Settings->Emails
    function init_form_fields() {
        $this->form_fields = array(
            'enabled' => array(
                'title' 		=> __( 'Enable/Disable', 'custom-email' ),
                'type' 			=> 'checkbox',
                'label' 		=> __( 'Enable this email notification', 'custom-email' ),
                'default' 		=> 'yes'
            ),
            'recipient' => array(
                'title'         => __( 'Recipient', 'custom-email' ),
                'type'          => 'text',
                'description'   => sprintf( __( 'Enter recipients (comma separated) for this email. Defaults to %s', 'custom-email' ), get_option( 'admin_email' ) ),
                'default'       => get_option( 'admin_email' )
            ),
            'subject' => array(
                'title' 		=> __( 'Subject', 'custom-email' ),
                'type' 			=> 'text',
                'description' 	=> sprintf( __( 'This controls the email subject line. Leave blank to use the default subject: <code>%s</code>.', 'custom-email' ), $this->subject ),
                'placeholder' 	=> '',
                'default' 		=> ''
            ),
            'heading' => array(
                'title' 		=> __( 'Email Heading', 'custom-email' ),
                'type' 			=> 'text',
                'description' 	=> sprintf( __( 'This controls the main heading contained within the email notification. Leave blank to use the default heading: <code>%s</code>.', 'custom-email' ), $this->heading ),
                'placeholder' 	=> '',
                'default' 		=> ''
            ),
            'email_type' => array(
                'title' 		=> __( 'Email type', 'custom-email' ),
                'type' 			=> 'select',
                'description' 	=> __( 'Choose which format of email to send.', 'custom-email' ),
                'default' 		=> 'html',
                'class'			=> 'email_type',
                'options'		=> array(
                    'plain'		 	=> __( 'Plain text', 'custom-email' ),
                    'html' 			=> __( 'HTML', 'custom-email' ),
                    'multipart' 	=> __( 'Multipart', 'custom-email' ),
                )
            )
        );
    }

}
return new Custom_Email();
?>
Since we have only 1 custom email, we will create only 1 email class class-custom-email.php. Following the WooCommerce structure, it is advisable to create the email class file in the /emails/ folder of your plugin.
The construct contains data like ID, title, description, heading and so on. It also contains a path to the template files.
We need to rewrite the below functions:
- get_content_html() – This function will get the html email template.
- get_content_plain() – This function will get the plain text email template.
- get_subject() – will return the email subject.
- get_heading() – will return the email heading.
- init_form_fields() – This function defines the fields which will be displayed in WooCommerce->Settings->Emails for the custom email.
We then need to attach functions to our email triggers. For e.g. our email actions are custom_pending_email and custom_item_email. So, in this class, we will attach functions to those.
The queue_notification function loops through all the items in an order and for each item triggers the custom_item_email event. This in turn will call the trigger function for each item.
We shall also create an object of the data that we need to pass to our email templates. This object will contain the item data in our case. It can hold any data as needed for the email.
As mentioned I’m going to send a custom email to the admin for each item in an order when the order status changes to pending. So the object that I create will contain basic details like order id, product ID, product name, quantity and amount.
We have passed this object to the template in the get_content_html() and get_content_plain() functions.
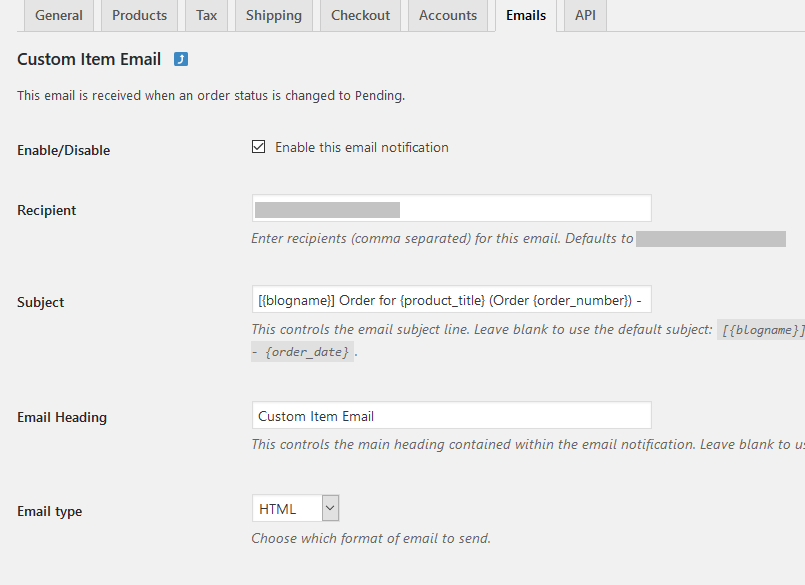
Once the email class file is created, the email will be listed in WooCommerce->Settings->Emails.

The email settings can easily be edited by clicking on the email title.
Step 3. Creating the Email Templates
You will need to create 2 email templates: HTML & plain text templates. Following the WooCommerce template structure, I usually create all my email templates in the templates/emails/ folder of my plugins.
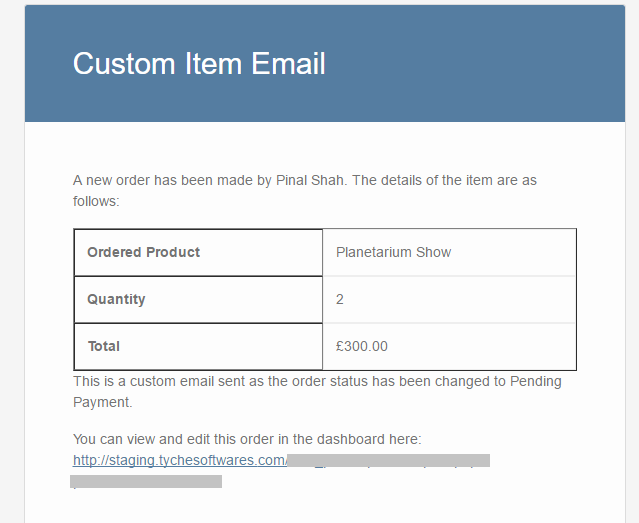
As you can see below, my Woocommerce email templates contain basic information about the product like product name, quantity and amount. Details, as desired, can be added here.
The HTML template file custom-item-email-html.php is placed within the templates/emails/ folder of my plugins.
<?php
/**
 * Admin new order email
 */
$order = new WC_order( $item_data->order_id );
$opening_paragraph = __( 'A new order has been made by %s. The details of the item are as follows:', 'custom-email' );

?>

<?php do_action( 'woocommerce_email_header', $email_heading ); ?>

<?php
$billing_first_name = ( version_compare( WOOCOMMERCE_VERSION, "3.0.0" ) < 0 ) ? $order->billing_first_name : $order->get_billing_first_name();
$billing_last_name = ( version_compare( WOOCOMMERCE_VERSION, "3.0.0" ) < 0 ) ? $order->billing_last_name : $order->get_billing_last_name();
if ( $order && $billing_first_name && $billing_last_name ) : ?>
	<p><?php printf( $opening_paragraph, $billing_first_name . ' ' . $billing_last_name ); ?></p>
<?php endif; ?>

<table cellspacing="0" cellpadding="6" style="width: 100%; border: 1px solid #eee;" border="1" bordercolor="#eee">
	<tbody>
		<tr>
			<th scope="row" style="text-align:left; border: 1px solid #eee;"><?php _e( 'Ordered Product', 'custom-email' ); ?></th>
			<td style="text-align:left; border: 1px solid #eee;"><?php echo $item_data->product_title; ?></td>
		</tr>
		<tr>
			<th scope="row" style="text-align:left; border: 1px solid #eee;"><?php _e( 'Quantity', 'custom-email' ); ?></th>
			<td style="text-align:left; border: 1px solid #eee;"><?php echo $item_data->qty; ?></td>
		</tr>
		<tr>
			<th scope="row" style="text-align:left; border: 1px solid #eee;"><?php _e( 'Total', 'custom-email' ); ?></th>
			<td style="text-align:left; border: 1px solid #eee;"><?php echo $item_data->total; ?></td>
		</tr>
	</tbody>
</table>

<p><?php _e( 'This is a custom email sent as the order status has been changed to Pending Payment.', 'custom-email' ); ?></p>

<p><?php echo make_clickable( sprintf( __( 'You can view and edit this order in the dashboard here: %s', 'custom-email' ), admin_url( 'post.php?post=' . $item_data->order_id . '&action=edit' ) ) ); ?></p>

<?php do_action( 'woocommerce_email_footer' ); ?>
The Plain text template file custom-item-email-plain.php is placed within the templates/emails/plain folder of my plugins.
<?php
/**
 * Admin new order email
 */
$order = new WC_order( $item_data->order_id );

echo "= " . $email_heading . " =\n\n";

$opening_paragraph = __( 'A new order has been made by %s. The details of the item are as follows:', 'custom-email' );

$billing_first_name = ( version_compare( WOOCOMMERCE_VERSION, "3.0.0" ) < 0 ) ? $order->billing_first_name : $order->get_billing_first_name();
$billing_last_name = ( version_compare( WOOCOMMERCE_VERSION, "3.0.0" ) < 0 ) ? $order->billing_last_name : $order->get_billing_last_name();
if ( $order && $billing_first_name && $billing_last_name ) {
	echo sprintf( $opening_paragraph, $billing_first_name . ' ' . $billing_last_name ) . "\n\n";
}

echo "=-=-=-=-=-=-=-=-=-=-=-=-=-=-=-=-=-=-=-=-=-=-=-=-=-=-=-=-=-=-=-=-=-=-=\n\n";

echo sprintf( __( 'Ordered Product: %s', 'custom-email' ), $item_data->product_title ) . "\n";

echo sprintf( __( 'Quantity: %s', 'custom-email' ), $item_data->qty ) . "\n";

echo sprintf( __( 'Total: %s', 'custom-email' ), $item_data->total ) . "\n";

echo "\n=-=-=-=-=-=-=-=-=-=-=-=-=-=-=-=-=-=-=-=-=-=-=-=-=-=-=-=-=-=-=-=-=-=-=\n\n";

echo __( 'This is a custom email sent as the order status has been changed to Pending Payment.', 'custom-email' ) . "\n\n";

echo apply_filters( 'woocommerce_email_footer_text', get_option( 'woocommerce_email_footer_text' ) );
Finally, add your email action triggers. I have added the trigger in the custom-email-manager.php file itself. The hook woocommerce_order_status_pending is triggered when order status changes to Pending Payment.
In the function attached to the hook, we add a do_action for our email action i.e. custom_pending_email.
This is all that we need to do. This will send an email to the admin for each item in order when the order status changes to Pending Payment.
Email sent when an order status is changed to Pending Payment.
A quick recap of which files do what:
- The email manager class queues up and triggers your emails to be sent by WooCommerce.
- The email class file adds your email in WooCommerce->Settings->Emails and also allows the user to easily manage the same.
- The email templates are used for creating the email content.
I have used this approach to create the emails that are sent by the Booking & Appointment Plugin for WooCommerce.
The plugin sends 4 different emails for different functionalities.

Originally I had 3 emails for the Requires Confirmation feature. Later when we decided to make the plugin compatible with 2 way Google Calendar sync, the need for another email template arose. That’s when I fully realized the ease of using WooCommerce to create custom emails. All that I had to do was add an extra email class, create the templates and we were ready to go!
Once the email manager is set up, it’s just a matter of adding more email triggers, classes and templates. You can add as many custom emails as needed.
Do let me know in the comments if this post helps you create your custom emails the WooCommerce way!


56 thoughts on “How to Create and Customize Email Templates in WooCommerce”
Hi. Very good article and thorough explanation. Thank you. For anyone getting the error that the WC_Email class was not found, please try this:
add_filter( ‘woocommerce_email_classes’, ‘filter_woocommerce_email_classes’ );
function filter_woocommerce_email_classes( array $email_classes ): array {
require_once dirname( __FILE__ ) .’/custom-wc-email-manager-class.php’;
require_once dirname( __FILE__ ) .’/emails/wc-shipping-status-class.php’;
$email_classes[‘WC_Custom_Email’] = new Custom_Email();
return $email_classes;
}
This code will load your classes via the woocommerce_email_classes hook only after the WooCommerce classes have loaded.
Maybe something has changed in the past few years but I just get:
“Uncaught Error: Class ‘WC_Email’ not found”
It seems like “new Custom_Email();” needs to run inside a hook somewhere because WC_Email is not running when it is instantiated.
Hi Jim,
Sorry for the late reply. Can you re-check the post and then try to follow the steps? We have updated it with the folder structure and exact path of the files. Also, you can download it as a stand-alone plugin from the GitHub repository here: https://github.com/saranyagokula/notify-pending-emails.git
Hi vishal,
i hope you doing well.
I am using this email custom template but its not working. So, could you explain the write path of the folder when i put the all these files.
Hi dinesh,
Can you re-check the post and then try to follow the steps? We have updated it with the folder structure and exact path of the files. Also, you can download it as a stand-alone plugin from the GitHub repository here: https://github.com/saranyagokula/notify-pending-emails.git
This code is not working. it’s making many issues like double registrations and overload.
after two days of trying to fix it… i suggest to follow a simple clean code that described here:
https://www.ibenic.com/create-custom-woocommerce-email/
We have updated the post with clear instructions on where to place the files. Please recheck and hope you will be able to execute it without any issues now.
Hello and thank you for this tutorial,
there is an error in the positioning of the files
custom-item-email.php must be placed in /templates/emails/custom-item-email.php
and
custom-item-email.php must be placed in /templates/emails/plain/custom-item-email.php
then check the email template path in class-custom-email.php
// path of the email template
$ this-> template_html = ’emails / custom-item-email.php’;
$ this-> template_plain = ’emails / plain / custom-item-email.php’;
Hi Lazhar,
Can you re-check the post and then try to follow the steps? We have updated it with the folder structure and exact path of the files. Also, you can download it as a stand-alone plugin from the GitHub repository here: https://github.com/saranyagokula/notify-pending-emails.git
Since code modification is not really preferred by many store owners, here’s an alternative way to customize all WooCommerce emails.
I’ve have order meta/custom fields attached to my orders but it’s not displaying the email. Do you mind please showing me how to add the rest of the customer details to the order?
Emails are not working. Rest of the functionality is working perfectly.
Hello,
i follow your templates but i change action liek this :
// hook for when order status is changed
add_action( ‘woocommerce_new_order’, array( &$this, ‘custom_trigger_email_action’ ), 10, 2 );
I translate a little to adapt with my language.
Woocommerce > Settings > Emails
I can see my custom template email but i have trouble with this template. he don’t want to find Email Templates in directory :
This is what i have now :
Name of plugin/
——————–/custom-email-manager.php
——————–/emails
—————————–/class-custom-email.php
Everything work unitl here because i can manage Custom Email in woocommerce’s settings.
at step 3 u say follow Woocommerce structure then
Name of plugin/
——————–/custom-email-manager.php
——————–/emails/
—————————–/class-custom-email.php
——————-/templates/
———————————/emails/
——————————————-/custom-item-email-html.php
——————————————-/plain/
—————————————————/custom-item-email.php
Can help me to understand my mistake ?
Best regards
This could be due to a mismatch in the defined template paths, or incorrect folder structure. Double-check the file names, their locations, and the hooks used for loading the custom email templates. Can you re-check the post and then try to follow the steps? We have updated it with the folder structure and exact path of the files. Also, you can download it as a stand-alone plugin from the GitHub repository here: https://github.com/saranyagokula/notify-pending-emails.git
Hi, i have followed all the steps, but i can’t find the template in woocommerce->settings->emails. I’m running woocommerce 3.8.1, will it work with this version?
Hi Francesco,
Yes, it should work with the latest version of WC. Please check to ensure all the files have been included. Extending the WC_Email class ensures the custom email template is visible in WooCommerce->Settings->Emails.
Pinal
Thanks for this very informative post. I have one problem though. What’s the best way to create or edit an in-built custom email (in html) that comes with a Woocommerce add-on plugin?
Hi James,
It depends on how the email template has been created in the plugin. If the plugin email is available in WooCommerce->Settings->Emails, then the best way to edit/customize the email template is to copy it to the site theme using the Copy to theme button present in the template and edit it in there itself.
Pinal
Thanks so much, Pinal.
Hello, I am confused are we creating an actual plugin or we adding these custom templates to the existing woocommerce email folders. I am so confused but I really need to make custom emails for my customers like local pickup and 1 day shipping etc
Hi Enola,
The files stated above can be a part of an existing plugin or can be used to create a stand alone plugin which relies on hooks present in either WooCommerce or another plugin.
If you wish to send emails 1 day prior to shipping or a pickup, the best way to do this would be to create these custom emails in a stand alone plugin. That will allow you to continue updating any other existing plugins that you might be using for shipping/pickup etc.
Pinal
I created new order status and now I want to send an email when change status from Processing to Error (it’s new order status)
I want to use your code but couldn’t.
could you say where should I put these files, I’m confused:
– custom-email-manager.php
– class-custom-email.php
– custom-item-email-html.php
– custom-item-email-plain.php
Hi,
Creating a plugin will be the easiest way to achieve the custom email. Simply because it will allow to update your existing plugins/themes without any issues.
Pinal
Hi, I use WooCommerce v.3.5.7, will it work ?
Hi,
Yes, it should work with WC 3.5.7.
E’ possibile decidere più email del mittente? Ogni trigger un mittente diverso?
HI Sandro,
I understand you need to know if you can send different emails for different trigger hook.
Yes, it is possible to send Email Template 1 when order status is changed to Processing, Email Template 2 when order status is updated to Complete and so on.
This can be achieved by setting up different trigger actions for each of the desired actions.
For e.g.
add_action( 'woocommerce_order_status_processing', array( &$this, 'custom_trigger_processing_email' ), 10, 2 );add_action( 'woocommerce_order_status_complete', array( &$this, 'custom_trigger_complete_email' ), 10, 2 );Here, both the functions
custom_trigger_processing_email()andcustom_trigger_complete_email()would trigger differentdo_action()as needed.I hope this helps.
Pinal
Hi,
I’d like to know the reason why you’re using these 2 lines of code inside the custom_trigger_email_action function:
$order = new WC_order( $order_id );
new WC_Emails(); // or, better, WC_Emails::instance();
Why are you using these 2 instances? $order is NOT used later inside the function and the WC_Emails instance is NOT assigned to any variable. Are they really necessary?
Thanks a lot,
Phil
Hi Phil,
Apologies for the delay in response.
The object for WC_order is not necessary, Thanks for pointing it out. I’ve removed it.
As for the WC_Emails instance is necessary to ensure our functions get triggered on hook execution.
Thanks,
Pinal
Thank you so much for your answer.
I’d have 2 more questions anyway:
1) what’s the exact DIFFERENCE between the “custom_pending_email_notification” hook and the “custom_pending_email” hook ? I’m a little confused about this.
2) In general when writing an OOP WordPress plugin, what is the ratio on which you insert “add_action” and “add_filter” calls one after the other inside your class Constructor ? The ORDER in which Hook-calls are invoked inside construct is not revelant ? Or it should follow a precise rule?
Thanks again,
Phil
Hi
My website is a tour booking service.
I want to send a reminder 1 day before a tour takes place.
Is there a way to do this using these templates?
Thanks
Rani
Hi Rani,
Apologies for the delay in replying. Yes, it should be possible to do that. However, you would have to find a trigger for the same. For e.g. in the post above, I’ve triggered the email template to be sent when the order status changes to Pending Payment using the hook
woocommerce_order_status_pending.So in your case, you would also have to use a trigger hook that works for you to achieve the desired result.
Pinal
Thanks.
What kind of trigger can I use to send one day prior to the tour?
Rani
Hi Rani,
There’s no specific answer to help you here. I presume you would be using some plugin to book the tour dates. Asking the plugin author would be the best course of action as he/she might be able to help you here.
In case if you are changing the order status prior to the tour conduction, then maybe you could trigger it on order status change. So for example, if you mark the tours to be conducted tomorrow as processing you could use
woocommerce_order_status_processinghook.I apologize for not being able to help you more.
Pinal
Hello, could you please create a blank plugin where this e-mail code is integrated? I think newbies are having trouble following what is going on.
Hi Beanie,
Sure. It might be a few days before I get around to it. But I will definitely integrate the code in a plugin and let you know.
Pinal
Hi,
Any update on this? Have you managed to put this together into a easy to follow plugin?
Thanks
Where is the plugin template? I simply cannot figure out the folder and file structure base on your instructions above. If you can show an actual visual example or else create a plugin with all your files exactly as you described above, this would make this a lot easier and provide clarity to all your readers/followers.
Thanks a Mil!
Thanks!! Finally a script that fully works!
One question, how can I modify the script so that the e-mail is being sent when the order changes to ‘Processing’? I tried changing ‘add_action( ‘woocommerce_order_status_pending’, array( &$this, ‘custom_trigger_email_action’ ), 10, 2 );’ by changing pending into processing, but that doesn’t work.
Looking forward to your reply!
Regards,
Max
Hi Max,
I apologize for the delay in response.
I am glad to know that the above script helpful for you. 🙂
I am assuming that you have tried ‘add_action( ‘woocommerce_order_status_pending_to_processing’, array( &$this, ‘custom_trigger_email_action’ ), 10, 2 );’ but it didn’t work.
If that is the case, then can can you please try adding
‘add_action( ‘woocommerce_order_status_processing’, array( &$this, ‘custom_trigger_email_action’ ), 10, 2 );’ and see if it works or not?
Please let me know the result.
Hi Priyanka,
Thanks for the reply, I already got it working by simply replacing ALL the ‘pending’ to ‘processing’. Seems there are multiple functions that hook into the actions, so all these names must be replaced. The script works perfect, thanks!
Hi Max,
You’re welcome 🙂
I am glad that you are able to achieve your requirement by replacing “pending” with “processing”.
Please let me know if you have any questions.
Thank you for the tutorial! I ran into an issue where emails were being duplicated.
The solution was to replace this line:
new WC_Emails();
with this:
WC_Emails::instance();
The reason being, each time you create a new instance of the WC_Emails class it will re-run the hooks (thus duplicating any pending emails).
Hi @torrelasley,
Thanks for sharing this with us 🙂
Thank you Torrelasley for your suggestion. It fixed strangely nested (standard WooCommerce) emails for me when I tried to trigger at woocommerce_order_status_processing instead of woocommerce_order_status_pending.
Hi where to place the custom-email-manager.php file.
Thank you
Hi Usha,
Apologies for the late reply. Since emails are usually sent as a part of some action performed by your plugin, you can place the custom-email-manager.php file in your plugin folder.
mean to say this path C:\xampp\htdocs\wordpress\wp-content\plugins
I’ll be trying this out to send custom emails for virtual products and to differentiate the emails sent for physical products.
I will also try to use this for review reminder emails using wp Cron. I’ll let you know how it goes. Thanks for creating such an informative document.
@Phil, That’s a great use case. Let me know how this goes. It would be nice to see this in action.
Hi Vishal,
I’m still working on it, but I’ll keep you posted once I get it working.
Cheers,
Phil
Cool.
Hi, this tutorial looks very great but i have an issue.. I can’t find my new template in woocommerce->settings-> emails. I think i didn’t put files in the right place. Could you be more specific please ? Especially about the manager..
Thank you
I just solved the issue. I just changed the ” include_once( ‘includes/emails/class-custom-email.php’ )” line 37 of my custom-email manager to make the same path as woocommerce does
@magsen, Apologies for the late reply. I am glad you were able to solve the issue by changing the path.
Hi where to place the custom-email-manager.php file.
Thank you