


WooCommerce can be used with plenty of WordPress themes, and every theme has a different way of laying out and styling the different features. In this post, we will talk about the quantity feature, more specifically about the buttons that we click to increase and decrease the quantity of a product before adding it to the Cart, or while updating the Cart. While in many themes, these WooCommerce quantity buttons are denoted by the “+” and “-” signs to add and reduce the quantity respectively, themes such as the Storefront theme display the up and down arrows for the same, by default (see image below). For such themes, let’s explore how to add + and – quantity increment buttons for woocommerce product page.

There are multiple ways of doing this i.e. using plugins or code snippets.
Using code snippets to add plus + and minus – buttons to WooCommerce quantity input on product page
You can use a simple code snippet consisting of PHP, JQuery and CSS to add plus (+) and (-) buttons in place of the up and down arrows to increase and decrease the quantity respectively. Start with adding the below PHP & JQuery snippets to the functions.php file of your child theme:
add_action( 'woocommerce_after_add_to_cart_quantity', 'ts_quantity_plus_sign' );

function ts_quantity_plus_sign() {
   echo '<button type="button" class="plus" >+</button>';
}

add_action( 'woocommerce_before_add_to_cart_quantity', 'ts_quantity_minus_sign' );

function ts_quantity_minus_sign() {
   echo '<button type="button" class="minus" >-</button>';
}

add_action( 'wp_footer', 'ts_quantity_plus_minus' );

function ts_quantity_plus_minus() {
   // To run this on the single product page
   if ( ! is_product() ) return;
   ?>
   <script type="text/javascript">

      jQuery(document).ready(function($){

            $('form.cart').on( 'click', 'button.plus, button.minus', function() {

            // Get current quantity values
            var qty = $( this ).closest( 'form.cart' ).find( '.qty' );
            var val   = parseFloat(qty.val());
            var max = parseFloat(qty.attr( 'max' ));
            var min = parseFloat(qty.attr( 'min' ));
            var step = parseFloat(qty.attr( 'step' ));

            // Change the value if plus or minus
            if ( $( this ).is( '.plus' ) ) {
               if ( max && ( max <= val ) ) {
                  qty.val( max );
               }
            else {
               qty.val( val + step );
                 }
            }
            else {
               if ( min && ( min >= val ) ) {
                  qty.val( min );
               }
               else if ( val > 1 ) {
                  qty.val( val - step );
               }
            }

         });

      });

   </script>
   <?php
}
After adding the above PHP and JQuery code snippets, we will refresh the product page:

You can see that the plus (+) and minus (-) buttons have been added next to the quantity input element. However, we need to add some styles / CSS in order for the buttons to render properly. If you’re using popular themes such as the StoreFront theme, you will have an option to add additional CSS by clicking on Customize on the front-end itself.

This to the shop owners who are running or planning to run BOGO offers on their WooCommerce store…
BOGO deals are great for increasing your sales, but have you thought about which offers are bringing you more revenue and which offers are not performing that great?
Don’t just set a BOGO deal, track the revenue generated by your deals in real-time with the Flexi BOGO for WooCommerce plugin.
.single-product div.product form.cart .quantity {
    float: none;
    margin: 0;
    display: inline-block;
}
You will see that the buttons now appear on both sides of the quantity input:

In this way, you can use code snippets with ease to add these buttons on the product page. However, in order to display plus(+) and minus(-) quantity selector button on the Cart page, it would be a good idea to use plugins which work for both purposes instead of using these code snippets.
Using plugins to add plus + and minus – buttons to the quantity input on the product page and Cart page
In order to add buttons on the product as well as the Cart page, there are two free plugins available:
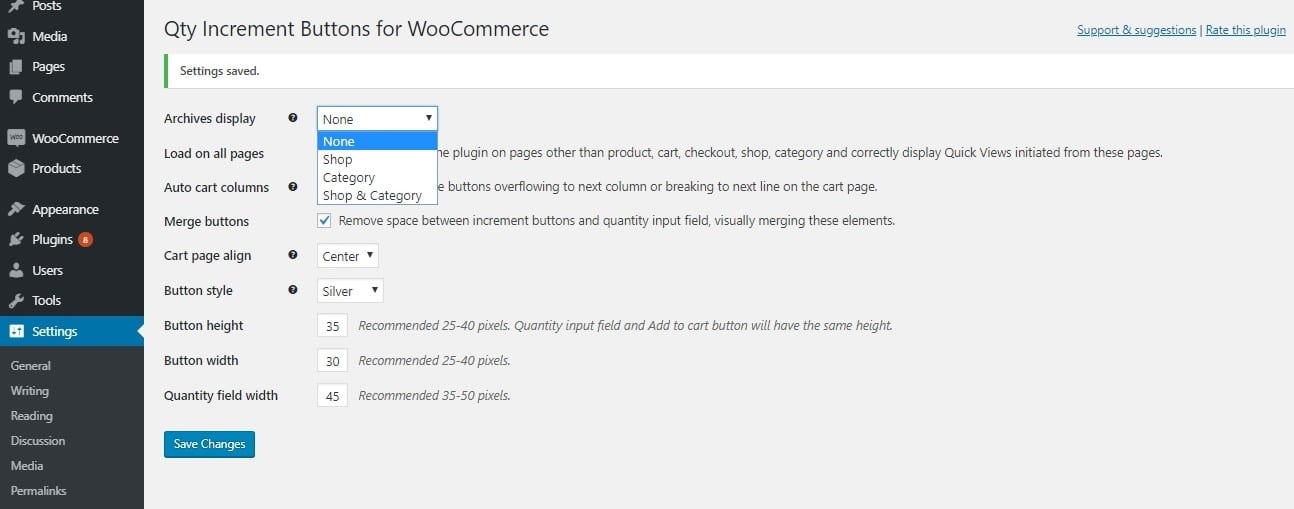
Qty Increment Buttons for WooCommerce Plugin: This is an easy-to-use plugin that renders the buttons on the Shop, Product and Cart pages by default. You have an option to render the buttons on pages such as the Category page (along with the Product page) depending on what you choose under “Archives Display”. Choosing the “Category” option however only renders the buttons on the Category, Product and Cart pages and not the Shop page.
You can see that there are various ways you can style the buttons too.
Although this plugin has not been updated in over 3 years, it was tested and worked properly on WordPress 6.3.1 with the Storefront theme active. The “Load on all pages” option however renders the buttons only on the Product and Cart pages, and not all pages as the label suggests.
SMNTS WooCommerce Quantity Buttons Plugin: This is also an easy plugin but has very few options in terms of styling. The only advantage it offers over the previous plugin is that it comes with an option of disabling the buttons on either the Cart or the Product page (if there is such a requirement) using just one line of code, as mentioned on the plugin homepage. It also manages to remove the default up and down arrows inside the quantity input element.
In this way, you can use plugins or code snippets based on your requirements to add plus + and minus – buttons to the quantity input in WooCommerce.


20 thoughts on “How to Add WooCommerce Quantity Plus + and Minus – Buttons on Product Page”
Please note! That elementor overwrites the mini-cart template even if you do not use the shopping cart from elementor. You have to deactivate it in Settings -> Integrations.
Hi Paul,
Thanks a lot for pointing that out — you’re absolutely right!
Elementor does override the WooCommerce mini cart template, and even if you’re not using it directly, it can still affect some custom code.
To fix it, just go to Elementor → Settings → Integrations, and under Mini Cart Template, select Disable from the dropdown. Here’s a quick screenshot: https://prnt.sc/P5G7ObV31mOH
I tried this, but the buttons didn’t work – using elementor, hello child theme – any advice?
thank you alot man, it really solved my big problem with elementor!
You’re welcome!!
Hi! Could the plus and minus buttons disappear (display: none) when there is only one product unit in stock?
Yes. But you need to call the server, to get the amount in the store.
It requires some code in JS on client side and server (PHP).
Hello,
I’m using your code but i have a problem that i’m not being able to solve. I have the arrows and the minus and plus but i don’t want the arrows, I just want to keep the – / +! Can you help me please ?
I’m sending you a screen shot !
Hi, you can use the SMNTS WooCommerce Quantity Buttons plugin option for this, as suggested in the article.
Do you know a way to make this works on any widget using on Elementor? I simply cant find a way to do it. Thanks!
Hi, we tested this code snippet on Elementor 3.13 with the Storefront theme and it works.
Thanks for posting this…exactly what I was looking for. Need help with one thing, on mine the minus sign is more narrow than the plus button. Any CSS to help with that? Here’s what mine looks like
This seems to be a theme-specific issue, though you can try applying styles to the “minus” class on the button element i.e. button.minus { } to change the width, through custom CSS.
To add quantity button on cart pages as well use different hooks:
woocommerce_after_quantity_input_field
woocommerce_before_quantity_input_field
You can find this hooks in templates/global
Hi Aleksandr, I just added the hooks you mentioned to make the custom plus, minus buttons to the quantity box on the cart page but after that if I click on the buttons they not update the quantity. Thanks for your advice. Here is the code:
// Add plus and minus symbol to the quantity box on the cart page // add_action( 'woocommerce_after_quantity_input_field', 'ts_quantity_plus_sign' ); function ts_quantity_plus_sign_cart() { echo '<button type="button" class="plus" >+</button>'; } add_action( 'woocommerce_before_quantity_input_field', 'ts_quantity_minus_sign' ); function ts_quantity_minus_sign_cart() { echo '<button type="button" class="minus" >-</button>'; } add_action( 'wp_footer', 'ts_quantity_plus_minus' ); function ts_quantity_plus_minus_cart() { // To run this on the single product page if ( ! is_product() ) return; ?> <script type="text/javascript"> jQuery(document).ready(function($){ $('.product-quantity').on( 'click', 'button.plus, button.minus', function() { // Get current quantity values var qty = $( this ).closest( '.product-quantity' ).find( '.qty' ); var val = parseFloat(qty.val()); var max = parseFloat(qty.attr( 'max' )); var min = parseFloat(qty.attr( 'min' )); var step = parseFloat(qty.attr( 'step' )); // Change the value if plus or minus if ( $( this ).is( '.plus' ) ) { if ( max && ( max <= val ) ) { qty.val( max ); } else { qty.val( val + step ); } } else { if ( min && ( min >= val ) ) { qty.val( min ); } else if ( val > 1 ) { qty.val( val - step ); } } }); }); </script> <?php }Hi, what you see in this article won’t work well in all cases. I needed it to work on all pages and in quickview pop-ups, so I refined the code a bit. Here is my final code:
https://gist.github.com/DeoThemes/647d255d1575953890d74874d3fa3a35
Feel free to to comment if you have any issue with it.
Hello, excellent tutorial, I would like to add a few more lines in the javascript part. I noticed that if a product is set to be sold individually it hides the QTY box leaving the [-][+] by themselves. I’ve added the code below that checks if the qty input is hidden it should also hide the -+ buttons as well:
var formCart = jQuery(‘form.cart’);
formCart.find(‘.quantity.hidden’).prev().hide();
formCart.find(‘.quantity.hidden’).next().hide();
Can you let us know where exactly this should go? Doesn’t seem to work for me unfortunately.
Did you get this solved?
How to this for woocommerce bookings that has a person type? I tried the code but it is not working.
do you have a video tutorial on this? also the second part “If you’re using popular themes such as the StoreFront theme, you will have an option to add additional CSS by clicking on Customize on the front-end itself.”
i am using Astra theme in my woocomerce store, where would i add this second part of the code? will it work if i added it to code snippet also?
thanks
The additional CSS has to be added by clicking on Customise from the top bar when you’re viewing the page itself, you need to be logged in for this. Yes, it will work with Astra theme too.