


We know that you understand how important it is to be thankful to your customers. You can have a great product or service to sell, but if you please them with nice customized message that they will see after the purchase was done, more likely that they will become repeat customers.
Happy clients are always up for recommending your product or service and thus can serve as the source of promotion – really working and the most reliable one! The importance of an appealing Thank You page is hard to overestimate.
Actually, WooCommerce does this on your behalf. It redirects you to a simple Thank You page (or “Order received” or “woocommerce order confirmation page” how is it called sometimes).

This is good, but you might want to change this to make it more attractive & appealing.
You can customize the Thank You page to do many things such as introduce after sales service, launch a new promotion, give a discount on the next purchase, etc.
8 Ways You can Edit & Customize the WooCommerce Thank You page:
- Using free or paid plugins
- By creating a redirect
- By using filters
- By overwriting WooCommerce template files
We will look at each of these methods below.
1. Edit and Customize the WooCommerce Thank You page with plugins
In the first case, you will possible have a straightforward plugin with the full range of functionality. Some of the free plugins available on the repository are:
- WooCommerce Thank You Page – NextMove Lite – This plugin allows you to build custom Thank You pages to pull more profits. It gives you access to a suite of plug & play components such as Dynamic coupons, Videos , HTML, Image & text blocks, recommended products, social share and more.
- Custom Thank You Page For WooCommerce – This plugin allows WooCommerce Shop Owners to send their customers to a different thank you page. But the page has to be set for each product separately.
- WC Custom Thank You – This WooCommerce extension allows you to define a custom Thank You page for your customers. This plugin allows you to set a page from the WooCommerce Settings page that is applicable to all products.
There are some paid plugins as well:
- Custom Thank You Pages Per Product for WooCommerce – This plugin by StoreApps allows you to set a single custom Thank You page for all products as well as it allows you to set a different Thank You page per product.
- WooCommerce Redirect Thank You – This extension by Shop Plugins works in the same way as the earlier one. It allows you to set a custom Thank You page for individual products as well as globally for all products.
- NextMove – This plugin by XLPlugins is the premium version of NextMove Lite mentioned above. It boasts of 17 plug & play components that helps WooCommerce store owners boost sales & increase customer retention.
I haven’t reviewed any of the above plugins yet, I might be doing that in a separate post later so as to go in the pros & cons of each.
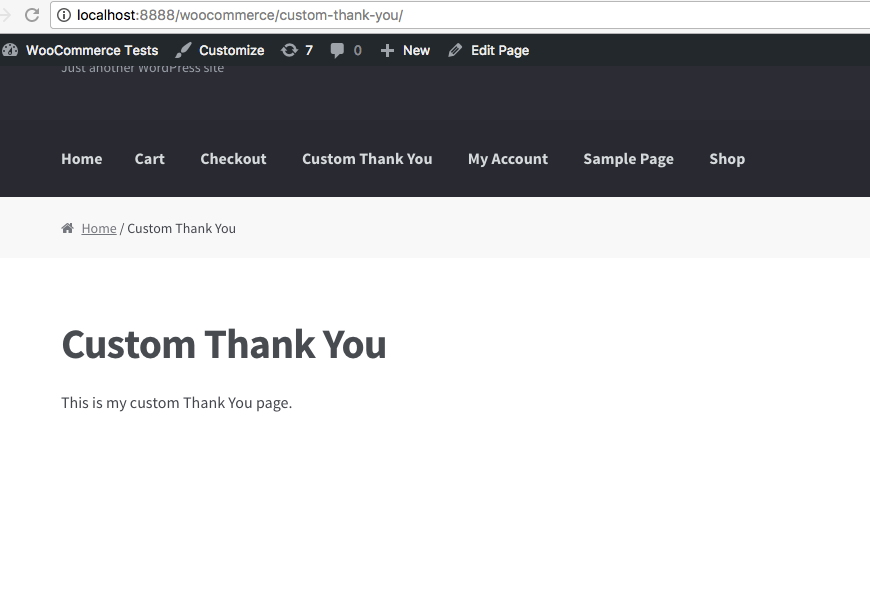
2. Customize the WooCommerce Thank You page by creating a Redirect
In another possible way, it will be rather simple to make redirection by creating a new plugin or opening the file functions.php that you can find in wp-content/themes/your-theme-name/ and enter the following code to the end of the file:
If you cannot view the above code snippet, please click here.
Below is the custom page shown after placing an order:
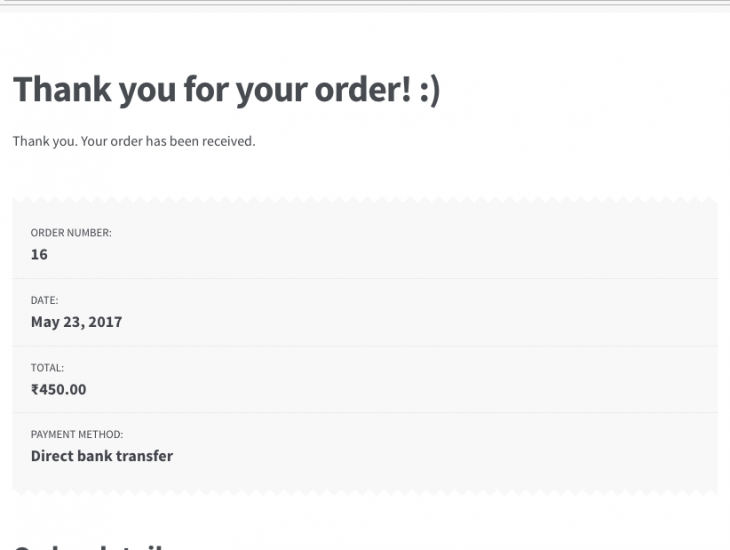
Redirecting can be a nice option, but at the same time, above page is missing important things such as summary table of the order and some other important information that WooCommerce currently provides.
We will see how to add that in point 4 below.

This to the shop owners who are running or planning to run BOGO offers on their WooCommerce store…
BOGO deals are great for increasing your sales, but have you thought about which offers are bringing you more revenue and which offers are not performing that great?
Don’t just set a BOGO deal, track the revenue generated by your deals in real-time with the Flexi BOGO for WooCommerce plugin.
3. Customizing WooCommerce Thank You page with Filters
1. Changing the Thank You page title
Instead of creating a Custom Thank You page as shown above, you might just want to change the title of the page.
You can add the below snippet in a plugin or in the theme’s functions.php file.
If you cannot view the above code snippet, please click here.
WooCommerce provides the function is_order_received_page() in includes/wc-conditional-functions.php file. This is how the changed title would appear:
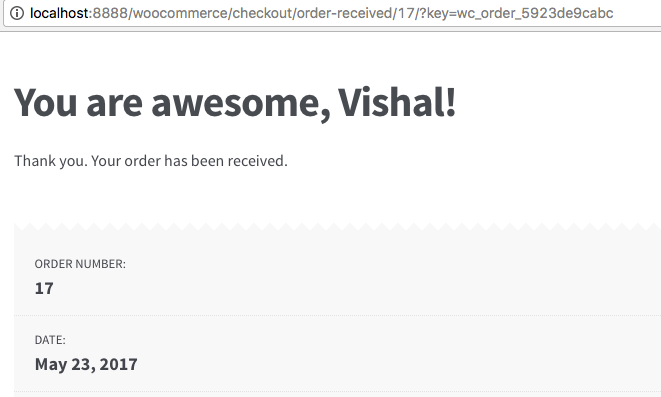
2. Personalize the title
You can go one step forward & also personalize the Thank You page title to include details like the customer’s name, or anything else.
You can add the below code in a plugin or in your theme’s functions.php:
If you cannot view the above code snippet, please click here.
This is how the personalized title would appear:
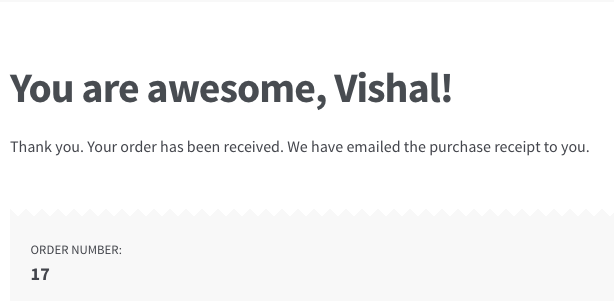
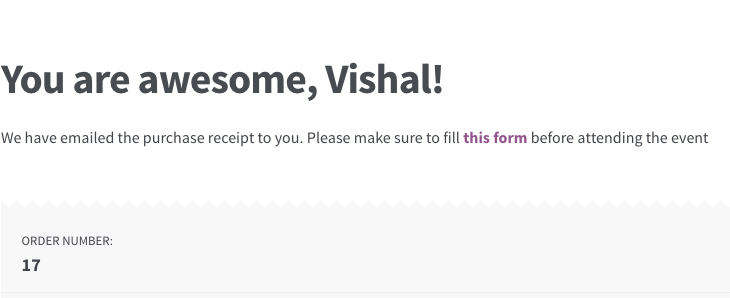
3. Changing the text before order information using woocommerce_thankyou_order_received_text
There are filters available in WooCommerce that allow you to also change the text shown on the Thank You page. By default, the text shown before the order information is “Thank you. Your order has been received.”.
This text comes from the file templates/checkout/thankyou.php. The filter available to change this text is: woocommerce_thankyou_order_received_text
If you cannot view the above code snippet, please click here.
Above code will append the text “We have emailed the purchase receipt to you.” to the existing text.
If you want to overwrite the text completely, you simply need to avoid concatenating the $str variable to your message variable $new_str.
$new = ' We have emailed the purchase receipt to you.';
If you want to add instructions here that need the customer to download a form, you can do that too.
If you cannot view the above code snippet, please click here.
This is how it would appear:
4. Customizing WooCommerce Thank You page by overwriting WooCommerce templates
WooCommerce shows the contents of the Thank You page from the thankyou.php template file that can be found in woocommerce/templates/checkout/ folder.
You will need some PHP knowledge if you want to choose this method of customizing your WooCommerce Thank You page.
You can use your own template by copying the thankyou.php file to your theme’s folder in a similar folder structure. So if you are using Twenty Seventeen theme, then your thankyou.php should be copied to: wp-content/themes/twentyseventeen/woocommerce/checkout/ folder. You will need to create the 2 folders, “woocommerce” & “checkout”.
When WooCommerce finds the same template is present in your own theme, then priority is given to the template present in your theme.
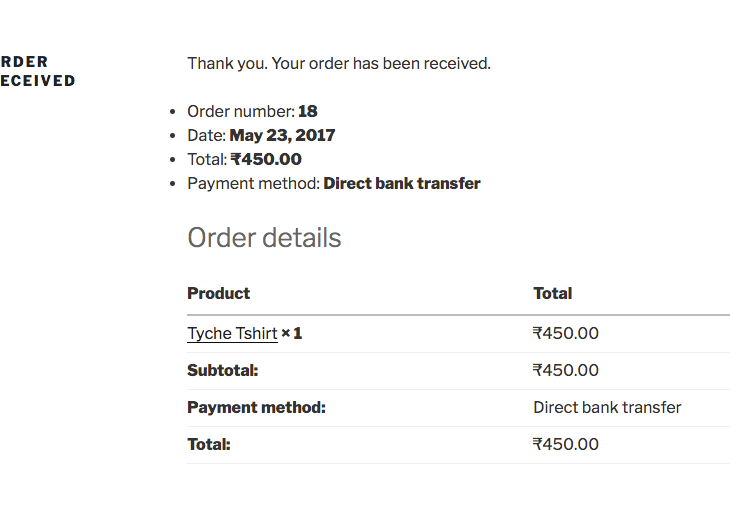
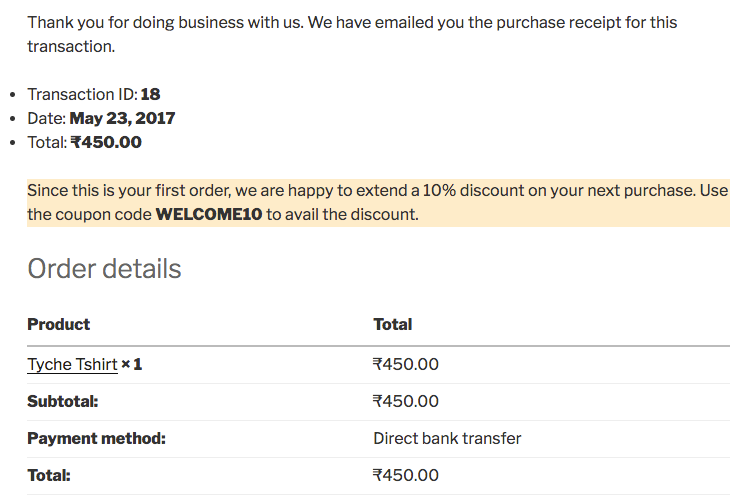
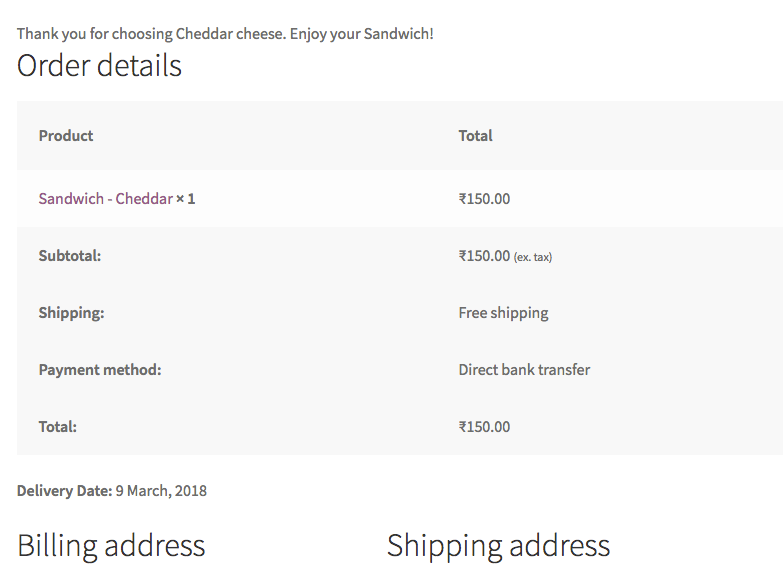
Let’s take an example. On the default thank you page, the Payment Method is shown in the Order Details as well as in the beginning:
I want to provide a coupon code to the customer for their next purchase & remove the Payment Method from the top section.
Below is the thankyou.php template from my theme:
If you cannot view the above code snippet, please click here.
You might want to change the data shown in the Order details table & the customer details (when logged-in).
Those are coming from another file. WooCommerce uses a function woocommerce_order_details_table() that is attached to the woocommerce_thankyou hook. The function woocommerce_order_details_table() is defined in includes/wc-template-functions.php file.
The Thank You page is actually a collection of 4 different template files:
- templates/checkout/thankyou.php
- templates/order/order-details.php
- templates/order/order-details-item.php
- templates/order/order-details-customer.php
Below image shows which data comes from which template file:
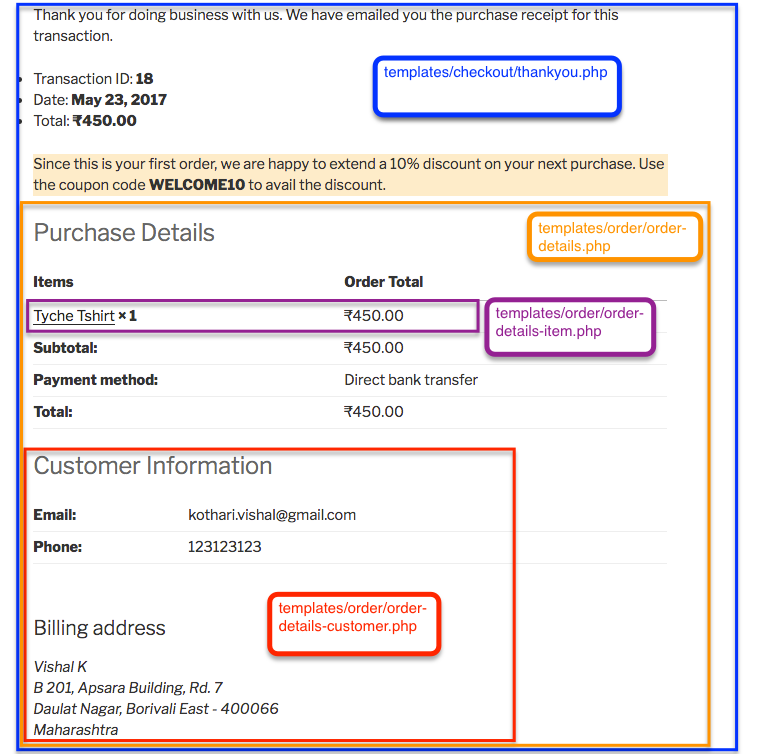
Once you know what data is coming from which template, you just need to copy the right template to your theme’s folder & that’s all.
5. Show different Thank You page for specific product or product attribute
1. Redirect to a custom Thank You page based on product ID using hook
We saw in point 2 that you can redirect to a custom page with the template_redirect hook. Another way to redirect to a custom thank you page is by using the ‘woocommerce_thankyou‘ hook. This hook has one argument – order_id.
If you want to redirect to a custom page for only a specific product, you can do this by getting the order from order_id parameter & then loop through each item of the order. If one of the items has the product id you want, redirect to a custom thank you page using wp_redirect.
If you cannot view the above code snippet, please click here.
2. Show a custom Thank You page template based on product ID
As we saw in point 4, we can override the thank you page template from WooCommerce. But you may want to display different template based on product ID. When you override the thank you template in your theme, you can define some conditions to display different HTML for a particular product ID.
For example, if you want to change the thank you text for just one product, loop through the items from the order and get all product IDs, and check if the product you want is present in it. If it is present, display some custom thank you text for that order.
If you cannot view the above code snippet, please click here.
3. Redirect to a custom Thank You page based on variation ID using hook
This question was asked on the Facebook group Advanced WooCommerce as to how to show a different Thank You page for each attribute of a product.
The code is mostly similar to the one shown in 5.a above, with a slight change. Here it is:
If you cannot view the above code snippet, please click here.
6. Print text on Thank You page based on product attribute
Extending the above 5.c example, it is also possible to display any custom text on the WooCommerce Thank You page based on the variation id. Below is the code for it:
If you cannot view the above code snippet, please click here.
When the above code is added, this is how the Thank You page would appear:
Related Article: How to Hide ‘Shipping Via’ Text from Thank You and View Order Pages in WooCommerce?
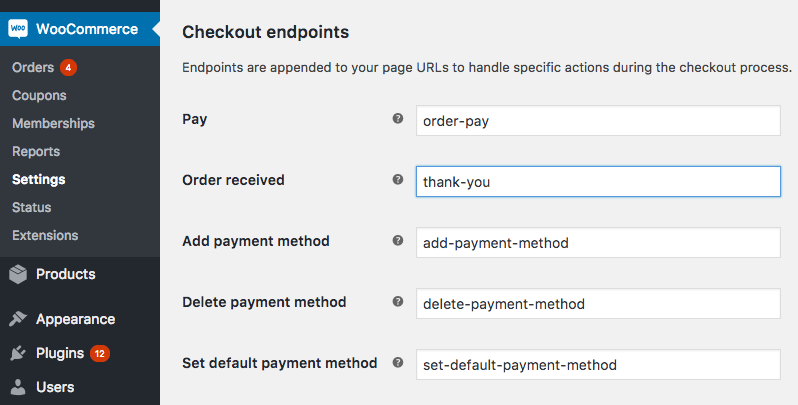
7. WooCommerce Thank You page URL
Some times we need to be pedantic about the customization to give a complete personalized and authentic customer experience. Apart from all the design and detail changes in your thank you page, you can also change the thank you page URL. Generally, the page URL will be treated as /checkout/order-received by WooCommerce once the user places an order. You can change this URL by going to WooCommerce>Settings>Checkout endpoints. On the page, you can see the Order Received label and the corresponding slug. You can change the slug to something in line with your thank you page. For instance, you can simply keep the slug as checkout/thank-you.
There are other options as well to help you set redirect and change the URL easily. Check Avada’s extensive guide to know more about the WooCommerce thank you page URL customizations.
8. Building Your Own Thank You Page from scratch
I was initially thinking to write on this. But I realized that this post by Nicola Mustone covers that topic very well.
I hope that this post helps you to build the right layout for your WooCommerce Thank You page & get the most out of it.
References: Change your WooCommerce thank you page title by Barry Kooij.


63 thoughts on “How to Customize the WooCommerce Thank You Page”
This is now out of date. The file you would need to copy and edit is not thankyou.php. That code has been moved to order-received.php in the same directory.
Hi Brian,
After double-checking the WooCommerce template files, it seems like the files are not shifted. As mentioned in this post, it’s still thankyou.php that you’d need to edit if you want to customize the Thank You page in WooCommerce. The code to edit the template files has been tested in both the checkout blocks page as well as the classic checkout page and it works fine.
Awesome tutorial! I just have added it to favourites and start customizing my thank you pages. I have i question, my site is multilingual with Polylang. Customizing thank You page this way is compatible with multilingual sites?
Thanks for your help! Cheers ✌
Thank you!
Thanks a LOT for this, that redirect to a custom page was just what I needed! I’m using WooCommerce for a “library/document archive”, so there are no prices or shipping details to show. “Thank you for your order, come and pick it up” is all I need to say. 🙂
Thanks so much
how to show purchase note in this page?
The same as we specified in the product settings
I can not see this, even though I have set it
Thanks so much
how to show purchase note in this page?
The same as we specified in the product settings
Thank you so much
Thanks so much for the awesome post!
I am trying to use your custom code to customise the text on the Thank you page.
I am just wondering If I can add my extra text as a new paragrap or couple of paragraphs?
I would like my extra text to be in a new row, a bit separated from the basic thank you text. Is that possible for example with <p></p>, if yes how can I do that?
Sorry I understand only a little bit of HTML and CSS, but not PHP :).
Thank you in advance If you can give me some instructions on that.
Hey, I m trying to use WooCommerce Thank You Page – NextMove plugin. How to edit that thankyou page created whis the plugin with elementor? I get the error “you must call the_content function in the current template in order for elementor to work”
And if i use a shortcode to display in other page plugin content its dosent work, any solution? Main question is to change full desing of page
Hello. Your webiste has great content. I addedd + – buttons in product pages thanks to you.
Here I would like to know how to add a full background color to checkout/order-receiverd page. I tried with .page-ID {} but this just fill the footer.
Thanks
This article was SO very helpful! Thank you very much for sharing these information with us 🙂
I have used several of your tips here after struggling for a while! THANK YOU!
Only thing I cannot do is replace the words Billing Address with the words Shipping Address, in the order-details-customer.php… The title seems to be coming from somewhere else. Can you advise? Even if not, this has helped so much, thanks!
Very helpful
Thanks for this article, it was helpful!
Thanks for great article! It was helpful!
Great post. Thank you. What about google analytics tracking code?
how to Redirect to a custom Thank You page based on pay getway?
Very nice!! Just what I was looking for, an extensive write up on the woo thank you page. Thank you 🙂
Hi Vishal, thaks fort this great artica… I hoped to find a solutiion for my problem in the thankyoupage. After i purchase and get redirected to the thankyoupage, i just see the thank you text and no prdouct data or something else…
Do you have an idea how to fix that?
Best Kris
Thanks for this info Vishal, helped me out heaps working out how to customise the thankyou page, much appreciated
Hi Vishal,
First of all my compliments for the great article!
I’m trying to use your code to redirect a customer to a specific URL depending on the product that is bought.
I copy and paste the code from 5.a
get_items() as $item ) {
// Add whatever product id you want below here
if ( $item[‘product_id’] == 643 ) {
// change below to the URL that you want to send your customer to
wp_redirect( ‘http://yoururl.com/custom-thank-you/’ );
}
}
}
?>
and copy and paste the specific order ID instead of 643, I also give in another URL (instead of http://yoururl.com/custom-thank-you/) but as soon as I save my functions.php file my website gives a grey screen with the text “This website is having technical problems”
Do you know what I’m doing wrong?
Thank you very much for your time and effort!
Great Help! Thanks man 🙂
Awesome, thank you for all this info. I really didn’t know what was the best way to edit this page. Your post did help me a lot.
This is really very helpful and great post saves alot of time 🙂 (y)
Hello. How can I remove the shipping line only on this page?
In the redirection URL is needed WC()->cart->empty_cart( true ); to refresh the cart.
Hi. I can’t find the thank-you.php file anywhere. I go to WooCommerce and there is no. Under Check out, there are 2 files but none of them is thank-you.php. What can I do? Thank you
EDIT: I actually had to use a File Explorer plugin to go to the actual php files and change the codes there. I just searched for “Thank you. Your order has been received.” and I changed it. No need to add other filters or extra codes.
Thank you
You are a legend! I was getting ready to shell out for an extension to customize our landing pages with different download links for different purchases, and then you posted exactly how to do it by customizing the template. Thank you!!
Good to know Stefan. Happy to help! 🙂
For “5. Show different Thank You page for specific product or product attribute” you describe how to do it, but there’s no code snippet for a non-techy to put this together?
Hi Mike, It seems the code snippet is not visible in Safari. I have now added links below each code snippet with the text “If you cannot view the above code snippet, please click here.”. You should be able to see this link & copy the code from the link provided.
That’s weird, I’m actually using Google Chrome, on Windows,, not the Safari browser, so might want to check that one too 🙂
Hi, great article!
I’d like to do option 2 but on my screen the code isn’t visible. All I see is:
2. Customize the WooCommerce Thank You page by creating a Redirect
In another possible way, it will be rather simple to make redirection by creating a new plugin or opening the file functions.php that you can find in wp-content/themes/your-theme-name/ and enter the following code to the end of the file:
Below is the custom page shown after placing an order.
Please share your code with me! 🙂
Hey Brody,
My apologies for the late reply. The code is actually a Github Gist. Here is the code pasted below:
<?phpadd_action( 'template_redirect', 'woo_custom_redirect_after_purchase' );
function woo_custom_redirect_after_purchase() {
global $wp;
if ( is_checkout() && !empty( $wp->query_vars['order-received'] ) ) {
wp_redirect( 'http://localhost:8888/woocommerce/custom-thank-you/' );
exit;
}
}
Hi: I have a problem. My store is in Bangladesh. I change some of the placeholders with the plugin Theme Customization from woocomerce, but when the page loads, this changes hold for a second and then return to the default values, and I have no idea why.
Other changes I did, load normal like a new field for telephones.
Do you have any idea why is this happening?
Hi Abdul,
You made those changes on the Checkout page or the Order Received (Thank you) page? It’s hard to understand why that would be happening without looking at it. But let me know if it’s on the Order Received page & I can help you out if it’s anything related to one of the code snippets that I have created in this post.
Hi, thanks so much for this! Ive been looking everywhere. I modified your code in order to change the title text but I ran into a problem. It turns every line of text to “Thank You”. Can you please help out? I only wanted to change the title on the thank you page. Thanks
add_filter( ‘the_title’, ‘woo_personalize_order_received_title’, 10, 2 );
function woo_personalize_order_received_title() {
$new_str = ‘Thank you’;
return $new_str;
Hi James,
You have missed adding the necessary ‘if’ condition that applies this change only on the Thank you page & not on other pages. The condition is:
if ( is_order_received_page() && get_the_ID() === $id ) {
Where $id is the 2nd parameter to the function & $title is the first parameter to your function. Please refer to the code snippet under “3.b. Personalize the title” part above.
Thank you so very much for these helpful guide on customizing the thank you page. I successfully added a custom text string by adding the code below on my function.php:
add_filter(‘woocommerce_thankyou_order_received_text’, ‘woo_change_order_received_text’, 10, 2 );
function woo_change_order_received_text( $str, $order ) {
$new_str = $str . ‘We have emailed the purchase receipt to you. Please make sure to whitelist our email address “email@example.com” to avoid our emails going into your Junk folder.’;
return $new_str;
}
However, since my site is bi-language I can’t translate this string. I don’t know much php, can you help me by showing where can I add a “text domain” info on this code above to make this custom string translatable on the wpml? Thank again!
Hi Gabe,
I will get back to you tomorrow with the exact code snippet. My current WPML setup is messed up & I need to fix that first so I can give you the exact snippet.
Hello, thanks for the useful post however it doesnt seem to work for me.
Added to functions.php and need to redirect based on product id:
Removed the public from function as it died when it was present (PHP Parse error: syntax error, unexpected ‘public’ (T_PUBLIC), expecting end of file in functions.php on line 537
Errors parsing functions.php)
—
add_action( ‘woocommerce_thankyou’, array( &$this, ‘redirect_product_based’ ), 1 );
function redirect_product_based ( $order_id ){
$order = wc_get_order( $order_id );
foreach( $order->get_items() as $item ) {
// Add whatever product id you want below here
if ( $item[‘product_id’] == 4852 ) {
// change below to the URL that you want to send your customer to
wp_redirect( ‘#urltoredirect’ );
}
}
}
—
Thanks for any advice
Hi Adam,
One thing was left out after removing ‘public’ keyword. The ‘add_action’ line also needed to be changed so it doesn’t reference any class. The gist is now updated & you can use that one. Or simply change your own code to:
add_action( ‘woocommerce_thankyou’, ‘redirect_product_based’, 1 );
That should fix it.
Hey Vishal! Thanks for these bro – very helpful!
Managed to implement the ‘Changing the text’ part – worked perfectly.
I’ve struggled with the ‘Personalize the title’ part – it’s not displaying. I’ve used the exact code, minus the <?php part… but no luck!
Any ideas?
Here's my site: theroastclub.co
Thanks so much mate!!
Stu
Hey Stuart, Glad you found it useful.
You are right about the ‘Personalize the title’ part. I have now updated the code so it uses the $order->get_billing_first_name() instead of earlier code: $order->billing_first_name .
The gist “personalize-woocommerce-thank-you-page.php” has been updated as well. The new code should work. Please try that out & let me know.
:Vishal
You have a wonderful site built there Stuart. 🙂 I am in love with it at first sight.
You might find couple of our other products useful when you are ready to take orders. Particularly Order Delivery Date plugin along with our Subscriptions Addon as well as the Abandoned Cart plugin. Feel free to check them out when you can.
Hey Vishal! Thanks for the reply and the kind words about the site 🙂
I tried the new code – Sadly it still doesn’t work 🙁
I’ve used the code in ‘Changing the text’, adding a sentence to the text, and that works fine.
Looking at the comments in the code, it mentions this:
// Get the order. Line 9 to 17 are present in order_received() in includes/shortcodes/class-wc-shortcode-checkout.php file
I’ve looked fia FTP and I can’t see that file anywhere… could that be the issue?
I’ll definitely check out your plugins when I’m up and running!
Thanks again bro!
Stu
Hey Stuart, I did try that code when I gave it to you & it worked fine. Also the file you are checking is under: wp-content/plugins/woocommerce/includes/shortcodes/class-wc-shortcode-checkout.php . Is this where you are looking?
I do see the code in that file in the order_received function.
Hey Vishal, thanks for your patience with this!
It’s definitely not working. I think the code is OK as it’s not breaking my site 🙂
Here’s the exact code I’m using in my functions.php file. I’m using a plugin rather than editing the file directly.
https://paste.ofcode.org/FGfhRigdjNN9ZCcprHXBar
Also, I found that file in the folder you mentioned – so that’snot the problem.
Thanks again Vishal!!
Stu
Hey Stuart, so I tried your exact code & put it in functions.php instead of a plugin.
This is how the page thank you page appeared to me after placing an order:
Top of page: https://screencast.com/t/2YhjZSmEN
Bottom of page: https://screencast.com/t/TzFUEBgvSW
It also gave me this error in the logs:
=====
[05-Dec-2017 06:49:47 UTC] customer_user was called incorrectly. Order properties should not be accessed directly. Backtrace: require(‘wp-blog-header.php’), require_once(‘wp-includes/template-loader.php’), do_action(‘template_redirect’), WP_Hook->do_action, WP_Hook->apply_filters, WC_AJAX::do_wc_ajax, do_action(‘wc_ajax_checkout’), WP_Hook->do_action, WP_Hook->apply_filters, WC_AJAX::checkout, WC_Checkout->process_checkout, WC_Checkout->process_order_payment, WC_Gateway_BACS->process_payment, WC_Order->update_status, WC_Order->save, WC_Order->status_transition, do_action(‘woocommerce_order_status_pending_to_on-hold’), WP_Hook->do_action, WP_Hook->apply_filters, WC_Emails::send_transactional_email, do_action_ref_array, WP_Hook->do_action, WP_Hook->apply_filters, WC_Email_New_Order->trigger, WC_Email->get_content, WC_Email_New_Order->get_content_html, wc_get_template_html, wc_get_template, include(‘/plugins/woocommerce/templates/emails/admin-new-order.php’), do_action(‘woocommerce_email_customer_details’), WP_Hook->do_action, WP_Hook->apply_filters, gens_raf_customer_email, WC_Abstract_Legacy_Order->__get, wc_doing_it_wrong. This message was added in version 3.0.
[05-Dec-2017 06:49:52 UTC] customer_user was called incorrectly. Order properties should not be accessed directly. Backtrace: require(‘wp-blog-header.php’), require_once(‘wp-includes/template-loader.php’), do_action(‘template_redirect’), WP_Hook->do_action, WP_Hook->apply_filters, WC_AJAX::do_wc_ajax, do_action(‘wc_ajax_checkout’), WP_Hook->do_action, WP_Hook->apply_filters, WC_AJAX::checkout, WC_Checkout->process_checkout, WC_Checkout->process_order_payment, WC_Gateway_BACS->process_payment, WC_Order->update_status, WC_Order->save, WC_Order->status_transition, do_action(‘woocommerce_order_status_pending_to_on-hold’), WP_Hook->do_action, WP_Hook->apply_filters, WC_Emails::send_transactional_email, do_action_ref_array, WP_Hook->do_action, WP_Hook->apply_filters, WC_Email_Customer_On_Hold_Order->trigger, WC_Email->get_content, WC_Email_Customer_On_Hold_Order->get_content_html, wc_get_template_html, wc_get_template, include(‘/plugins/woocommerce/templates/emails/customer-on-hold-order.php’), do_action(‘woocommerce_email_customer_details’), WP_Hook->do_action, WP_Hook->apply_filters, gens_raf_customer_email, WC_Abstract_Legacy_Order->__get, wc_doing_it_wrong. This message was added in version 3.0.
=====
I couldn’t find a property named ‘customer_user’ in the $order object. You might want to check that part. Apart from this error, rest of the things did show up fine as you have written in your code snippet.
Hey Vishal – thanks for helping with this – hugely appreciated!
I’ve removed all the other items in the functions plugin and just running the ‘personalise the title’ code… still not working 🙁
Here’s the code: https://paste.ofcode.org/39AUFr492ryCrA5mjeyvF4p
With those errors you mentoned, could the fact that ‘customer_user’ isn’t there be the problem?
I’ve no idea what else I can do!
Cheers Vishal!
Stu
You’re welcome Stuart. Happy to help.
I tried your code again – exact same code, copied & pasted in functions.php. The title does appear personalised to me.
I am trying on Storefront theme with latest WooCommerce installed. You could probably try switching to another theme & see if that helps. I am not sure if that’s possible for you to do or not.
Since ‘customer_user’ is not present in your most recent code, the title personalisation code should work fine for you.
Lifesaving post, thank you very much!
You’re welcome Tamas. 🙂
I have a custom checkout page which is accessible for public which means anyone can access the page. How can I block the page after order placed and thank you page rendered?
Hey Girish, Apologies for the delayed reply. I missed replying to this one. You probably need to have some custom coding done for this by a developer. That’s a unique use case though, why would you not want your users to place another order after placing 1 order? Just curious.
Is it possible to add a shortcode to thank you page? How would I go about doing the same?
Hi Pramathesh,
Depending on where you want the shortcode to be displayed, you can use one of the filters provided by WooCommerce & pass your shortcode to it.
Which shortcode are you trying to add to the thank you page?
Thanks so much for the awesome how to! Wondering could I write a conditional statement with filters to show a custom thank you page for a product based on the product ID and any other product order to show the original thank you page? Thank you so much for your guidance!!!!
Hey Karen, Yes, you could write a conditional statement with filters to show custom thank you page based on the product ID. I’ll post a snippet for this shortly today on the post.
Hey Karen, I have updated the post with an additional point that talks about the conditional statement to show custom thank you page for a particular product based on product ID. Please check the points 5.a & 5.b.
Thanks so much!!!!!! This is awesome.